Gigabyte GA-X58A-UD7 Manual - Page 16
Installing the Hybrid Silent-Pipe Module, A Philip's screwdriver - waterblock
 |
UPC - 818313009494
View all Gigabyte GA-X58A-UD7 manuals
Add to My Manuals
Save this manual to your list of manuals |
Page 16 highlights
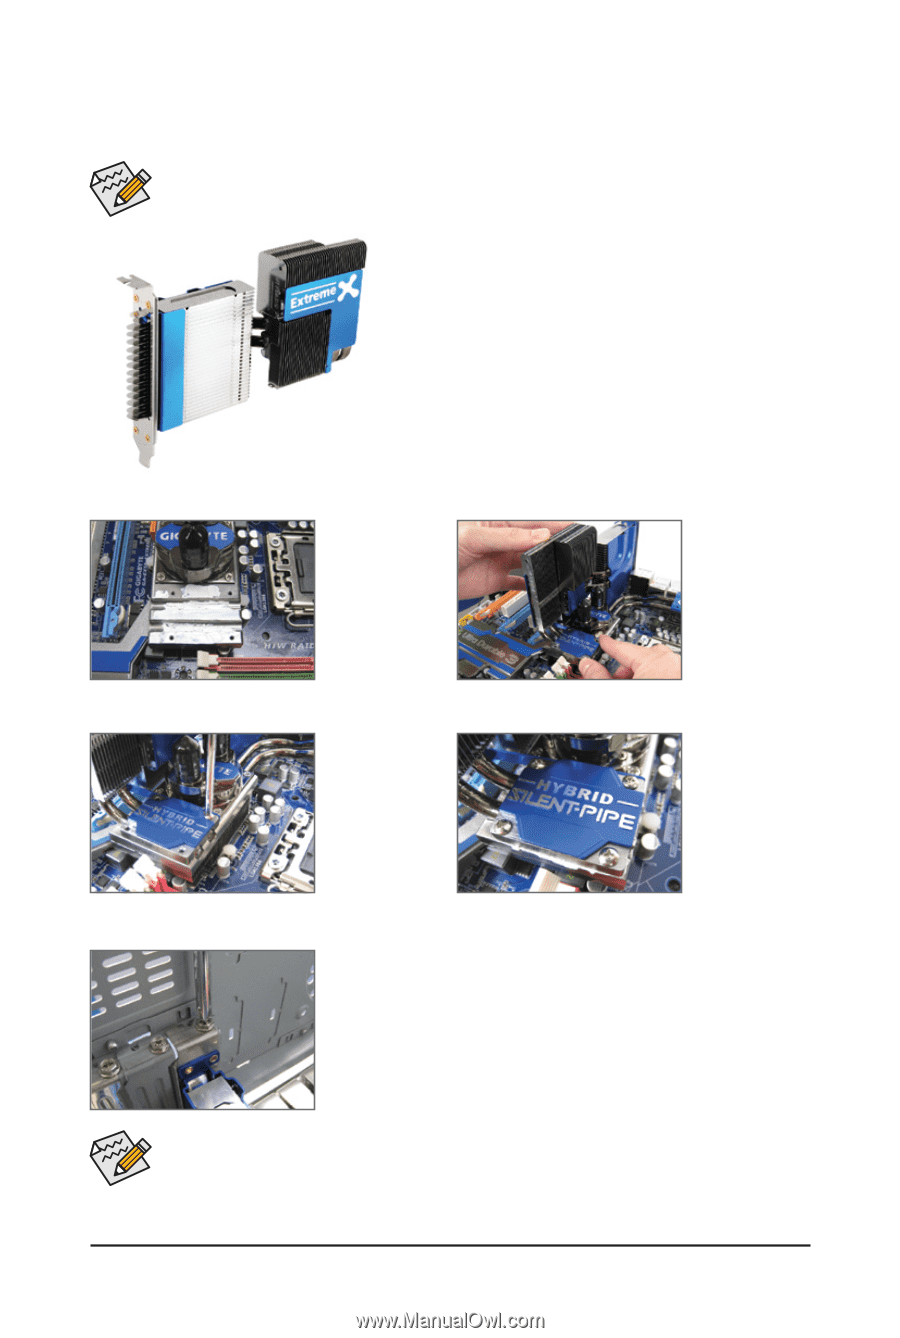
1-4 Installing the Hybrid Silent-Pipe Module Read the following guideline before you begin to install the Hybrid Silent-Pipe module: If you want to connect the front audio module from your chassis to the F_AUDIO connector on the motherboard, be sure to connect it before installing the Hybrid Silent-Pipe module to avoid interference. Tools needed: 1. A Philip's screwdriver 2. Thermal grease 3. Screws included with the motherboard Hybrid Silent-Pipe Follow the steps below to install the Hybrid Silent-Pipe module: Step 1: Apply an even thin layer of thermal grease on the surface of the North Bridge heatsink base and it grooves. Step 3: Secure the Hybrid Silent-Pipe heatsink to the heatsink base by the included screws.(Use one hand to hold the top of the fins to avoid shaking.) Step 2: Position the heatpipe underneath the heatsink of the Hybrid Silent-Pipe module into the tunnel of the North Bridge heasink base. Step 4: The picture on the left shows that four screws are fastened to the heatsink and heatsink base. Step 5: Secure the Hybrid Silent-Pipe bracket to the chassis back panel with a screw to complete the installation. (Note) For the waterblocks on the North Bridge heatsink, we recommend tubes with inner diameter of 7.5mm and outer diameter of 10mm. After connecting the tubes, make sure that the tubes are attached to the waterblocks securely and tightly and there is no leak. The components received may vary in appearance from the products illustrated. Hardware Installation - 16 -
-
 1
1 -
2
-
3
-
4
-
5
-
6
-
7
-
8
-
9
-
10
-
 11
11 -
 12
12 -
 13
13 -
 14
14 -
 15
15 -
 16
16 -
 17
17 -
 18
18 -
 19
19 -
 20
20 -
 21
21 -
22
-
23
-
24
-
25
-
26
-
27
-
28
-
29
-
30
-
31
-
32
-
33
-
34
-
35
-
36
-
37
-
38
-
39
-
40
-
41
-
42
-
43
-
44
-
45
-
46
-
47
-
48
-
49
-
50
-
51
-
52
-
53
-
54
-
55
-
56
-
57
-
58
-
59
-
60
-
61
-
62
-
63
-
64
-
65
-
66
-
67
-
68
-
69
-
70
-
71
-
72
-
73
-
74
-
75
-
76
-
77
-
78
-
79
-
80
-
81
-
82
-
83
-
84
-
85
-
86
-
87
-
88
-
89
-
90
-
91
-
92
-
93
-
94
-
95
-
96
-
97
-
98
-
99
-
100
-
101
-
102
-
103
-
104
-
105
-
106
-
107
-
108
-
109
-
110
-
111
-
112
-
113
-
114
-
115
-
116
-
117
-
118
-
119
-
120
-
121
-
122
-
123
-
124
-
125
-
126
-
127
-
128
-
129
-
130
-
131
-
132
-
133
-
134
-
135
-
136
-
137
-
138
-
139
-
140
-
141
-
142
-
143
-
144
 |
 |