Gigabyte GB-BER5HS-7535 Quick Start Guide - Page 2
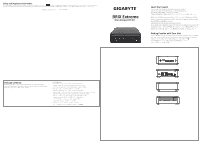
C Wireless Module, D BRIX Extreme Support LAN/COM/M.2 Upgrade Kit, VESA Bracket, A M.2 SSD
 |
View all Gigabyte GB-BER5HS-7535 manuals
Add to My Manuals
Save this manual to your list of manuals |
Page 2 highlights
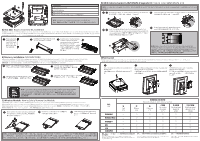
1 2 B CD A PIN Defini�on A M.2 2280 SSD Connector B DDR SO-DIMM slot C Wi-Fi Connector D SATA connector for LAN/COM/M.2 Upgrade Kit ( *Super SKU ) NOTE: Wireless module inclusion may vary based on local distribu�on D) BRIX Extreme Support LAN/COM/M.2 Upgrade Kit: How to Install LAN/COM/M.2 Kit NOTE: This system does not support the installa�on of both LAN/COM kit and 2.5" HDD; also the M.2 module here cannot be equipped with a thermal plate due to the space limita�on. 1 2 5 Unscrew and remove the bracket, and then disconnect the SATA cable. Connect the other end of the cable to the SATA connector on the motherboard. SATA 線。 SATA 接頭。 1 2 5 A) M.2 SSD: How to Install the M.2 2280 SSD M.2 SSD: Installa�on der M.2 2280 SSD / SSD M.2 : Comment installer le SSD M.2 2280 / SSD M.2: Como instalar el SSD M.2 2280 / M.2 SSD: Como instalar o M.2 2280 SSD / SSD M.2: Come installare l'SSD M.2 2280 / M.2 SSD M.2 2280 SSD / M.2 SSD: Instalacja dysku SSD M.2 2280 / M.2 SSD: M.2 2280 SSD nasıl Yüklenir / M.2 SSD:M.2 2280 SSD M.2 SSD M.2 2280 SSD /M.2 SSD:M.2 2280 SSD M.2 SSD: M.2 2280 SSD 1 Remove the small screw secured to the M.2 SSD slot B screw hole. 取下 M.2 SSD B 2 Carefully insert the M.2 SSD into slot B M.2 SSD 裝入B 插槽。 2 3 Insert the tab on the thermal plate into the slit near the connector, then secure the thermal plate and M.2 SSD in place with the previously removed screw M.2 SSD 3 4 Install the upgrade kit board onto the bo�om panel using the four screws provided, then connect the cable included in the upgrade kit to 6 Reinstall the bracket with upgrade kit to bo�om panel the upgrade kit board 4 3 NOTE: Please ensure a thermal pad is a�ached on the motherboard before installing the M.2 into the upgrade kit. Installing a M.2 without any thermal pad may result in the system overhea�ng or system performance being thro�led M.2 M.2 B) Memory Installa�on: SO-DIMM DDR4 Arbeitsspeicher Installa�on: SO-DIMM DDR4 / Installa�on de la mémoire : SO-DIMM DDR4 / Instalación de la memoria: SO-DIMM DDR4 / Instalação de memória: SO-DIMM DDR4 / Installazione della memoria: SO-DIMM DDR4 SO-DIMM DDR4 / Instalacja pamięci: SO-DIMM DDR4 / Ha�za Yüklemesi: SO-DIMM DDR4 SO-DIMM DDR4 SO-DIMM DDR4 SO-DIMM DDR4 SO-DIMM DDR4 1 Carefully insert SO-DIMM memory modules SO-DIMM 3 Carefully insert SO-DIMM memory modules 2 Push down un�l the modules click into place 4 Push down un�l the modules click into place VESA Bracket VESA Halterung / Support VESA / Soporte VESA / Suporte VESA / Staffa VESA VESA / Wspornik VESA / VESA Brake� / VESA 支架 / VESA 支架 / VESA VESA 브래킷 NOTE! VESA screws: Length 5.0 mm with M3 type screws, Metal enclosure with bo�om side. 1 A�ach the screws provided on the underside of the BRIX Extreme VESA BRIX Extreme 底 部。 2 A�ach the VESA moun�ng plate to the rear of a compa�ble display using the screws provided VESA VESA 3 The BRIX Extreme can now be mounted by sliding the device into place. VESA BRIX Extreme 插入 VESA NOTE: Please ensure a thermal pad is a�ached on the motherboard before installing the SO-DIMM device into the system. Installing a SO-DIMM device without any thermal pad may result in the system overhea�ng or system performance being thro�led SO-DIMM SO-DIMM C) Wireless Module: How to Safely Remove the Module Drahtlosmodul: Sicheres En�ernen des Moduls / Module sans fil : Comment re�rer le module en toute sécurité / Módulo inalámbrico: Cómo quitar el módulo de forma segura / Módulo sem fios: Como remover com segurança o modulo / Modulo senza cavi: Come rimuovere il modulo in sicurezza Moduł bezprzewodowy: Bezpieczne usuwanie modułu / Kablosuz Modül: Modül Güvenli Bir Şekilde nasıl Çıkar�lır 1 Disconnect the two antennas by manually li�ing off the clips that hold them in place 2 Remove the screw in the middle 3 Carefully pull the wireless module from the slot M.2 單元 Unit 鉛 Lead (Pb) 汞 Mercury (Hg) Restricted substances and its chemical symbols 鎘 Cadmium (Cd) 六價鉻 Hexavalent chromium (Cr+6) Polybrominated biphenyls (PBB) Polybrominated diphenyl ethers (PBDE) - ○ ○ ○ ○ ○ - ○ ○ ○ - ○ ○ ○ 線材 - ○ ○ ○ 外殼 - ○ ○ ○ - ○ ○ ○ 備考1. "超出0.1 wt 0.01 wt Note 1:"Exceeding 0.1 wt %" and "exceeding 0.01 wt %" indicate that the percentage content of the restricted substance exceeds the reference percentage value of presence condition. � 備考2 Note 2:"○" indicates that the percentage content of the restricted substance does not exceed the percentage of reference value of presence. ○ ○ ○ ○ ○ ○ ○ ´ ○ ○ 備考3 Note 3:The "−" indicates that the restricted substance corresponds to the exemption.�
-
 1
1 -
 2
2
 |
 |
