Gigabyte GB-BKi3A-7100 User Manual - Page 2
VESA Bracket, B M.2 SSD
 |
View all Gigabyte GB-BKi3A-7100 manuals
Add to My Manuals
Save this manual to your list of manuals |
Page 2 highlights
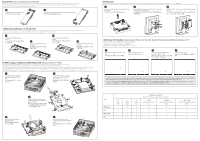
B) M.2 SSD: How to Install the M.2 2280 SSD M.2 SSD: Wie Sie die M.2 SSD installieren / SSD M.2: Comment l'installer / M.2 SSD: Cómo instalar SSD M.2 / SSD M.2: Como instalar o SSD M.2 / M.2 SSD: Come installare un' unità M.2 SSD M.2 SSD M.2 SSD / M.2 SSD: Jak zainstalować M.2 SSD / M.2 SSD: M.2 SSD nasıl kurulum yapılır M.2 SSD M.2 SSD M.2 SSD:M.2 SSD M.2 SSD : M.2 방식 SSD 1 Carefully insert the M.2 SSD into slot B M.2 SSD 於 B 插槽。 2 The M.2 SSD is secured in place with a small screw in the left corner M.2 SSD。 VESA Bracket VESA-Halterung / Support VESA / soporte VESA / Suporte VESA / Staffa VESA VESA / Uchwyt VESA / VESA Desteği / VESA 支架 / VESA 支架 / VESA VESA 브래킷 1 Attach the screws provided on the underside of the BRIX or BRIX s VESA BRIX 底部。 2 Attach the VESA mounting plate to the rear of a compatible display using the screws provided VESA VESA 3 The BRIX or BRIX s can now be mounted by sliding the device into place VESA BRIX 插入 VESA C) Memory Installation: SO-DIMM DDR4 Arbeitsspeicher Installation DDR4 / Installation de la mémoire DDR4 / Instalación de la Memoria DDR4 / Instalação da memória DDR4 / Installazione Memoria DDR4 DDR4 Instalacja pamięci DDR4 / Bellek Yerleştirilmesi DDR4 DDR4 DDR4 1 Carefully insert SO-DIMM memory modules SO-DIMM 2 Push down until the modules click into place 3 Carefully insert SO-DIMM memory modules 4 Push down until the modules click into place D) BRIX s Support Additional SATA 6Gbps HDD: How to Install 2.5" HDD BRIX s Unterstützt Zusätzliche SATA 6Gbps HDD: So installieren Sie die 2,5 "Festplatte / Le BRIX s supporte un disque dur SATA 6Gbps additionel: Comment l'installer Soporte adicional HDD 6Gbps SATA para BRIXs: Cómo instalar HDD 2.5" / BRIX s Suporte adicional para HDD SATA 6Gbps: Como instalar HDD 2.5" BRIX Supporta un' ulteriore porta SATA 6Gbps per HardDisk: Come installare un HDD da 2,5" / BRIX SATA 6 2,5 BRIX wspiera dodatkowy dysk SATA 6Gbps HDD: Jak zainstalować 2.5" HDD / BRIX, extra 6Gbps HDD destekler: 2.5'' HDD nasıl kurulum yapılır / BRIX s SATA 6Gbps 2.5" HDD BRIX s SATA 6Gbps 2.5" HDD / BRIXs SATA 6Gbp HDD) 増設:2.5 インチ HDD BRIX s 는 추가 SATA 6Gbps HDD : 2.5" HDD 1 Unscrew and remove the bottom panel, disconnecting the SATA 2 cable. 移除 BRIX s 1 的 SATA 線。 2 Flip the bottom panel and unscrew the four screws holding the HDD cage in place. 4 USB Power On Function: Allows Device Power-on Via USB. Useful When Mounted Behind a Display or TV USB Power On Funktion / Fonction Démarrage par USB / Función USB Power On Função USB Power On / Funzione USB Power On USB Power On Opcja USB Power On / USB Güç Açık Fonksiyonu / USB USB USB ON 機能 / USB 1 Press "Del" during device start up to enter BIOS Del 鍵進入 BIOS 2 Select "Chipset" from the menu. 在 BIOS Chipset"。 3 Manually configure "USB S5 Wakeup Support" settings to "Enable". 進入 Chipset 的 USB S5 Wakeu Support Enable"。 4 Press F4 to Save and Exit. 按啟 F4 BIOS Note: 'USB Power On' functionality in Windows requires an additional Windows patch. This is provided on GIGABYTE's official website labeled 'USB Power-On Patch'. Your GIGABYTE BRIX can be powered on via a connected USB device such as a keyboard or mouse, offering greater convenience when mounted behind a display or monitor. Windows USB Power On USB Power-On Patch USB Power On BRIX 上的 USB BRIX BRIX 3 Install the HDD in the cage using the screws provided and connect the SATA cable to the HDD. 4 SATA 4 Screw the HDD cage in place in the bottom panel BRIX s 底蓋。 5 Connect the SATA cable to the motherboard and reinstall the bottom panel. 1 SATA BRIX s 底蓋。 2 單元 Restricted substances and its chemical symbols 鉛 汞 鎘 六價鉻 多溴聯苯 Lead Mercury Cadmium Hexavalent chromium Polybrominated biphenyls Polybrominated diphenyl ethers (PB) (Hg) (Cd) (Cr6) (PBB) (PBDE) - O O O O O O O O O O O - O O O O O O O O O O O
-
 1
1 -
 2
2
 |
 |
