Gigabyte GH-PDU21-SC Installation Guide - Page 9
Installation Instructions for AMD K7 Clip
 |
View all Gigabyte GH-PDU21-SC manuals
Add to My Manuals
Save this manual to your list of manuals |
Page 9 highlights
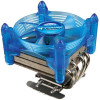
English Installation Instructions for AMD K7 Clip Figure 1-1 A Figure 1-2 B Figure 1-3 Figure 2-1 Figure 2-2 Figure 2-3 Figure 3 Figure 4 Figure 1 Please add an adequate layer of heat sink paste on the surface of the CPU. Remove the bracket of the cooler along the direction of the arrow (Figure 1-2). The bracket should be removed as that shown in Figure 1-3. Figure 2 Place point A of the clip (Figure2-1)on point B at the bottom of the cooler(Figure2-2).As Figure 2-3. Figure 3 Align the three spaces on the cooler with the three clips on the base of the CPU and make sure point A of the clip (Figure 2-1) is placed on point B at the bottom of the cooler (Figure 2-2) and push down on the clip until it's firmly locked. Figure 4 Connect the 3-pin connector to the CPU fan connector on the motherboard. Clip Installation is now complete. If fan speed control is required, please refer to "Installation of the Fan Speed Control Cable". - 9 - GH-PDU21-SC
-
 1
1 -
2
-
3
-
 4
4 -
 5
5 -
 6
6 -
 7
7 -
 8
8 -
 9
9 -
 10
10 -
 11
11 -
 12
12 -
 13
13 -
 14
14 -
15
-
16
-
17
-
18
-
19
-
20
-
21
-
22
 |
 |
