Gigabyte GSmart MS802 User Manual - GSmart MS802 English Version - Page 13
Features, 3 Insert the Battery & SIM card, 4 SIM, 5 Battery
 |
View all Gigabyte GSmart MS802 manuals
Add to My Manuals
Save this manual to your list of manuals |
Page 13 highlights
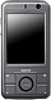
1.2 Features MS802 is not only having mobile phone features, it also integrates Personal Digital Assistant (PDA) capability. The following section provides more information about the device features: ˙Touch screen: 2.8" TFT LCD display with 65,536 colors effective. ˙Navigation key, Windows key, GPS key. ˙Speaker. ˙Mini-USB slot for connection and battery charging. ˙Camera: 3.0 mega pixels with auto focus. Front camera lens with 0.3 mega pixels CMOS. ˙Connections: 3.5G, GPRS, Bluetooth, and Wireless LAN. ˙Microsoft Windows Mobile 6.1: Windows Live Messenger, Pocket Outlook, Pocket Explorer, and Office tools (Word, Excel, PowerPoint, and OneNote). Also features Encryption, Internet Sharing, Windows Update, Pictures & Videos, Calculator, Games, ActiveSync, and File Explorer. ˙Other programs: GPS Tracking, Location Message, FM Radio, Zip, Java, SIM Manager, Streaming Player, etc. 1.3 Insert the Battery & SIM card Before inserting/removing a SIM card, please make sure that MS802 is powered off and is not connected to any power supply. 1. Check the back of your MS802. Push the button located at the bottom of your device, and pull the battery cover, and then remove the battery. 2. Find the SIM card carrier on the upper-left corner of the device. 3. Insert the SIM card with the metal contacts facing down into the carrier. 4. Return the battery back to the battery slot, battery cover back onto the device in that order. 5. Push the battery cover back, and then you will hear "click". 1.4 SIM Before using your MS802, you must contact a network operator to get a personal SIM (Subscriber Identity Module). The SIM card contains the device number, the services included in your subscription, and your personal data such as your phonebook and messages. The phone functions are unusable (except for emergency calls) until a valid SIM card is inserted. Note: If the device or the SIM card is lost or stolen, you should contact your network operator immediately in order to prevent unauthorized use. 1.5 Battery Your MS802 comes with a removable and rechargeable Lithium Polymer battery. The standby time and talk time will depend on your actual usage network coverage and whether the device is in standby mode. The battery life may also vary depending on how frequently the user switches between functions. Note: Using any battery pack or AC adapter (charger) not specified/endorsed by GSmart on this phone may be dangerous and may invalidate any warranty and approval given to the device. Unplug the charger from the power supply when it is not in use. MS802│1-3
-
 1
1 -
2
-
3
-
4
-
5
-
6
-
7
-
 8
8 -
 9
9 -
 10
10 -
 11
11 -
 12
12 -
 13
13 -
 14
14 -
 15
15 -
 16
16 -
 17
17 -
 18
18 -
19
-
20
-
21
-
22
-
23
-
24
-
25
-
26
-
27
-
28
-
29
-
30
-
31
-
32
-
33
-
34
-
35
-
36
-
37
-
38
-
39
-
40
-
41
-
42
-
43
-
44
-
45
-
46
-
47
-
48
-
49
-
50
-
51
-
52
-
53
-
54
-
55
-
56
-
57
-
58
-
59
-
60
-
61
-
62
-
63
-
64
-
65
-
66
-
67
-
68
-
69
-
70
-
71
-
72
-
73
-
74
-
75
-
76
-
77
 |
 |
