Gigabyte GeForce GTX 1080 Xtreme Gaming Water cooling Manual - Page 4
Step 8, Step 6, Step 7
 |
View all Gigabyte GeForce GTX 1080 Xtreme Gaming Water cooling manuals
Add to My Manuals
Save this manual to your list of manuals |
Page 4 highlights
Step 6 Step 7 Power cables Water pipes Close the top cover and front cover of A WATERCOOLING BOX. Tips: Please note the power cables and water pipes need to be well-stored as shown in picture. Insert the C CD-ROM BOX inside the drive bay. Tips: If the CD-ROM BOX cannot be well-fixed to the chassis, users may extend the arm of the CD-ROM BOX to strengthen to structure. Step 8 Connect each VGA cards with two 8-pin power cables. Use D VGA JACK to safely support the cards. Connect 3 VGA cards together by using the E 3-WAY SLI BRIDGE. Close the chassis,turn on the power,and install OC GURU II and Graphics card driver to get started. Recommended area for VGA JACK
-
 1
1 -
 2
2 -
 3
3 -
 4
4
 |
 |
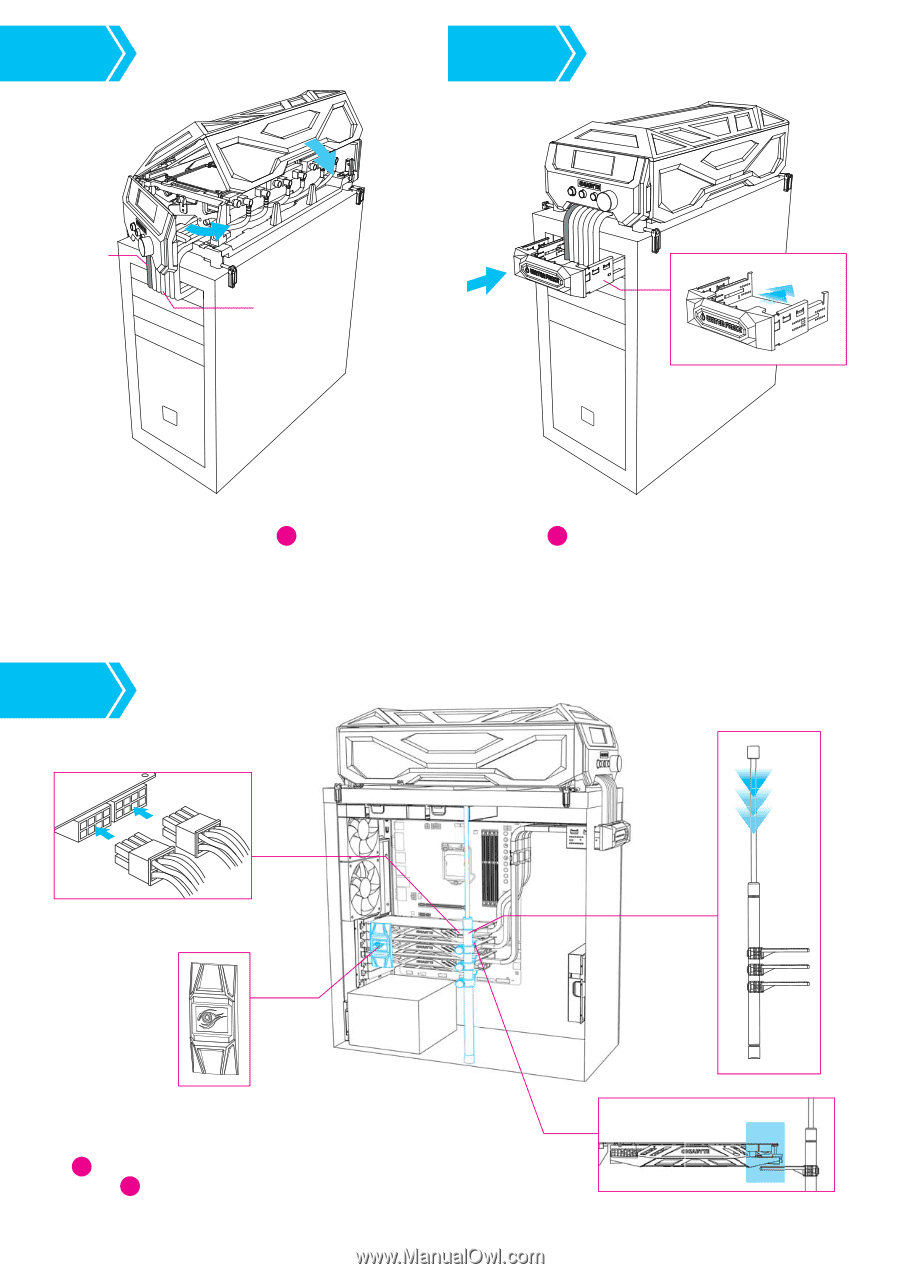
Connect each VGA cards with
two 8-pin power cables.
Close the top cover and front cover of
WATERCOOLING BOX
.
Tips:
Please note the power cables and water pipes
need to be
well-stored as shown in picture.
Insert the
CD-ROM BOX
inside the drive bay.
Tips:
If the CD-ROM BOX cannot be well-fixed to the chassis,
users may extend the arm of the CD-ROM BOX to strengthen
to structure.
Use
VGA JACK
to safely support the cards. Connect 3 VGA cards together
by using the
3-WAY SLI BRIDGE
. Close the chassis, turn on the power, and
install OC GURU II and Graphics card driver to get started.
Step 8
C
D
E
A
Step 6
Step 7
Power cables
Water pipes
Recommended area for VGA JACK
area for VGA JACK
Recommended