Gigabyte M7800S Manual - Page 2
A. Hardware Installation - wireless mouse
 |
View all Gigabyte M7800S manuals
Add to My Manuals
Save this manual to your list of manuals |
Page 2 highlights
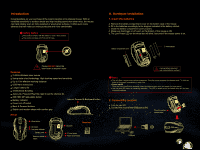
Introduction Congratulations on your purchase of the most innovative mini wireless mouse. With an incredible sensitivity to surface details and high tracking speed than other mice, the mouse can track reliably even on tricky polished or wood-grain surfaces. It offers even more advance that will make you more productive and more comfortable. Safety Notice This product complies with IEC 60825-1, Class I laser product. The product complies with FCC and CE rules. A. Hardware Installation 1. Insert the batteries a. Remove the battery compartment cover on the bottom case of the mouse. b. Fit in the batteries accordingly to the diagram indicated in the battery cabinet. c. Close the battery compartment cover properly. d. Make sure the Power on-off swich on the bottom of the mouse is ON. e. The Low Power LED on the wheel bar will blink 3 seconds if the mouse power is on. Battery compartment cover 2 * AAA batteries Please DO NOT direct the laser beam at anyone's eyes. Features 2.4GHz Wireless laser mouse Using state-of-art technology. High tracking speed and sensitivity. Up to 10m effective working distance USB Nano transceiver Longer battery life 4 Directional Scrolling Auto-Link, Plug and Play! No need to set the channel ID. 800/1600 DPI adjustable button Battery indicator Internet Forward & Backward button Power on/ off switch Back & Forward buttons Stylish and modern shape with comfort grip Mouse Wheel button Dpi button Low power indicator Battery cover Receiver release button Receiver Receiver ID reset button Power on/off switch A wrong battery placement may cause batteries overheat. The unit offers a strong power saving management. Once the mouse accesses the sleeping mode, " to click any button of the mouse" is compulsory to wake it up. Power on/off: There is a Power on/off switch designed to save the batteries power while non-usage of a longer period. User can push DPI button to change the resolution. The LED on wheel bar will be flashed when dpi has been sucessfully swithced. 2. Connect the receiver a. Turn on your PC. b. Connect the receivere to USB port on PC Press the receiver release button PC USB port
-
 1
1 -
 2
2 -
 3
3
 |
 |