Graco 3250281 Assembly Instructions - Page 10
B, A, C
 |
UPC - 654582325213
View all Graco 3250281 manuals
Add to My Manuals
Save this manual to your list of manuals |
Page 10 highlights
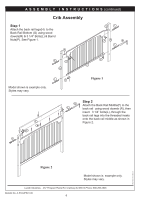
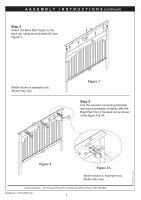
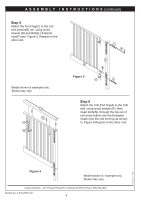
A S S E M B L Y I N S T R U C T I O N S (continued) Figure 9 Step 9 Attach the Dropside Rail (D) to cribs ends as shown in Figure 9A, pull the drop rail up to the highest position. Screw the (2) block brakes (T) into the holes provided in the lower plastic drop track as shown in Figure 9B, tighten block brakes with a Philips screwdriver. Insert the foot casters (S) as shown in Figure 9C and tighten all bolts.Inspect the crib to make sure it is assembled correctly and all bolts are tight. D D C T Model shown is example only. Styles may vary. T Figure 9B PRINTED IN CHINA S S Figure 9A S Figure 9C LaJobi Industries. - 257 Prospect Plains Rd. Cranbury,NJ 08512-Phone: 888-266-2848 Bulletin No. A-RTAUPS01-00 10
-
 1
1 -
2
-
3
-
4
-
 5
5 -
 6
6 -
 7
7 -
 8
8 -
 9
9 -
 10
10 -
 11
11 -
 12
12 -
 13
13
 |
 |
ASSEMBLY INSTRUCTIONS
(continued)
PRINTED IN
CHINA
10
Figure 9
Figure 9B
T
T
Figure 9A
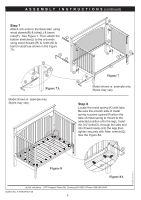
Step 9
Attach the Dropside Rail (D) to cribs ends as
shown in Figure 9A, pull
the drop rail up to the
highest position. Screw the (2) block brakes (T)
into the holes provided in the lower
plastic drop
track as shown in Figure 9B, tighten block
brakes with a Philips screwdriver.
Insert the foot casters (S) as shown in Figure
9C and tighten all bolts.Inspect the crib to make
sure it is assembled correctly and all bolts are
tight.
LaJobi Industries. - 257 Prospect Plains Rd. Cranbury,NJ 08512-Phone: 888-266-2848
Figure 9C
S
Bulletin No. A-RTAUPS01-00
Model shown is
example only.
Styles may vary.
D
S
S
C
D