Haier ATB08ARW User Manual - Page 9
Estantes de la Puerta del Refrigerador - washer
 |
View all Haier ATB08ARW manuals
Add to My Manuals
Save this manual to your list of manuals |
Page 9 highlights
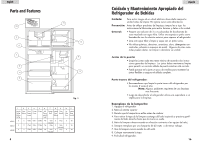
Español • La opción BAJO permite que la humedad se escape del comparitmento para un almacenamiento optimo de frutas y vegetales con piel. • La opción ALTO retiene parte de la humedad en el compartimento para optimizar la guarda de vegetales y verduras frescas. Low High fig. 14 ALTO /BAJO Estantes de la Puerta del Refrigerador Estante de la puerta: (ver fig. # 15) Su unidad esta equipada con estantes para colocar botellas en la puerta. Los mismos le permitirán el almacenaje de recipientes o botellas de tamaño en galones. Para retirar los estantes de la puerta: (ver fig. # 15) 1. Retire todos los elementos que se encuentren almacenados en el estante 2. Gentilmente tire hacia arriba de ambos laterales hasta que el estante salga de los soportes y retire. Para colocar los estantes: (ver fig. # 15) 1. Alinee los laterales del estante con los soportes de la puerta. 2. Cuidadosamente empuje hacia abajo hasta que el mismo trabe seguramente en su lugar. Estante de puerta superior fig. 15 Estante de puerta inferior 13 English Dismantling 1. Fix refrigerator and freezer door by sticking adhesive tape on both sides to hold doors in place. 2. As shown in fig. 1, remove hinge top cover on the upper part of freezer door. Then remove the two screws from the hinge. Take out the hinge by pulling it vertically, and keep it in a safe place. 3. Remove the adhesive tape on freezer door, lift and take the door down, and carefully put it aside. 4. As shown in fig. 2, remove screws of the central hinge, lift and take down the central hinge and pad, and keep them in a safe place. 5. Remove the adhesive tape on refrigerator door, lift and take down refrigerator door, and carefully put it aside. fig. 2 central hinge axle central hinge pad Reinstallation 1. As shown in fig 3 remove the door axle and install on the opposite hole with washer pads (2) in place. Now dismantle the lower hinge and install the opposite side with the hinge spacer and washer pads in place. 2. Install refrigerator door: make the left bottom hole of the refrigerator compartment door fall over the lower hinge axle, move the door back and forth to make it straight and in alignment with central hinge. Install the central hinge again, turn the hinge axle until it completely enters the door body, then fix it with screws. 3. Install freezer door: align left bottom hole of freezer door over the central axle. Take hinge and adjust so that hinge axle can be installed in the upper hole of the freezer door; adjust door to make it straight and level. Tighten the screws of upper hinge. 4. Install top hinge cover on the left side. fig. 4 central hinge axle central hinge pad 8
-
 1
1 -
2
-
3
-
 4
4 -
 5
5 -
 6
6 -
 7
7 -
 8
8 -
 9
9 -
 10
10 -
 11
11 -
 12
12 -
 13
13 -
 14
14 -
15
-
16
-
17
-
18
-
19
-
20
-
21
-
22
-
23
-
24
-
25
-
26
-
27
-
28
-
29
-
30
 |
 |
