Haier EB-2485E User Manual - Page 8
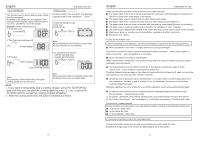
Example:10, Example:Cooking of 0.4kg fish
 |
View all Haier EB-2485E manuals
Add to My Manuals
Save this manual to your list of manuals |
Page 8 highlights
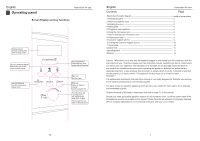
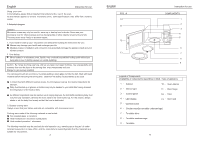
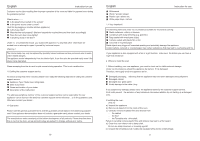
English Instruction for use The microwave oven is therefore not suitable for: frying Making popcorn melting sugar or fats cooking dried beans etc. When preparing food(s) with uncertain compositions, you should keep an eye on the appliance until the end of the set cooking time. 2.1 How to react when smoke develops inside the oven Should smoke or fire develop inadvertently inside the oven, this problem can usually be easily overcome by taking the following correct steps: Whatever happens, keep the oven door closed. First thing, switch off the appliance immediately Then switch off the power supply by unplugging the appliance or activating the fuse safety switch. Open the oven to take out the burnt food only when you can no longer detect any smoke. CAUTION ELECTRIC SHOCK Under no circumstances should you attempt to extinguish smouldering or burning food inside the oven with water . In this case serious accidents may be caused by electric shock. 7 How to operate your microwave oven MICROWAVE COOKING You can choose from 8 different power levels.Set the desired power level before setting the cooking time. Screen display P stands for % power 1 2345 6 78 P100 P80 P70 P60 P50 P40 P30 P20 Example:10 minutes cooking with P50 power level 1.Press key five times MICROPOWER Screen display 2.Turn the knob clockwise until - + /kg +30s Screen display SETTING THE CLOCK 1.Make sure that oven is plugged in and door is closed. 2.Touch Clock pad to set clock. 3.To enter the correct time of the day. For example:If you want to set 12:30. Please follow the right chart; 1)Press key once CLOCK 2)Turn the knob clockwise set the minutes - + /kg +30s 3)Press key once CLOCK 3.Press key - + /kg Screen display +30s Clock counts backwards Note:1.The power level is displayed in the percent.With each pressing of the key MICROPOWER the power level reduces from p100 to P80 to P70to P60to P50 to P40to P30 to P20 then start again from P100. 2.After expiry of the cooking time (display 0:00) a buzzer rings five times. 3.The maximum cooking time is 60 min. 4)Turn the knob clockwise set the hours - + /kg +30s 5)Press key once CLOCK Then the clock is start the colon will flash and the time will go on. 6 English Instruction for use AUTO COOKING MENU Set the type and the weight of the food to be cooked In the AUTO COOKING function ,the required cooking time is automatically determined. Screen display A stands for Automatic A-1 Potato A-2 A-3 A-4 A-5 A-6 Vegetable Meat Fish Milk Bread Example:Cooking of 0.4kg fish Note:1. Set the AUTO COOKING MENU A-1 A-3 A-5 Press once A-2 A-4 A-6 Press twice 2.The weight within one menu and one type of food is displayed stepwise. 3.The weight grades in the AUTO MENU serve as a reference to the automatic cooking time. 4.Take note of setting the correct type of food in the AUTO COOKING MENU.(See table following) 1.Press key twice Screen display 2.Turn the knob clockwise until - + Screen display /kg +30s 3.Press key - /kg +30s + Screen display WEIGHT TABLE AUTO COOKING MENU Recipe A-1 Type Potato Weight Methed 1 Weigh the potatoes after peeling,washing and cutting into a similar size. Put them into a glass bowl with lid.Add 45 ml (3 tablespoons) water Add when cooking 300-450g, 2 add 60 ml water (4 tablespoons) for c ooking 500-750 g. 0.2kg Weigh the vegetables after washing, cleaning and cutting into similar size. Put them A-2 Vegetable 0.4kg into a glass bowl with lid. Add 30 ml(2 tablespoons) water when cooking for 200-250g, add 45ml 3tablespoons) for 300-450 add 60-75ml(4-5tablespoons) for 500-600g. Stir 0.6kg after cooking.W hen cooking higher quantiti es stir once dur ing cooking. 0.1kg A-3 Meat 0.2kg Shield the edges with aluminium foil. Turn the meat over,in the course of the cooking. This programme is suit able for beef, l amb, pork, steaks, chops and mi nced meat. 0.3kg 0.2kg A-4 Fish 0.4kg Shield the tail of a whole fish with aluminium foil. Turn the fish over during cooking. This programme is suit able for whole fi shes as well as for fish fil lets. 0.6kg 0.2kg Pour the liquid into ceramic cups only and reheat uncovered. Place one cup in the A-5 Milk 0.4kg centre,2cups opposite to each other and 3 or 4 cups in acircle.Leav e them to stand in the microwave oven.Stir drinks before and after standing time.Be careful while taking 0.6kg the cups out (see safety instructi ons for liquids). 2piece Put bread on a piece of kitchen paper and turn over, at the half time of cooking (oven A-6 Bread 4piece keeps operating and is stopped, when you open the door). This programme is suitable 6piece for sliced bread . 7
-
 1
1 -
2
-
 3
3 -
 4
4 -
 5
5 -
 6
6 -
 7
7 -
 8
8
 |
 |
