Haier ES15V-M1 User Manual - Page 1
Haier ES15V-M1 Manual
 |
View all Haier ES15V-M1 manuals
Add to My Manuals
Save this manual to your list of manuals |
Page 1 highlights
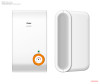
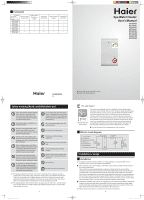
Packing list Name Quantity Model ES10V-M1 ES10V-M2 ES15V-M1 ES15V-M2 ES25V-M1 ES25V-M2 ES35V-M1 ES35V-M2 Electric water heater (Set) 1 1 1 1 Safety valve Drain hose (Unit) 1 1 1 1 Expansion User's manual Connecting hook (PCS) (Copy) line (PCS) 2 1 1 2 1 1 2 1 1 2 1 1 Spa Water Heater User's Manual ES10V-M1 ES15V-M1 ES25V-M1 ES35V-M1 ES10V-M2 ES15V-M2 ES25V-M2 ES35V-M2 0040502334 V Safety warning (Read carefully before use) Check if the ammeter and the diameter of the wires are in accordance with the rated current of the water heater. If necessary, please have it checked by an experienced electrician. In case the power cord of the water heater is damaged, be sure to have it replaced by after service technicians manufacturer. This water heater is available for AC 230V/50Hz power. Do not set at place that is too cold and may freeze. Be sure to use independent socket and earth it reliably, and socket quality shall conform to the national standard requirements. Set the power socket of the water heater at the dry position away from spraying water. Do not plug/unplug with wet hands. After installation, be sure to fill the heater completely with water before switching on the power in the first usage. Children must take a bath under the supervision of adult. In opening and closing the water valve, do not point the showerhead toward the human body. Otherwise it may hurt by the spraying hot water. During winter in a cold area, if the heater is idle for a long period, please pull the handle of the safety valve to discharge the water. Otherwise it may freeze inside the water heater and cause damage. Do not set at outdoor places. Do not use as floor standing appliances. Please mount it to firm and reliable wall. Do not install to places without sewage. Connect the drain hose to the inlet of the sewer to avoid polluting by splashing. Never do that. Be sure to act as per instructions. The product adopts the patented "Safe Care" technology of our company. As long as product adopts civil power supply, even if the earthing wire is electrified by mistake, the "Safe Care" technology still can block dangerous electricity, and ensure your personal safety. But if you find any perceptible current, please disconnect the power and contact after service department for maintenance. Do not disassemble by yourself. The original pipeline of the water heater is an organic part of "Safe Care" . Do not remove it by yourself. Otherwise we will not take responsibility for injury and loss caused by the safety danger occurring. 1 Please read this manual before usage. Retain it for future reference. Pre-safe Expert Mark of Haier Safe Water Heater This mark is the designation for Pre-safe Expert of Haier Water Heater Company, which indicates the use of the company's patented technology inside the product. It ensures you a safe bath while monitoring whether your house ground wire is live or not all the time. If this mark is lit, it indicates your house ground wire was come live (poor grounding and live). In this case, please immediately stop use and disconnect the power, and remember not to touch any electric appliance in your house. At the same time, immediately contact after-sales service and your property Pre-safe Expert will become the electric safeguard for your family. See to the physical for the appearance, color or pattem. Electric circuit diagram Live wire (brown) Null line (blue) High temperature limiter Thermostat Heating indicator Heating element Grounding wire (yellow/green) Installation • Usage Installation Installation must be made by installers of, or designated by, our company after-service department. The water heater shall be wall-mounted. Make 2 holes Φ12mm, 65mm deep in wall with an impact drill according to the drawing of the external dimensions. Take out all accessories in packaging liner, unpack one hook, sleeve the ring end of the connection lines among the accessories into the hook tightening end and assemble the hook well. Afterwards, insert and fix two hooks into the holes (wherein the hook with connection lines is fixed in the right hole). Lift the water heater and hang it with wall rack corresponding to the two hooks. insert the connection spacer led from the rear shell wall rack of the heater into the connection terminal of the line on the hook (See Figure 2). Install accessories such as safety valve as shown in Figure 3. Do use sealing compound to prevent water leakage. To facilitate installation and removal, it is suggested a G1/2 movable nut be fitted at appropriate locations on inlet and outlet pipes respectively. Find the location requiring hot water supply. Connect inlet pipe, outlet pipe and city water pipe respectively to the use point for hot water. Note: The hot water pipe shall not be too long to reduce heat losses. Please reserve some space in installation for the future maintenance. 2
-
 1
1 -
 2
2
 |
 |