Haier HCS10B User Manual - Page 6
Coffee Filters, Brewing Coffee - 10 cup coffee dispenser
 |
UPC - 688057393476
View all Haier HCS10B manuals
Add to My Manuals
Save this manual to your list of manuals |
Page 6 highlights
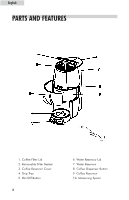
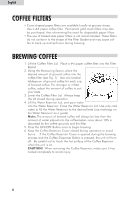
English COFFEE FILTERS • Cone-shaped paper filters are available locally at grocery stores. Use a #4 paper coffee filter. Permanent gold mesh filters may also be purchased, thus eliminating the need for disposable paper filters. • The use of basket-style paper filters is not recommended. These filters do not conform to the shape of the Filter Basket and may cause coffee to back up and spill over during brewing. BREWING COFFEE 1. Lift the Coffee Filter Lid. Place a #4 paper coffee filter into the Filter Basket. 2. Using the Measuring Spoon, place the desired amount of ground coffee into the coffee filter (see Fig. 1). Use one leveled tablespoon of ground coffee for each cup of brewed coffee. For stronger or milder coffee, adjust the amount of coffee to suit your taste. 3. Lower the Coffee Filter Lid. Always keep the lid closed during operation. 4. Lift the Water Reservoir Lid, and pour water into the Water Reservoir. Close the Water Reservoir Lid. Use only cold water to fill the Water Reservoir to the desired level (use markings on the Water Reservoir as a guide). Note: The amount of brewed coffee will always be less than the amount of water placed into the coffeemaker, since about 10% is absorbed by the coffee grounds and the filter. 5. Press the ON/OFF Button once to begin brewing. 6. Keep the Coffee Reservoir Cover closed during operation to avoid burns. If the Coffee Reservoir Cover is opened during the brewing process and the Coffee Dispenser Button is pressed, the unit will turn off. Be careful not to touch the hot surface of the Coffee Reservoir when the unit is on. CAUTION! When removing the Coffee Reservoir, make sure it has cooled completely to avoid injury. 5
-
 1
1 -
 2
2 -
 3
3 -
 4
4 -
 5
5 -
 6
6 -
 7
7 -
 8
8 -
 9
9 -
 10
10
 |
 |
