Haier HHN1230DBBB HHV2230 Manual - Page 8
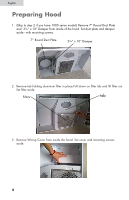
Fasten the vent cover with 2 screws supplied., Insert the vent cover into the slot on the front
 |
View all Haier HHN1230DBBB manuals
Add to My Manuals
Save this manual to your list of manuals |
Page 8 highlights
English 7 Insert the vent cover into the slot on the front of the range hood. 8. Fasten the vent cover with 2 screws supplied. (2) #8 Screws 9. Remove appropriate Duct Knockout(s) from top or back of hood. TOP RECTANGULAR DUCT KNOCKOUT (Remove for 3¼" x 10"Vertical & for 7"Round Discharge) SEMI-CIRCULAR DUCT KNOCKOUT (Remove for 7"Round Discharge) BACK RECTANGULAR DUCT KNOCKOUT (Remove for 3 1/4" x 10" Horizontal Discharge) NOTE: To accommodate off-center ductwork, the Damper/Duct Connector can be installed up to 1-inch on either side of hood center or the 7" Round Duct Plate can be installed up to ½" on either side of hood center. In extreme off-center installations, one end of the duct connector may need to be trimmed to clear the electrical cable clamp. 7
-
 1
1 -
2
-
 3
3 -
 4
4 -
 5
5 -
 6
6 -
 7
7 -
 8
8 -
 9
9 -
 10
10 -
 11
11 -
 12
12 -
 13
13 -
14
-
15
-
16
 |
 |
