Haier HHN1230DBWW HHV2230 Manual - Page 5
Installation Preparation, Preparing Hood Location
 |
View all Haier HHN1230DBWW manuals
Add to My Manuals
Save this manual to your list of manuals |
Page 5 highlights
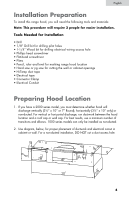
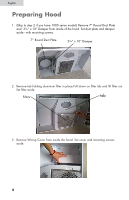
English Installation Preparation To install this range hood, you will need the following tools and materials: Note: This procedure will require 2 people for easier installation. Tools Needed for Installation t Drill t 1/8" Drill bit for drilling pilot holes t 1-1/4" Wood bit for drilling electrical wiring access hole t Phillips head screwdriver t Flat-head screwdriver t Pliers t Pencil, ruler and level for marking range hood location t Hand saw or jig saw for cutting the wall or cabinet openings t Hi-Temp duct tape t Electrical tape t Connector Clamp t Electrical Conduit Preparing Hood Location 1. If you have a 2000 series model, you must determine whether hood will discharge vertically (3¼" x 10" or 7" Round), horizontally (3¼" x 10" only) or non-ducted. For vertical or horizontal discharge, run ductwork between the hood location and a roof cap or wall cap. For best results, use a minimum number of transitions and elbows. 1000 series models can only be installed as non-ducted. 2. Use diagram, below, for proper placement of ductwork and electrical cutout in cabinet or wall. For a non-ducted installation, DO NOT cut a duct access hole. 4
-
 1
1 -
 2
2 -
 3
3 -
 4
4 -
 5
5 -
 6
6 -
 7
7 -
 8
8 -
 9
9 -
 10
10 -
 11
11 -
12
-
13
-
14
-
15
-
16
 |
 |
