Haier HPN12XHM User Manual - Page 6
Assembly, Installation
 |
View all Haier HPN12XHM manuals
Add to My Manuals
Save this manual to your list of manuals |
Page 6 highlights
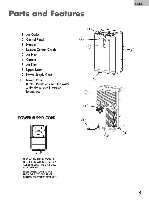
English Assembly and Installation Accessories Include 1. Main window panel and extension panels - extends from 20" up to 46" 3 pieces 2. Exhaust nozzle 1 piece 3. Screws 8 pieces 4. Exhaust hose 1 piece 5. Cover 1 piece 6. Foam 2 pieces 7. Hose connector 1 piece sos 0,5•°053> A B 1)Connect the 3 pieces of the window panels by sliding the 2 extension panels into the main window panel. C 2)Apply a foam strip to the end of each extension panel. 3)Open the window and place the window panel assembly into the window. Adjust the extension panels to fit the width or height of the window as shown below (see figure A). Secure the extension panels using 4 blunt tip screws (see figure B-1). Secure the main window panel using 4 pointed screws (see figure B-2 and B-3). 4)Expand the 2 ends of the exhaust hose. Connect the hose connector to one end of the exhaust hose by turning clockwise. Then insert the exhaust nozzle at the other end of the exhaust hose by turning clockwise (see figure C) to create the hose assembly. 5)Insert the hose connector end of the hose assembly into the rear of the unit and turn clockwise to secure (see figure D). 6)Insert the exhaust hose with nozzle end into the window panel(see figure E). 7)Plug the power cord into the wall outlet and press the"Reset"button. 8)Please allow 8"of space around the unit for proper air circulation. 9)When removing the portable air conditioner for storage, the window panel may be left in place. Simply place the cover over the nozzle hole (see figure A). Hose outlet of E INDOOR Double Hung Window INDOOR Sliding Window INDOOR Screws B B-1 5 Screws A B-2 Screws A B-3
-
 1
1 -
 2
2 -
 3
3 -
 4
4 -
 5
5 -
 6
6 -
 7
7 -
 8
8 -
 9
9 -
 10
10 -
 11
11 -
 12
12 -
13
-
14
-
15
-
16
-
17
-
18
-
19
-
20
-
21
-
22
-
23
-
24
-
25
-
26
-
27
-
28
-
29
-
30
-
31
-
32
-
33
-
34
-
35
-
36
 |
 |
