Haier LE42B1380 LE42B1380 Manual - Page 11
Base Stand Assembly Instructions
 |
View all Haier LE42B1380 manuals
Add to My Manuals
Save this manual to your list of manuals |
Page 11 highlights
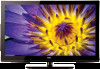
Introduction 4. Base Stand Assembly Instructions Note: the pictures below are only for reference 1. Put the neck on the base stand, and attach the neck with the supplied screws (5 x B4 x 16F). Screws: 5xB4X16F 2. Put the rear board on the neck, and attach the rear board with the supplied screws (2 x ST4 x 12, 2 x M4 x 12). Front Back 46" Screws: 2xM4X12 Screws: 2xST4X12 3. Place the TV face down on a soft and flat surface (blanket, foam, cloth, etc.) to prevent any damage to the TV. Put the rear board on the rear cabinet of the TV , and attach the rear board with the supplied screws (4 x M4 x 12). Screws: 4xM4X12 1. Place the TV face down on a soft and flat surface (blanket, foam, cloth, etc.) to prevent any damage to the TV. Put the stand on the TV set 2. Affix the stand in-to position with the supplied screws (4 x B4 x 22F). 42" Screws:4xB4X22F 5. Remote Control Installing Batteries 1. Open the battery compartment cover on the back of the remote control. 2. Insert two 1.5V AAA size batteries observing the polarity markings inside the battery compartment. Don't mix different types or used batteries with new ones. 3. Close the cover. Batteries shall not be exposed to excessive heat such as direct sunlight or fire. - The remote control should be operated within 30 feet (7m) and 300 to the left and right of the IR receiver at the front of the TV. - Used batteries should be disposed of properly. Step 1 Step 2 Step 3 Battery Compartment Cover 2 x AAA Battery 9
-
 1
1 -
2
-
3
-
4
-
5
-
 6
6 -
 7
7 -
 8
8 -
 9
9 -
 10
10 -
 11
11 -
 12
12 -
 13
13 -
 14
14 -
 15
15 -
 16
16 -
17
-
18
-
19
-
20
-
21
-
22
-
23
-
24
-
25
-
26
-
27
-
28
-
29
-
30
-
31
-
32
-
33
-
34
-
35
-
36
-
37
-
38
-
39
-
40
-
41
-
42
-
43
-
44
-
45
-
46
-
47
-
48
-
49
-
50
-
51
-
52
-
53
-
54
-
55
-
56
-
57
-
58
-
59
-
60
-
61
-
62
-
63
-
64
-
65
-
66
-
67
-
68
-
69
-
70
-
71
-
72
-
73
-
74
-
75
-
76
-
77
-
78
-
79
-
80
-
81
-
82
-
83
-
84
 |
 |
