Haier MWM10100GCSS Product Manual - Page 10
CLOCK SETTING, Clock/Pre-set, Stop/Clear, PRE-SET FUNCTION, 0,1,2, Start/+30 SEC./Confirm, MICROWAVE
 |
UPC - 688057370620
View all Haier MWM10100GCSS manuals
Add to My Manuals
Save this manual to your list of manuals |
Page 10 highlights
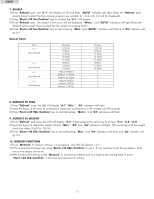
English 1.CLOCK SETTING When the microwave oven is electrified,the oven will display "0:00", buzzer will ring once. The input time should be within 0:00--23:59 (24H) or 1:00-12:59 (12H); Example: To set 12:12. 1) Press the "Clock/Pre-set" button, "24H" will light, and the buzzer will ring once. Press the same key to choose 12 hour system or 24 system. 2) Press the number buttons* "1", "2", "1","2" in order. 3) Press "Clock/Pre-set" to finish clock setting. ":" will flash, and the time will light. Note: 1) If the clock is not set, "0:00" is displayed and the clock will not count. 2) During the process of clock setting, if you press "Stop/Clear", the oven will go back to the previous status automatically. 2. PRE-SET FUNCTION 1) Set the clock first. (Consult the instruction of clock setting.) 2) Set a certain cooking procedure, at most 3 section can be set. The setting method and display is the same as relevant cooking procedure. (Defrosting is beyond pre-set cooking). 3) Press "Clock/Pre-set", "0:00" is dispalyed. 4) Press the number keys and enter the correct time. For example, to start cooking at 10:12 now, please press "1,0,1,2" in turn. 5) Press "Start/+30 SEC./Confirm" to confirm; the current time is displayed. Press the number keys and enter the correct time. For example, to start cooking at 10:12 now, please press "1,0,1,2" in turn. 6) When preset time arrives, cooking starts after the buzzer sounds twice. If the oven door is not well closed, the procedure will wait. 3. MICROWAVE COOKING Select different microwave power level and set cooking time as you wish. There are 10 power levels available for choosing. Level 10 9 8 7 6 5 4 3 2 1 Power 100% 90% 80% 70% 60% 50% 40% 30% 20% 10% Display PL10 PL9 PL8 PL7 PL6 PL5 PL4 PL3 PL2 PL1 Keep on pressing "Mircowave" to choose the power. 1) Press "Mircowave" once, the LED will display "P100", "Micro." indicator will light. 2) Press "Mircowave" twice to choose 80% power, the LED will display "P80". 3) Press the number buttons of "1", "0", "0","0" in order, the LED will display "10:00" Example: If you want to use 80% microwave power to cook for 10 minutes, you can operate the oven as the following steps. 4) Press "Start/+30 SEC./Confirm" to start cooking, ":" will light and the "Micro." indicator will flash. 4. GRILLING COOKING 1) Press the "Grill" button once to choose the grill function, the LED will display "G-1" and "Grill" indicator will light. 2) Set the cooking time, the maximum cooking time is 99 minutes and 99 seconds.Example: Set 12 minutes 50 seconds, press "1", "2", "5","0" in order. 3) Press "Start/+30 SEC./Confirm" to start cooking. The cooking time counts down, ":" will light and "Grill" indicator will flash. Note: When half of the grill time passes,the buzzer will sound twice to remind you to turn the food over. If the door is not opened, the unit will continue working. 9
-
 1
1 -
2
-
3
-
4
-
 5
5 -
 6
6 -
 7
7 -
 8
8 -
 9
9 -
 10
10 -
 11
11 -
 12
12 -
 13
13 -
 14
14 -
 15
15 -
16
-
17
 |
 |
