Hamilton Beach 60600 Use & Care - Page 2
S3A11.33Ella, Z3A113SNO3
 |
View all Hamilton Beach 60600 manuals
Add to My Manuals
Save this manual to your list of manuals |
Page 2 highlights
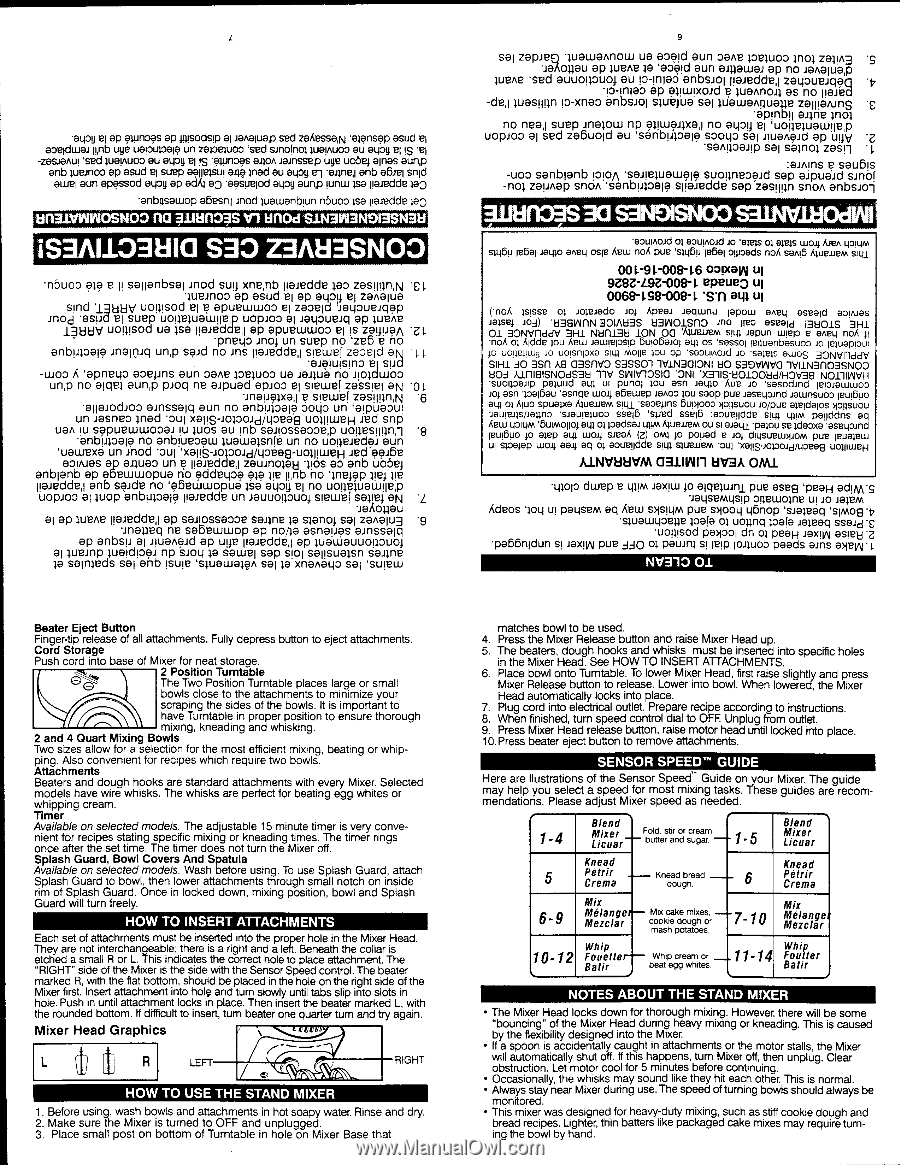
L '9U04 el 9P 91PnDPs 9P ggsodsip al Janapap sed zaAessa,N •alansap aspd el eoeidwei ll,nb uge uaroppaia un zat0Equoo ted sinolno; luainuoo eu apg el IS 'el -ZeSJ8AL4 luainuoo eu agog el IS •Egin0as aJpAJainssap uge uoga alms eun,p anb Immo ap esiid el suep aapelsw aJla mad eu agog el •ailnalenb abet snid awe' aun apassod agog ap edAt ao •apsueiod agog eun,p iunw Ise iieJeddelao •anbgsawop ebesn,i mod luawanbiun n5uoo Ise ilaJedde leo • s • . S3A11.33Ella S33 Z3A113SNO3 •n5uoo ego ell solienbsai mod suit xne,nb lieJedde goo zaslIlln,N 'EL lueinoo op asud el ap 81.134 el zenolue sind '13day uoigisod el e apuewwoo 81 zeoeld 'Jayoualciap Jnod 'aspd 81 suep uoneguoaliie,p uop.Joo al .18113LIEJCI op we've 1381: jv UOWS0d ue 1S9 liaJedde,i ap apuewwoo el !S Z94p9A 'ZL •pnet.to Jnot un suep no `ze5 e no anbugoala inainJo un,p sand no Jns HaJedde,i siewef zageici aN • jj •eJEruising aI sud -woo A `apnego aoetJns aun °one goewoo ue memtue no Jiogdwbo un,p no eicieg eun,p pioq ne aJpued apJoo el siewef zeSsiel ON 'Cll. •inauogxe,i a siewef zaall!ln,N '6 •oliaJodJoo aJnssalq aun no anbUgoalp ociijo un 'aipueoui un Jasneo pied 'oul xolis-JogooJdji.peag uo111weH Jed snp uan lu sapuewwooaJ lu guos eu inb salioss000e,p uoigesuign,-1 '8 'onbugoalp no enbiueoew guaLualsrife un no uoileJedai aun 'uewexe un Jnod •oui 'xalis-JogooJd/Ltoeae-uogliweH Jed'eoJee Bowes op oiguao un a iiaJedded zauJnoga8 tins ao anb uobet anbianb op abewwopue no oddeqop ego lie ii,nb no Inetop pet lie lieJedded anb saJdu no `p5ewwopue gsa atJoil el no uoigeguawile,p uopJoo al woo anbugoal9 Paiedde un Jouuoipuot siewef sagieg aN 'L •JaAolgau al ap gUEAE paledded ap salioss000e saigne to sganot sal zanaiu3 'g •Jnaggeq ne sabewwop op no/ga asnaues amssalq ap anbsu al JivanaJd ap ulte liaJecided op guoWauuonouot el tueJnp lueidloem np SJOL4 to sewei sap slot sausuagsn mime soingeds sal anb isuie 'sguewegan se' to xnenetto sal 'sulew 9 sal zapJeo 'wawa/mow U9 aopid aun Dan goeguoo gnog zagin3 •JaAoggau ap guene to 'aoaid aun eiggewai ap no Janalue,p guene 'sed auuoigouo/ au io-injao anbsJoi liaiedded zagoueiqoa to Infeo ap atiwlxad a guannaq as no paled de,l lues!Illn io-xnao anbsJoi swetua sal guewaniguagge zoilloiunS •apinbil aigne )not no need suep inagow np ogiwomed no aqoit el uoneguawile,p uopmoo al sed zabuoid au 'sanbugoalo soot.to sal iluanoid ap ui "Z -saAnoeJip sal sagnog zosn L :emnins a sau6is -uoo senbianb ioioA •saileguawolo suoigneooJd sop alpueJd sJno[ -nog zeunep snon 'saribulosio sliaJedde sap zesilign snon anbsJoi S m- I S it .. '0014A0Jd of eguoold JO 'ems of ems ww; Nan ipqm s1115P 18591 .19410 aneq osie Aew noA pue 's446p 185a! °woods no/ sam6 Aluzuem sN1 00L-9L-oos-L6 03vaina ul 9Z9Z-L9Z-009-L epeueo ui 0068-LS8-008-1. 'S'fl 943 ul ('noA ;else; Ispse .Jo) of .KNE;ado Jo; 133BIAMN 30IAH3S Aup3eWa! OJIaSqnwonuinoiepIoluwo eABL; eseald apvuas °seek] 13801S 3H1 0'no1A3oO; NAVlgIoldtdioVu3AHew1 iNa8p1-e11p21s:lpIOBuNpf0ia0io;'A01IL11ieousem'sassigsnolJlaopwuannpbaespuoeo °Neu noA 11 JO lemappur ;o uoriel!w!! JO uopnioxa sql moue IOU op •seou!Awd SIH1 dO 3Sf1 AS 03Sf1VO S3SSO1 1V1N130IONI HO JO 'salep awoS .30NYIlddV S3OVIANG 1VI1N31103SNO0 HOd AlrlISISNOdSal 11Y .suo!pa;!p paluyd 9111 u! SWlV10S10 puno; lou a'sOnNIJa')(w3o1ISA-u8e01J0O0b'sde/sHodOmVn3d9 NO11IIANH ielomewwoo Jo; asn loalbau 'asnqe wo.4 abewep .10A00;ou swop pue Jaseywnd Jawnsuoo leu!bpo ay) o) Apo spuegxe Aluenem •sagepns 6uppoo Nogsuou Jo/pue aleidaps Nopuou Aupppaund 'slaurewoo ssei5 'sued sseifi :apuendde t.(21A4 pailddns eq Aew ;ppm '5u!Anollo; 911101padsa; pAAAILlelieM OU s! eJayl 'paiou se Ideoxa 'aseywnd ieu!6po Jo amp 9L4 WO.4 smaA (z) 0Ml io payed a JO; d!usueuppotA pue repalew u! spaiep WO.4 004 eq of aguaidde S441. SIUBJJEM '0U1 `XOIG-10130.1d/140Bee uolgweH AINVHUVM 03111A117 HV3A OMl •woio dwep a y11M Jaxiw to eigewini pue ose9 'peek &JIM'S •Jaysemusip ogewome ul JO Jelem Adeos log ul paysEm eq Aew sNsiqm pue smooy qfinop 'sJaleaq 'siAno817 •swaujoeue ;Deja of uounq pare Jaleaq ssaid 's •uopsod pa>poi do 0; POOH JaxgAl osleld 'Z •pa56nidun si JaxgA) pue ddo 0 pawn; si IEIp ioiwoo peads ains a>len • I. NV313 01 Beater Eject Button Finger-tip release of all attachments. Fully depress button to eject attachments. Cord Storage Push cord into base of Mixer for neat storage. 2 Position Turntable The Two Position Turntable places large or small bowls close to the attachments to minimize your scraping the sides of the bowls. It is important to have Turntable in proper position to ensure thorough mixing, kneading and whisking. 2 and 4 Quart Mixing Bowls Two sizes allow for a selection for the most efficient mixing, beating or whipping. Also convenient for recipes which require two bowls. Attachments Beaters and dough hooks are standard attachments with every Mixer. Selected models have wire whisks. The whisks are perfect for beating egg whites or whipping cream. Timer Available on selected models. The adjustable 15 minute timer is very convenient for recipes stating specific mixing or kneading times. The timer rings once after the set time. The timer does not turn the Mixer off. Splash Guard, Bowl Covers And Spatula Available on selected models. Wash before using. To use Splash Guard, attach Splash Guard to bowl, then lower attachments through small notch on inside rim of Splash Guard. Once in locked down, mixing position, bowl and Splash Guard will turn freely. HOW TO INSERT ATTACHMENTS Each set of attachments must be inserted into the proper hole in the Mixer Head. They are not interchangeable; there is a right and a left. Beneath the collar is etched a small R or L. This indicates the correct hole to place attachment. The "RIGHT" side of the Mixer is the side with the Sensor Speed control. The beater marked R, with the flat bottom, should be placed in the hole on the right side of the Mixer first. Insert attachment into hole and turn slowly until tabs slip into slots in hole. Push in until attachment locks in place. Then insert the beater marked L, with the rounded bottom. If difficult to insert, tum beater one quarter tum and try again. Mixer Head Graphics t It VIP' L R LEFT ;*` RIGHT HOW TO USE THE STAND MIXER 1. Before using, wash bowls and attachments in hot soapy water. Rinse and dry. 2. Make sure the Mixer is turned to OFF and unplugged. 3. Place small post on bottom of Turntable in hole on Mixer Base that matches bowl to be used. 4. Press the Mixer Release button and raise Mixer Head up. 5. The beaters, dough hooks and whisks must be inserted into specific holes in the Mixer Head. See HOW TO INSERT ATTACHMENTS. 6. Place bowl onto Turntable. To lower Mixer Head, first raise slightly and press Mixer Release button to release. Lower into bowl. When lowered, the Mixer Head automatically locks into place. 7. Plug cord into electrical outlet. Prepare recipe according to instructions. 8. When finished, turn speed control dial to OFF Unplug from outlet. 9. Press Mixer Head release button, raise motor head until locked into place. 10.Press beater eject button to remove attachments. SENSOR SPEED" GUIDE Here are Ilustrations of the Sensor Speed Guide on your Mixer. The guide may help you select a speed for most mixing tasks. These guides are recommendations. Please adjust Mixer speed as needed. 1-4 Blend Mixer Licuar Fold, stir or cream butter and sugar. Knead 5 Petrir Crema Knead bread dough. 6-9 Mix Melange,- Mix cake mixes, Mezclar cookie dough or mash potatoes. Whip 10-12 Fouetter-- Whip cream or Batir beat egg whites. 1-5 Blend Mixer Licuar Knead 6 Petrir Crema Mix 7-10 Melangel Mezclar Whip 11-14 Foutter Batir NOTES ABOUT THE STAND MIXER • The Mixer Head locks down for thorough mixing. However, there will be some "bouncing" of the Mixer Head during heavy mixing or kneading. This is caused by the flexibility designed into the Mixer. • If a spoon is accidentally caught in attachments or the motor stalls, the Mixer will automatically shut off. If this happens, turn Mixer off, then unplug. Clear obstruction. Let motor cool for 5 minutes before continuing. • Occasionally, the whisks may sound like they hit each other. This is normal. • Always stay near Mixer during use. The speed of turning bowls should always be monitored. • This mixer was designed for heavy-duty mixing, such as stiff cookie dough and bread recipes. Lighter, thin batters like packaged cake mixes may require turning the bowl by hand.
-
 1
1 -
 2
2 -
 3
3 -
 4
4
 |
 |