Hamilton Beach 63224 Use & Care - Page 6
Parts and Features
 |
UPC - 040094632244
View all Hamilton Beach 63224 manuals
Add to My Manuals
Save this manual to your list of manuals |
Page 6 highlights
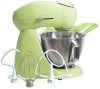
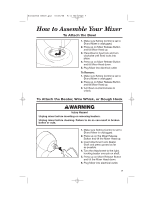
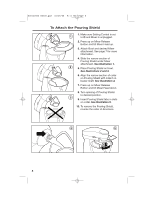
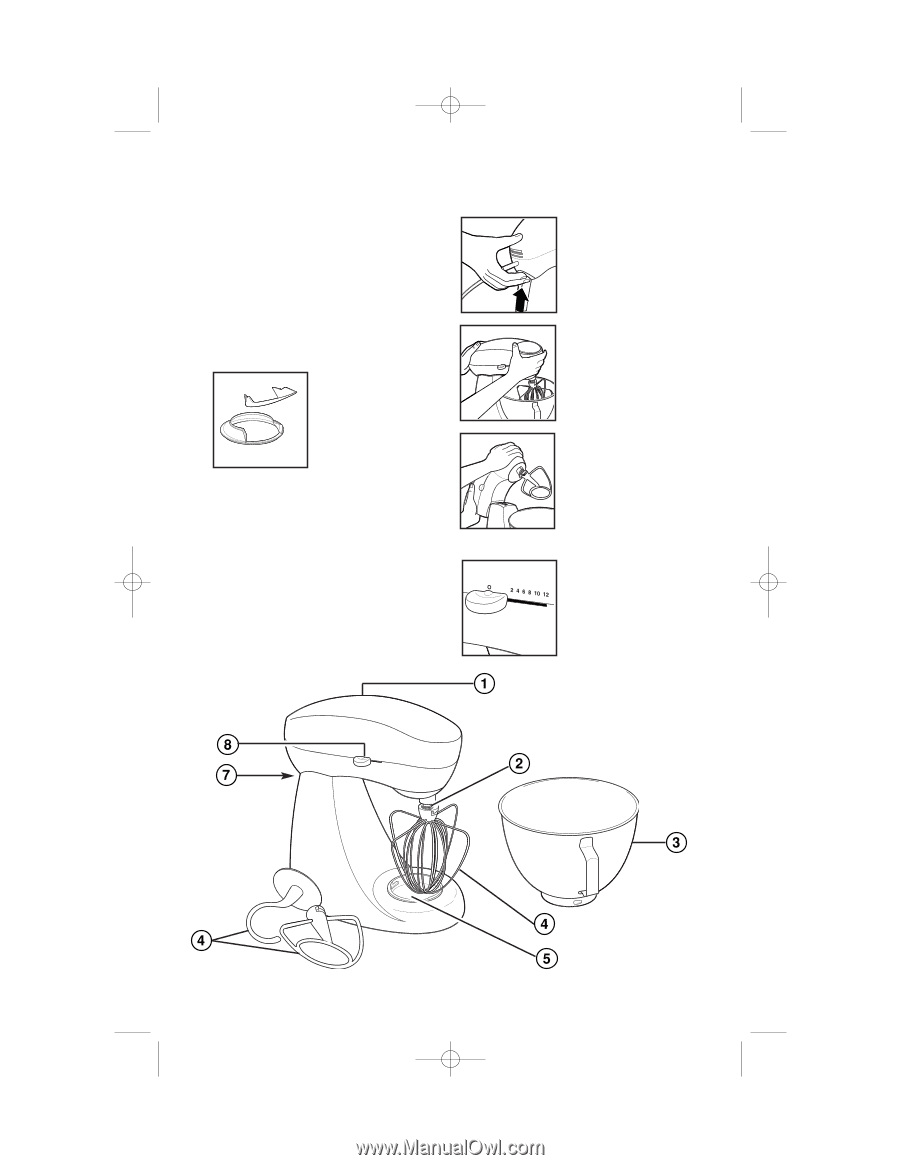
840142500 ENv00.qxd 10/25/05 9:11 AM Page 6 Parts and Features 1. Mixer Head 2. Attachment Shaft 3. Bowl 4. Attachments Mixer attachments include a flat beater, a wire whisk, and a dough hook. 5. Bowl Lock 6. Pouring Shield (see page 8 for more information). 7. Mixer Release Button This button locks the Mixer Head down to ensure thorough mixing. When the Mixer Head is raised, it locks in the upright position. Hold the Mixer Head when lowering it into the bowl. Press up on the button to release the Mixer Head. 8. Setting Control Select a setting from 2 to 12. The setting of the mixer increases with the numbers. 6
-
 1
1 -
 2
2 -
 3
3 -
 4
4 -
 5
5 -
 6
6 -
 7
7 -
 8
8 -
 9
9 -
 10
10 -
 11
11 -
 12
12 -
13
-
14
-
15
-
16
-
17
-
18
-
19
-
20
-
21
-
22
-
23
-
24
-
25
-
26
-
27
-
28
-
29
-
30
-
31
-
32
-
33
-
34
-
35
-
36
-
37
-
38
-
39
-
40
-
41
-
42
-
43
-
44
-
45
-
46
-
47
-
48
-
49
-
50
-
51
-
52
-
53
-
54
-
55
-
56
-
57
-
58
-
59
-
60
-
61
-
62
-
63
-
64
-
65
-
66
-
67
-
68
-
69
-
70
 |
 |
6
Parts and Features
1. Mixer Head
2. Attachment Shaft
3. Bowl
4. Attachments
Mixer attachments include a flat
beater, a wire whisk, and a dough
hook.
5. Bowl Lock
6. Pouring Shield
(see page
8 for more
information).
7. Mixer Release Button
This button locks
the Mixer Head
down to ensure
thorough mixing.
When the Mixer
Head is raised,
it locks in the
upright position.
Hold the Mixer
Head when lower-
ing it into the bowl.
Press up on the
button to release
the Mixer Head.
8. Setting Control
Select a setting
from 2 to 12.
The setting of the
mixer increases
with the numbers.
840142500 ENv00.qxd
10/25/05
9:11 AM
Page 6