Hannspree SN12E2 8 User Manual - Page 19
Install Windows 7 in Notebook, 1 Setting BIOS and Install a new Windows 7 system
 |
View all Hannspree SN12E2 8 manuals
Add to My Manuals
Save this manual to your list of manuals |
Page 19 highlights
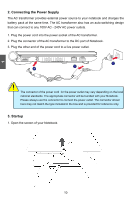
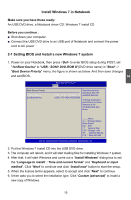
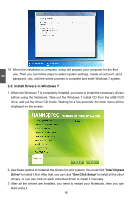
2 Install Windows 7 in Notebook Make sure you have these ready: An USB DVD drive, a Notebook driver CD, Windows 7 Install CD Before you continue : ■ Shut down your computer ■ Connect the USB DVD drive to an USB port of Notebook and connect the power cord to AC power 2-1 Setting BIOS and Install a new Windows 7 system 1. Power on your Notebook, then press to enter BIOS setup during POST, set "1st Boot Device" to "USB : SONY DVD-ROM D"(DVD drive name) in "Boot" -> "Boot Device Priority" menu, the figure is shown as below. And then save changes and exit BIOS. BIOS SETUP UTILITY Boot Boot Device Priority 1st Boot Device [USB : SONY DVD-ROM D] 2nd Boot Device [HDD : PO-WDC WD2500B] Specifies the boot sequence from the available devices. A device enclosed in parenthesis has been disabled in the corresponding type menu. Move +/-/ :Change Option Enter:Select Esc :Exit F1 :General help F2/3 :Change color F9 : Optimal defaults F10 : Save and exit v02.67 (C)Copyright 1985-2009, American Megatrends, Inc. 2. Put the Windows 7 Install CD into the USB DVD drive. 3. The computer will reboot, and it will start loading files for installing Windows 7 system. 4. After that, it will start Windows and come out a "Install Windows" dialog box to set the "Language to install", "Time and current format" and "Keyboard or input method". Click "Next" to continue and click "Install now" button to start the setup. 5. When the license terms appears, select to accept and click "Next" to continue. 6. It then asks you to select the installation type. Click "Custom (advanced)" to install a new copy of Windows. 15
-
 1
1 -
2
-
3
-
4
-
5
-
6
-
7
-
8
-
9
-
10
-
11
-
12
-
13
-
 14
14 -
 15
15 -
 16
16 -
 17
17 -
 18
18 -
 19
19 -
 20
20 -
 21
21 -
 22
22 -
 23
23 -
 24
24 -
25
-
26
-
27
-
28
-
29
-
30
-
31
-
32
-
33
-
34
-
35
-
36
-
37
 |
 |