Harbor Freight Tools 47604 User Manual - Page 5
Operation, Maintenance
 |
View all Harbor Freight Tools 47604 manuals
Add to My Manuals
Save this manual to your list of manuals |
Page 5 highlights
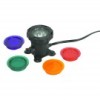
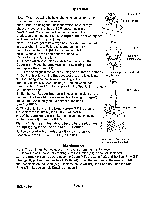
Operation FIGURE 2 Note: When replacing bulbs or changing lenses, unplug the unit and remove it from the water. ' Short Hanger Note: Before placing the unit in the water, make sure you choose a location that has a OCR outlet that is in a 2 arTh -iIL IP' covered, waterproof area, within the distance of the product cord length (19' 4"). The Adapter (#8) is not waterproof and must be kept dry at all times. Note: The Spotlight must always be completely submerged Base in water when in use. Failure to submerge the entire unit will cause the Bulb (#4) to overheat and fail. FIGURE 3 Note: Make sure the pond-bottom surface you choose to use is flat and level. 1. Choose which lens color you desire and unscrew the ors Fixed with suction cups Cover (#1). Place the Lens (#2) on the Seal Ring (#3) and replace the Cover (#1). 2. Set the Spotlight in the water by using one of three Smethods: connection point to short and A. Set the Spotlight on the Base (Accessory) by sliding it into long hangers. the short hanger on the Base, connecting at the tab (see Assembly Drawing on page 6) on the Case (#5). See FIGURES 2 and 3. In this application the Spotlight will rotate to your desired angle. B. Set the four Rubber Suction (#6) cups in the slots on the bottom of the Case (#5) (see Assembly Drawing on page 6) and set the unit directly on the bottom of the pond. FIGURE 4 i-) •_...f See FIGURE 3. C. The circular band on the Long Hanger (#7) fits around the shaft of the fountain (See FIGURE 4), and the % i V Long Hanger end of the Long Hanger (#7) fits into the connection point on the Case (#5). See FIGURE 3. Warning! Hands and feet should be dry before plugging or unplugging in the line cord to a GFCI outlet. .---, P.' .-r.-.1 i ... 3. Run the cord with the Adapter (#8) to the waterproof location with the GCFI outlet. Plug in the unit. Attached o Fountain Jet (Fountain Not Included) Maintenance Note: The unit must be unplugged whenever performing maintenance. 1. Check the unit periodically making sure the Cover (#1) is securely fastened. 2. If the Bulb (#4) burns out, remove the Cover (#1), the Lens (#2), and the Seal Ring (#3). Then gently pull and remove the old Bulb (#4). Snap the two pins on the new Bulb (#4) into the receptacle on the Case (#5). Replace the Cover (#1), the Lens (#2), and the Seal Ring (#3). See Assembly Drawing on page 6. SKU 47604 Page 5
-
 1
1 -
 2
2 -
 3
3 -
 4
4 -
 5
5 -
 6
6
 |
 |