Harbor Freight Tools 61972 User Manual - Page 15
Adjusting the Fence, Adjusting the Miter Table Indicator, Adjusting the Bevel Angle, Adjusting or
 |
View all Harbor Freight Tools 61972 manuals
Add to My Manuals
Save this manual to your list of manuals |
Page 15 highlights
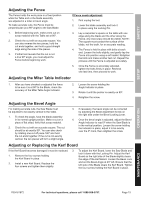
Safety Setup Adjusting the Fence The Fence holds the work piece in a fixed position while the Table and or the blade assembly are adjusted in a miter or bevel angle. To make accurate cuts, the Fence must be perpendicular (at a 90º angle) to the Saw Blade. 1. Before beginning work, make a test cut on scrap material with the Table set at 90º. 2. Check the cut with an accurate square. You can also reverse the two pieces, hold the cut ends together, and hold a good straight edge along the side of the pieces. 3. If either test reveals that the cut is not a true 90º angle, you must adjust the Fence before beginning work. If Fence needs adjustment: 1. First unplug the tool. 2. Lower the blade assembly and lock it in place using the Locking Pin. 3. Lay a carpenter's square on the table with one edge along the blade and the other along the Fence. Any inaccuracy should be visible. NOTE: The square must contact the surface of the blade, not the teeth, for an accurate reading. 4. The Fence is held in place with bolts at each end. Loosen the bolts slightly, and gently tap the Fence into position using a soft mallet. Retighten the bolts and make another test cut. Repeat the process until the Fence is adjusted accurately. 5. Once the Fence is accurately adjusted, tighten the bolts firmly in place. Recheck one last time, then proceed to work. Adjusting the Miter Table Indicator 1. After you have checked or adjusted the fence to be sure it is at 90º to the Blade, check the accuracy of the Miter Table Angle Indicator. 2. Loosen the screw holding the Angle Indicator in place. 3. Rotate it until the pointer is exactly on 90º. 4. Retighten the screw. Adjusting the Bevel Angle For making accurate cuts, the Saw Blade must be adjusted to be exactly vertical to the Table. 1. To check the angle, have the blade assembly in its normal upright position. Make a cut on a piece of flat sided, fairly thick scrap material. 2. Check the cut with an accurate square. The cut should be at exactly 90º. You can also check by rotating one cut-off piece 180º and hold the cut ends together. If the cut is not exactly vertical, the two pieces will form a slight angle. 3. If necessary, the bevel angle can be corrected by adjusting the Bevel Adjustment Screw on the right side under the Bevel Locking Lever. 4. Once the bevel angle is adjusted, adjust the Bevel Angle Indicator to read 0º when the Saw Blade is in the vertical position. Loosen the screw holding the Indicator in place, adjust it to be exactly over the 0º mark, then retighten the screw. Adjusting or Replacing the Kerf Board If the Kerf Board becomes damaged it must be replaced. 3. 1. Remove the four screws holding the Kerf Board in place. 2. Install a new Kerf Board. Replace the four screws and tighten them slightly. To adjust the Kerf Board, lower the Saw Blade and lock it down with the Locking Pin. Adjust the Kerf Board so the right side of the Blade slightly clears the edge of the Kerf Board. Loosen the Bevel Lock and set the Bevel Angle at 45º left. Ensure that the left side of the Blade clears the Kerf Board. Tighten the four screws holding the Kerf Board in place. Operation Maintenance ITEM 61972 For technical questions, please call 1-888-866-5797. Page 15
-
 1
1 -
2
-
3
-
4
-
5
-
6
-
7
-
8
-
9
-
 10
10 -
 11
11 -
 12
12 -
 13
13 -
 14
14 -
 15
15 -
 16
16 -
 17
17 -
 18
18 -
 19
19 -
 20
20
 |
 |
