Harman Kardon AVR 145 Owners Manual - Page 42
System Settings
 |
View all Harman Kardon AVR 145 manuals
Add to My Manuals
Save this manual to your list of manuals |
Page 42 highlights
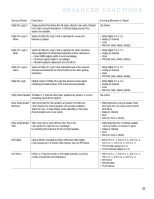
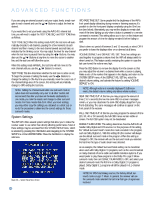
ADVANCED FUNCTIONS If you are using an external source to set your output levels, simply navigate to each channel and use the ⁄/¤ Buttons to adjust the level as desired. If you would like to set your levels using the AVR 145's internal test tone, you will need to adjust the TEST TONE SEQ and TEST TONE lines as follows. TEST TONE SEQ: When this setting reads AUTO, the test tone will automatically circulate to all channels, pausing for a few moments at each channel and then moving to the next channel several seconds later, as indicated by the blinking cursor. You may adjust the level for any channel when the test tone is paused there by using the ‹/› Buttons. You may also use the ⁄/¤ Buttons at any time to move the cursor to another line, and the test tone will follow the cursor. When this setting reads MANUAL, the test tone will not move to the next channel until you use the ⁄/¤ Buttons to move it. TEST TONE: This line determines whether the test tone is active or not. To begin the process of setting the levels, use the ‹/› Buttons to change the setting to ON. Any time you manually move the cursor out of the channel listings area of the screen, this setting will automatically change to OFF, ending the test tone. NOTE: Setting the channel levels while one surround mode is active does not necessarily carry over to all other modes. We recommend that after you have set the levels satisfactorily in one mode, you note the results and change to other surround modes. For those modes that don't reflect your level settings, you may either copy the settings you obtained as a short cut, or re-do the procedure to determine the correct settings for those surround modes. System Settings The AVR 145 offers several system settings that allow you to make the receiver easier to use rather than directly affecting performance. Most of these settings may be accessed from the SYSTEM SETUP menu, which is selected by pressing the OSD Button and navigating to the SYSTEM SETUP line of the MASTER MENU. Press the Set Button to display the submenu. Figure 68 - System Setup Menu Screen VFD FADE TIME OUT: Some people find the brightness of the AVR's front-panel display distracting during movies or listening sessions. It's possible to dim the front-panel display completely using the Dim function (see below). Alternatively, you may set the display to remain dark most of the time, lighting up only when a button is pressed or a remote command is received. This setting allows you to turn on this feature and program the amount of time the display remains lit before fading to dark. Select a time-out period of between 3 and 10 seconds, or select OFF if you prefer to leave the displays either on or dimmed at all times. VOLUME DEFAULT and DEFAULT VOL SET: These two settings are used together to program a volume level the AVR will always switch to when turned on. This feature avoids overtaxing the system in case the last user turned the volume very high. Press the OSD Button to remove the display from the screen so that you may adjust the volume to a desired level while a source is playing. Make a note of the number that appears in the display, and return to the SYSTEM SETUP menu. At the DEFAULT VOL SET line, select the desired volume setting, and activate the feature by setting VOLUME DEFAULT to ON. NOTE: Although volume is normally displayed 0.5dB increments, the default volume setting only allows whole numbers. SEMI OSD TIME OUT: At this line you may program the amount of time (2 to 5 seconds) the two-line semi-OSD on-screen messages remain, or you may deactivate the semi-OSD display altogether if you find it distracting. The same messages will continue to appear on the front panel of the receiver. FULL OSD TIME OUT: At this line you may program the amount of time (20, 30, 40 or 50 seconds) the full-OSD menus remain visible on screen. The full-OSD system may not be deactivated. DEFAULT SURR MODE: This setting determines how the AVR 145 will handle Dolby Digital and DTS sources. For the purposes of this setting, the "default surround mode" means the mode encoded in the program, such as Dolby Digital 5.1. With this setting ON, the receiver will always use the default surround mode in the program. When this setting is changed to OFF, the receiver will use the surround mode you selected the last time this type of audio stream was detected. As an example, the Default Surround Mode setting can be beneficial when used with Dolby Digital 2.0 programs, such as the ones broadcast on many channels of some cable and satellite television systems. If you would prefer to play these programs in the Dolby Pro Logic II Movie surround mode, then set DEFAULT SURR MODE to OFF, and select your desired surround mode the first time a Dolby Digital 2.0 program is played. Dolby Digital 5.1 programs will still be played in 5.1-channel mode. NOTE: For PCM and analog sources, the factory default surround mode is Logic 7 Music. In general, the receiver will use the surround mode selected the last time that type of signal was received. 42
-
 1
1 -
2
-
3
-
4
-
5
-
6
-
7
-
8
-
9
-
10
-
11
-
12
-
13
-
14
-
15
-
16
-
17
-
18
-
19
-
20
-
21
-
22
-
23
-
24
-
25
-
26
-
27
-
28
-
29
-
30
-
31
-
32
-
33
-
34
-
35
-
36
-
 37
37 -
 38
38 -
 39
39 -
 40
40 -
 41
41 -
 42
42 -
 43
43 -
 44
44 -
 45
45 -
 46
46 -
 47
47 -
48
-
49
-
50
-
51
-
52
-
53
-
54
-
55
-
56
-
57
-
58
-
59
-
60
-
61
-
62
-
63
 |
 |