Harman Kardon GPS-810NA Quick Start Guide - Page 11
Quick-Start Guide, Control Knob Button Operation, Mounting the Control Knob
 |
View all Harman Kardon GPS-810NA manuals
Add to My Manuals
Save this manual to your list of manuals |
Page 11 highlights
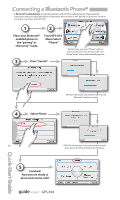
ENGLISH Mounting the Control Knob 1 Select Mounting Location 2 Install Battery Use a coin to remove the bottom cover. CR2032/DL2032 3 4 Mount Control Knob Base Attach Control Knob to Base Toward front of car Orient the base so that the arrow is facing the front of the car. UP You can either screw the base to the mounting location or use the supplied adhesive pad. If you use the adhesive pad, you must FIRST CLEAN the surface with the supplied alcohol cleaning pad. UP Push the knob down onto the base, and turn clockwise to lock it into place. The knob can be removed by turning the bottom counterclockwise. Control Knob Button Operation Rotate outer ring to move the highlight bar on the active screen If Left or Right button is held for 2 seconds, outer ring becomes Volume or Brightness adjustment Screen Dependent Button Function Press once for Back (Same as Left button on Screen) Press and hold for 2 seconds to adjust Volume Up/Down from outer ring Press once for Center menu bar item Press and hold for 2 seconds to suspend power or turn on Left Center Press once for Source (Same as Right button on Screen) Press and hold for 2 seconds to adjust Brightness from outer ring Press to select the highlighted menu item Right GPS-810 Quick-Start Guide 11
-
 1
1 -
2
-
3
-
4
-
5
-
 6
6 -
 7
7 -
 8
8 -
 9
9 -
 10
10 -
 11
11 -
 12
12 -
 13
13 -
 14
14 -
 15
15 -
 16
16
 |
 |
