Harman Kardon HD7600II Owners Manual - Page 9
receiver/preamplifier/integrated
 |
View all Harman Kardon HD7600II manuals
Add to My Manuals
Save this manual to your list of manuals |
Page 9 highlights
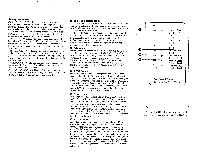
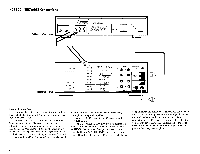
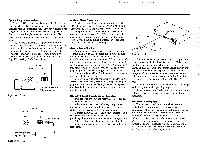
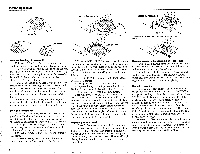
Optional Digital Connections The HD76OO also has two digital output jacks-one a single electrical RCA-type connector and the other a single connector for an optical fiber cable. If your preamplifier has a digital-to-analog decoder and can accept a digital signal from a compact disc player, you can connect your CD player to your preamplifier using one of these two digital jacks. Please note that using the digital outputs (either optical or co-axial) will bypass the internal Bit Stream D/A conversion circuitry and therefore miss one of the major benefits of this machine. The best use of these outputs is for direct connection to a digital recorder, a very high performance external D/A Converter, or a true Digital Signal Processing (DSP) Preamplifier. OUTPUT COAXIAL OPTICAL Digital Coaxial Connecton IR_ to amplifier or receiver digital coaxial part OUTPUT COAXIAL OPTICAL O C) remove dust cap 71 to amplifier or receiver F4H digital optical part Optional Direct Connection An alternative method of connecting your HD75OO/ HD7600 to your system is to connect its VARIABLE output directly to the INPUT connectors of a power amplifier. In this configuration, you would use the OUTPUT LEVEL control on the front panel of the CD player as your volume control, which in some systems may provide the purest possible sound quality during playback. Never connect fixed outputs directly to a power amp. General Connection Hints As you connect your compact disc player, carefully connect the plugs to the output jacks, being sure to push the plugs in all the way. Loose connection of a plug can cause hum or other intermittent noise. Take care to match the left and right plugs on the CD player with the left and right input jacks on the back of the receiver/preamplifier/ integrated amplifier. Common practice is to use the red plug as right, and the white, gray, or black plug as left. Do not wind the cables with the power cord; doing so may degrade the sound quality. When you have finished connecting your HD7500 or HD76OO to your receiver/preamplifier/integrated amplifier, plug the power cord of the CD player either into a power outlet on the back of another component, or into the power outlet in the wall. HD7500/HD7600 Remote Control Operation Two batteries are provided with your remote control. To load batteries 1. Locate the cover over the battery compartment on the back of the remote control. Remove the cover by sliding it in the direction of the embossed arrow. 2. Insert the two AA (1.5V/R6/UM3) batteries. Make sure you insert the batteries according to the + and polarity symbols at the bottom of the battery compartment. 3. Replace the cover of the battery compartment When you replace weak batteries, replace both at the same time. Photo Sensor 30° 23 feet 7m 30° Remote Control Unit The remote control operates within a 3O° angle of the remote sensor on the front panel of the unit. Make sure that the remote's front projection "lens" as well as the REMOTE SENSOR area on the front panel of the unit are kept free from dirt to ensure proper transmission and reception of the infrared beam. Also make sure that no objects (e.g., stereo cabinet doors, end tables) block the path from the remote control to the REMOTE SENSOR area. Avoid using the remote control near fluorescent lamps, as they may shorten its operating range. If your remote control will sit unused for a long period of time, remove the batteries to prevent damage from corrosion. Rear Panel Remote Jacks The remote control input jack allows remote control of this unit via a cable. This cable can be connected to the remote control output jack of another Harman Kardon product. Alternatively, it can be connected to an accessory device that converts infrared remote control signals into detected pulses. While all Harman Kardon products with remote control jacks are compatible with one another, not all accessory devices or other manufacturer's products are. However, it is safe to experiment. Digital Optical Connection 5
-
 1
1 -
2
-
3
-
 4
4 -
 5
5 -
 6
6 -
 7
7 -
 8
8 -
 9
9 -
 10
10 -
 11
11 -
 12
12 -
 13
13
 |
 |
