Harman Kardon HE 1000 Owners Manual - Page 2
Harman, Kardon, He1000a, Remote, General, Instructions, Installation
 |
View all Harman Kardon HE 1000 manuals
Add to My Manuals
Save this manual to your list of manuals |
Page 2 highlights
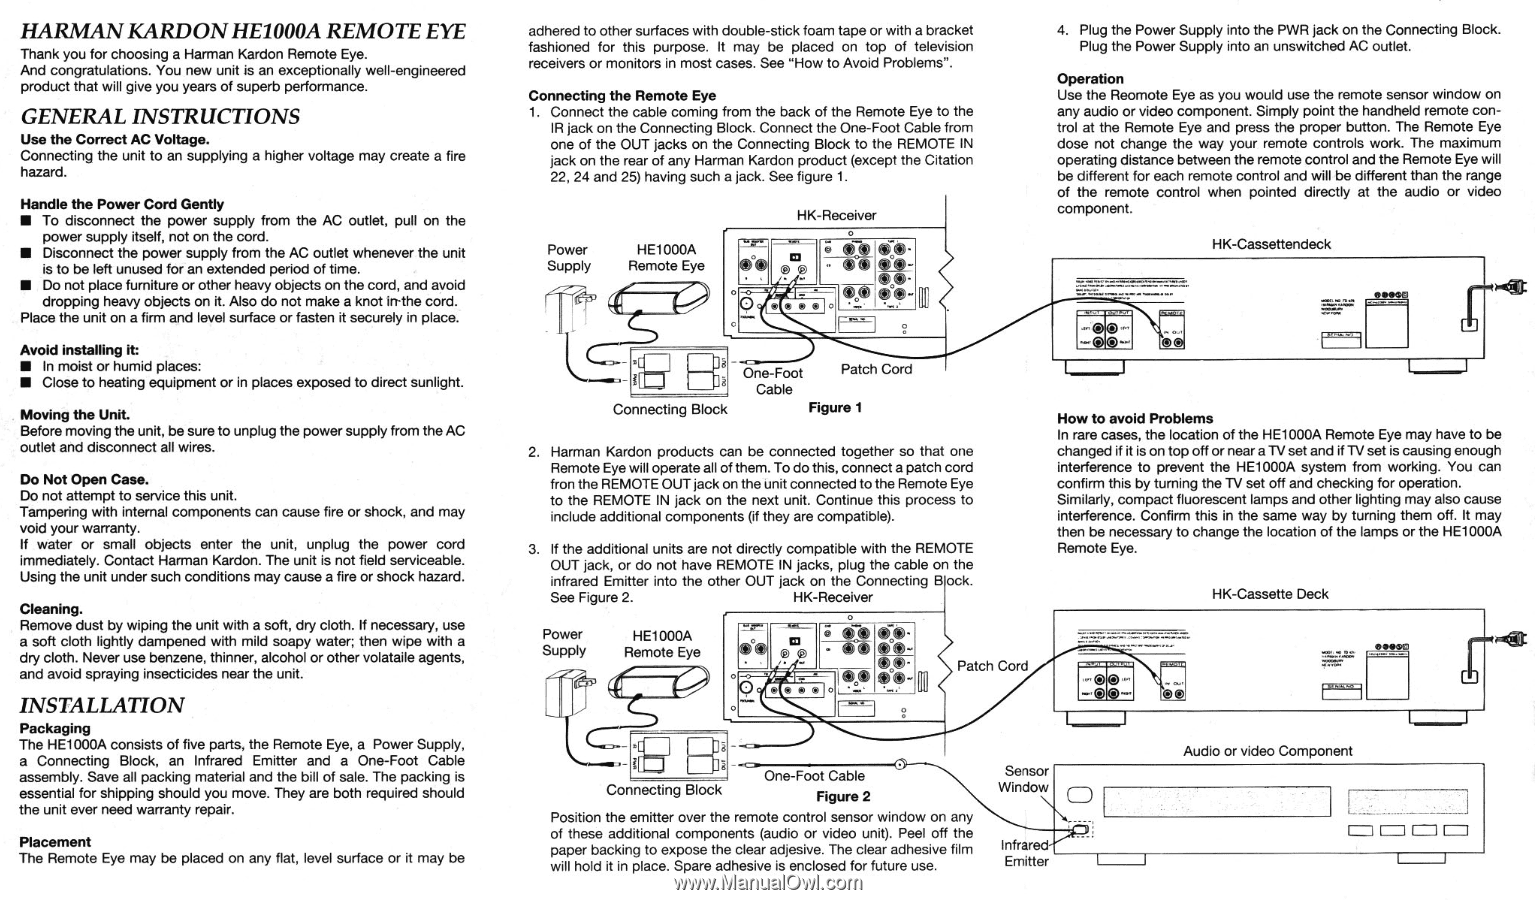
HARMAN KARDON HE1000A REMOTE EYE Thank you for choosing a Harman Kardon Remote Eye. And congratulations. You new unit is an exceptionally well-engineered product that will give you years of superb performance. GENERAL INSTRUCTIONS Use the Correct AC Voltage. Connecting the unit to an supplying a higher voltage may create a fire hazard. Handle the Power Cord Gently IN To disconnect the power supply from the AC outlet, pull on the power supply itself, not on the cord. ■ Disconnect the power supply from the AC outlet whenever the unit is to be left unused for an extended period of time. ■ Do not place furniture or other heavy objects on the cord, and avoid dropping heavy objects on it. Also do not make a knot irrthe cord. Place the unit on a firm and level surface or fasten it securely in place. Avoid installing it: • In moist or humid places: • Close to heating equipment or in places exposed to direct sunlight. Moving the Unit. Before moving the unit, be sure to unplug the power supply from the AC outlet and disconnect all wires. Do Not Open Case. Do not attempt to service this unit. Tampering with internal components can cause fire or shock, and may void your warranty. If water or small objects enter the unit, unplug the power cord immediately. Contact Harman Kardon. The unit is not field serviceable. Using the unit under such conditions may cause a fire or shock hazard. Cleaning. Remove dust by wiping the unit with a soft, dry cloth. If necessary, use a soft cloth lightly dampened with mild soapy water; then wipe with a dry cloth. Never use benzene, thinner, alcohol or other volataile agents, and avoid spraying insecticides near the unit. INSTALLATION Packaging The HE1000A consists of five parts, the Remote Eye, a Power Supply, a Connecting Block, an Infrared Emitter and a One-Foot Cable assembly. Save all packing material and the bill of sale. The packing is essential for shipping should you move. They are both required should the unit ever need warranty repair. Placement The Remote Eye may be placed on any flat, level surface or it may be adhered to other surfaces with double-stick foam tape or with a bracket fashioned for this purpose. It may be placed on top of television receivers or monitors in most cases. See "How to Avoid Problems". Connecting the Remote Eye 1. Connect the cable coming from the back of the Remote Eye to the IR jack on the Connecting Block. Connect the One-Foot Cable from one of the OUT jacks on the Connecting Block to the REMOTE IN jack on the rear of any Harman Kardon product (except the Citation 22, 24 and 25) having such a jack. See figure 1. Power Supply HE1000A Remote Eye HK-Receiver ® ® I_ 0. 0 0 0 0 O, 0.) 0 - 4. Plug the Power Supply into the PWR jack on the Connecting Block. Plug the Power Supply into an unswitched AC outlet. Operation Use the Reomote Eye as you would use the remote sensor window on any audio or video component. Simply point the handheld remote control at the Remote Eye and press the proper button. The Remote Eye dose not change the way your remote controls work. The maximum operating distance between the remote control and the Remote Eye will be different for each remote control and will be different than the range of the remote control when pointed directly at the audio or video component. HK-Cassettendeck .1•INV,0 I One-Foot Patch Cord Cable Connecting Block Figure 1 2. Harman Kardon products can be connected together so that one Remote Eye will operate all of them. To do this, connect a patch cord fron the REMOTE OUT jack on the unit connected to the Remote Eye to the REMOTE IN jack on the next unit. Continue this process to include additional components (if they are compatible). 3. If the additional units are not directly compatible with the REMOTE OUT jack, or do not have REMOTE IN jacks, plug the cable on the infrared Emitter into the other OUT jack on the Connecting B ock. See Figure 2. HK-Receiver Power Supply HE1000A Remote Eye 0 o O lf - so 0 @0 0 r Patch Cord Ma • 0 How to avoid Problems In rare cases, the location of the HE1000A Remote Eye may have to be changed if it is on top off or near a TV set and if TV set is causing enough interference to prevent the HE1000A system from working. You can confirm this by turning the TV set off and checking for operation. Similarly, compact fluorescent lamps and other lighting may also cause interference. Confirm this in the same way by turning them off. It may then be necessary to change the location of the lamps or the HE1000A Remote Eye. HK-Cassette Deck 0® Connecting Block One-Foot Cable Figure 2 Position the emitter over the remote control sensor window on any of these additional components (audio or video unit). Peel off the paper backing to expose the clear adjesive. The clear adhesive film will hold it in place. Spare adhesive is enclosed for future use. Sensor Window n Infrared Emitter Audio or video Component = O0 O
-
 1
1 -
 2
2
 |
 |