Harman Kardon HK250 Owners Manual - Page 2
two speakers
 |
View all Harman Kardon HK250 manuals
Add to My Manuals
Save this manual to your list of manuals |
Page 2 highlights
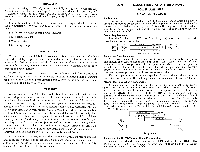
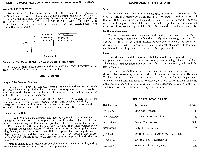
UNPACKING After unpacking the HK250, inspect it carefully for signs of transit damage. The unit was subjected to many inspections and tests prior to final packing, and it, therefore, should be in perfect condition. If damage is visible, notify your dealer at once. If the unit was shipped to you, notify the transportation company without delay. Check the contents of the carton thoroughly and inspect the folds of the packing material before discarding it. Your package should contain the following items: 1 Model HK250 Stereophonic Power Amplifier. 1 Instruction Booklet 1 Warranty Card 1 Mounting Template. WARRANTY POLICY We urge you to completely fill in your warranty card and mail it to the factory without delay to protect your rights under warranty. The warranty cards are carefully filed for reference and should you require information on the use of this high fidelity unit, or repair service, we will he able to immediately identify your set and reply quickly. NOTE: It is necessary to receive factory authorization before returning a set for warranty repair either to the factory or to an authorized station. Repairs are to be returned on an Express Prepaid basis. A letter describing the exact difficulty must be enclosed with the unit. WARRANTY We warrant each Model HK250 to be free from defects in material and workmanship under normal use and service, and in accordance with the conditions herein below set forth, for a period of 1 year from date of delivery to the original purchaser, and agree to replace or repair any part or parts, with the exception of tubes which are under the manufacturer's 90 day warranty, returned to us within said 1 year, with transportation prepaid and which our examination shall disclose to our satisfaction to have been thus defective. This warranty does not include free labor, nor is it applicable to any instrument which shall have been repaired or altered in any way so as in our judgment to affect its stability or reliability nor which has been subject to neglect, misuse, abuse, negligence or accident nor which has had the serial number altered, effaced, or removed. Neither shall this warranty apply to any instrument which has been connected otherwise than in accordance with instructions furnished by us. This warranty is expressly in lieu of all other warranties, express or implied, and of all other obligations or liability on our part, and we neither assume nor authorize any representative or other person to assume for us any other liability in connection with the sale of this instrument. USIN, MODEL HK250 AS A STEREOPHONIC POWER AMPLIFIER INSTALLATION PROCEDURE Ventilation: The unit is well ventilated in itself, but sufficient space must be allowed around it to permit proper air flow. Install the amplifier in a manner to allow for unrestricted circulation. Do not place objects on the cage or in the immediate vicinity of the instrument. Reducing the air flow will result in sharply reduced component and tube life. Power Requirements: • Plug the AC line cord (117 volts, 50 or 60 cycles) into the convenience AC receptacle on your preamplifier. INPUT *0 A RIGHT LEFT RIGHT SPEAKER 0 O0 OO G 4 5 16 32 LEFT SPEAKER OOOOO G 4 8 16 32 44- 3AG II7VAG 60-1, FUSE ISOW REAR PANEL MODEL HK250 Connecting Your Speakers: Your two speakers should be matched if possible to obtain optimum results and should be placed approximately 8 to 15 feet apart against one wall of your listening room. Corner placement is also quite acceptable. Facing the speakers straight out or slanting them slightly will depend on your room size, acoustic effect and where you will be seated for listening. It may be necessary to experiment with speaker placement until best results are obtained. Use any type wire to connect your speakers. Lamp cord is excellent and may be easily dressed around the molding for an inconspicuous and neat installation. Normal Stereo Speaker Arrangement: Connect one lead from the left speaker to the 16 ohm terminal on the LEFT SPEAKER OUTPUT STRIP and the other lead to the G terminal on the same strip. Now connect one of the leads from the right speaker to the 16 ohm terminal on the RIGHT SPEAKER OUTPUT STRIP and the other lead to the G terminal on the same strip. (See Diagram A) The output terminals used should be those marked with the same impedance as the speakers. The illustration is for 16 ohm speakers. If you are using 8 ohm speakers connect to the 8 ohm SPEAKER output terminals rather than to the 16 ohm terminals. NOTE: For this method of operation the PARALLEL-SEPARATE switch must remain in the SEPARATE position. !SR LEFT SPEAKER RIGHT SPEAKER OO O 4 16 32 LEFT SPEAKER OO O G 4 8 16 32 1611 RIGHT SPEAKER Diagram A Connecting the HK250 To Your Stereo Preamplifiers: Connect two shielded leads, one to the LEFT and one to the RIGHT IN- PUTS on the HK250. Now connect the other ends of these leads to the Audio Outputs on your stereo preamplifier.
-
 1
1 -
 2
2 -
 3
3 -
 4
4 -
 5
5
 |
 |
