Harman Kardon HKTS 30 Satellite Owners Manual - Page 4
that your receiver or amplifier is turned OFF - speakers
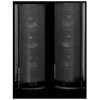 |
View all Harman Kardon HKTS 30 Satellite manuals
Add to My Manuals
Save this manual to your list of manuals |
Page 4 highlights
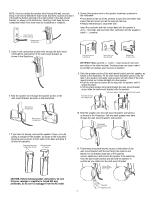
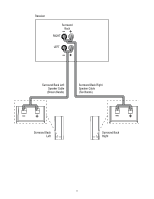
NOTE: If you're running the speaker wire through the wall, you can bring it out directly behind the wall-mount bracket's location and insert it through the bottom opening in the wall portion of the wall-mount bracket, as shown in the illustration. Inserting it will keep the wire completely hidden from view once the installation is complete. Insert wire into bottom opening Bring wire out through here 8. Connect the speaker wire to the speaker terminals, as shown in the illustration: • Press down on the top of the terminal to open the connection hole. • Insert the wire's bare end all the way into the hole. • Release the terminal to secure the wire. Insert the conductor with the colored band into the speaker's red ( + ) terminal, and insert the other conductor into the speaker's black ( - ) terminal. + - 5. If you're not running the speaker wire through the wall, insert it through the wall portion of the wall-mount bracket, as shown in the illustration. 6. Pass the speaker wire through the speaker portion of the wall-mount bracket, as shown in the illustration. Push down on cap to open hole Insert bare wire into open hole Release cap to secure wire IMPORTANT: Make sure the ( + ) and ( - ) bare wires do not touch each other or the other terminal. Touching wires can cause a short circuit that can damage your receiver or amplifier. 9. Slide the speaker portion of the wall-mount bracket onto the speaker, as shown in the illustration. Fit the wall-mount bracket's grooves onto the rails in the speaker, and apply even pressure on both sides of the wallmount bracket so it slides straight onto the speaker. • Push the wall-mount bracket all the way onto the speaker until it snaps into place. • Pull any slack speaker wire back through the wall-mount bracket as you slide the wall-mount bracket onto the speaker. Push down evenly on both sides of wall-mount bracket Fit bracket grooves onto speaker rails Bring wire in through here Bring wire out through here 7. If you have not already removed the speaker's base, do so by pulling it straight off the speaker, as shown in the illustration. Applying even pressure to both sides of the base will allow it to slide off smoothly. Apply pressure evenly to both sides of base Lift base straight off speaker 10. Slide the speaker onto the wall-mount bracket's wall section, as shown in the illustration. Pull any slack speaker wire back through the wall-mount bracket's wall section. Slide speaker onto wall-mount bracket 11. Fit the metal stop plate into the recess on the bottom of the wall-mount bracket with the pad facing the bracket, and fasten it to the bracket using two of the supplied screws. Fastening it will prevent the speaker from detaching from the wall-mount bracket and will hold the speaker in position as you rotate it on the wall-mount bracket. CAUTION: Before making speaker connections, be sure that your receiver or amplifier is turned OFF and, preferably, its AC cord is unplugged from the AC outlet. 4 Stop plate Supplied screws
-
 1
1 -
 2
2 -
 3
3 -
 4
4 -
 5
5 -
 6
6 -
 7
7 -
 8
8
 |
 |
