Harman Kardon TD4400 Owners Manual - Page 7
Operating, Instructions
 |
View all Harman Kardon TD4400 manuals
Add to My Manuals
Save this manual to your list of manuals |
Page 7 highlights
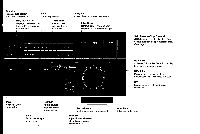
OPERATING INSTRUCTIONS Inserting a Tape 1. Check cassette tape for excessive slack. If necessary, insert a pencil into one of the cassette hubs and rotate to take up slack. 2. Press Eject. 3. Insert cassette, tape side down, and close compartment door. NOTE: The cassette deck determines the type of tape in use and sets Bias/ Equalization circuitry automatically. Playing a Tape 1. If tape was recorded with Dolby Noise Reduction, press Dolby NR button. 00 and "B" or "C" will appear on the display panel. Choose B or C by pressing the B/C button. 2. Press ► to begin play. Previewing a Tape (TD4400 only) 1. Press Intro Scan. Cassette deck locates the beginning of recorded material and plays for 15 seconds. Tape is then advanced to the beginning of each successive recorded segment, or track, playing for 15 seconds before automatically advancing to the next track. 2. To stop Intro Scan, press ■ (Stop). Or, press ► during any 15-second play segment, and tape will continue to play. Locating Places on a Tape 1. (TD4400 only.) To move quickly to the beginning of any desired selection, use the Skip reverse and Skip Forward buttons (IN and ►N at upper right corner of the deck). a. Pressing IN rewinds the tape to the beginning of the current selection. "P 00" is displayed to indicate this selection. b . To locate the beginning of a previous selection, repeat pressing IN . Display shows "P-01," "P02," "P-03," etc., to indicate first, second, third selection previous to the original selection. c. To locate the beginning of the selection following the original selection, press ►N "P 01" is displayed. Continue pressing ►►I to locate subsequent selections (designated "P 02," "P 03," etc.). 2. Use the Counter. The Linear Time Counter indicates approximate tape position in minutes and seconds. Press Counter Reset at the start of a cassette and/or to identify any desired point on the tape. (Elapsed time is maintained in Fast Forward and Rewind.) When counter is reset to 00:00 at the beginning of a cassette, the approximate time remaining can be determined by subtracting the counter reading from the total tape time. The Linear Timer Counter accuracy is typically within 1 minute of the tape's actual running time. Recording a Tape 1. Turn Bias Fine Trim knob to middle position or to previously determined proper position for this tape (refer to following section for details). 2. Press the Dolby NR button to turn Dolby circuitry on/off, and press B/C button to select Dolby B or C as follows: a. To record a tape without Dolby Noise Reduction, turn the Dolby NR switch off. b. To record a tape with Dolby Noise Reduction, turn the Dolby switch on, and select Dolby B or C with the B/C switch. c. When recording with Dolby Noise Reduction, consider the equipment on which you will play your tape. If playback equipment is not equipped for Dolby, turn the Dolby switch Off. If it s_ equipped for Dolby, turn the Dolby switch On; then select B if playback device is equipped only for Dolby B; otherwise select C. 7
-
 1
1 -
 2
2 -
 3
3 -
 4
4 -
 5
5 -
 6
6 -
 7
7 -
 8
8 -
 9
9 -
 10
10 -
 11
11 -
 12
12 -
13
 |
 |
