Hayward AquaVac 500 Robotic Cleaner AquaVac 500 - Page 7
General Operating Instructions
 |
View all Hayward AquaVac 500 Robotic Cleaner manuals
Add to My Manuals
Save this manual to your list of manuals |
Page 7 highlights
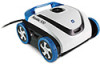
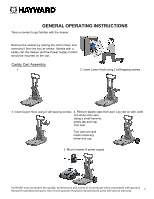
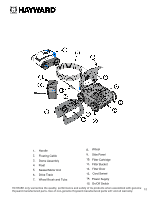
GENERAL OPERATING INSTRUCTIONS Take a moment to get familiar with the cleaner. Remove the cleaner by placing the carton down and removing it from the box as shown. Models with a caddy cart the cleaner and the Power Supply Control should be mounted on the cart. Caddy Cart Assembly 1. 2. Insert Lower Hook using 2 self-tapping screws 3. Insert Upper Hook using 2 self-tapping screws 4. Remove plastic caps from axel. Lay cart on side, slide one wheel onto axel. Using a small hammer, gently tap axel cap onto axel. Turn cart over and install remaining wheel and cap. 5. Mount cleaner & power supply HAYWARD only warranties the quality, performance and safety of its products when assembled with genuine Hayward manufactured parts. Use of non-genuine Hayward manufactured parts will void all warranty. 7
-
 1
1 -
 2
2 -
 3
3 -
 4
4 -
 5
5 -
 6
6 -
 7
7 -
 8
8 -
 9
9 -
 10
10 -
 11
11 -
 12
12 -
13
-
14
-
15
-
16
-
17
-
18
-
19
-
20
-
21
-
22
-
23
-
24
-
25
-
26
-
27
-
28
-
29
-
30
-
31
-
32
-
33
-
34
-
35
-
36
-
37
-
38
-
39
-
40
-
41
-
42
-
43
-
44
-
45
-
46
 |
 |
