Hayward Micro Star-Clear C2001540LS Micro Star Clear Filters - Page 2
Filtering, Clean/replace Cartridge - cartridge filter system
 |
View all Hayward Micro Star-Clear manuals
Add to My Manuals
Save this manual to your list of manuals |
Page 2 highlights
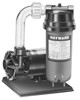
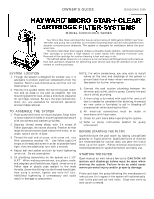
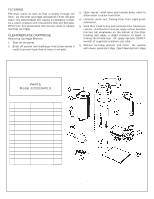
FILTERING Filtration starts as soon as flow is steady through the filter. As the filter cartridge removes dirt from the pool water, the accumulated dirt causes a resistance to flow. As a result, pressure will rise and the flow will decrease. When flow decreases below desired rate, clean or replace the filter cartridge. CLEAN/REPLACE CARTRIDGE Removing Cartridge Element 1. Shut off the pump. 2. Block off suction and discharge lines (close valves if used) to prevent back flow of water from pool. 3. Open top air relief valve and remove drain valve to allow water to drain from filter. 4. Unscrew union nut, freeing filter from rigid union connection. 5. Hold filter head firmly and unscrew filter housing to remove. If difficult to unscrew, apply a lever between the two tab extensions on the bottom of the filter housing and apply a slight pressure to assist in freeing the thread seal. Or, apply optional S200KT wrench (if supplied) to bottom side tabs. 6. Remove cartridge element and clean. Or, replace with clean, spare cartridge. (See Cleaning Cartridge) PARTS Model C2001540LS REF. NO PART NO. DESCRIPTION 1 CX120AA Filter Head 2 CX120D O-Ring 3 CX200RE Cartridge Element 20 sq. ft. 4 CX120B Filter Body Housing 5 ECX1321A Air Relief Valve with O-Ring 6 SPX1485C Gasket 7 SPX14858PAK Threaded Elbow Union Assembly 8 SP1540CLS 9 SPX1500WA Power-Flo LX Pump 6 Ft. Cord Set 10 ECX12891 Mounting Base 11 ECX1108 12 ECX1109 Mounting Screw Washer 13 S200KT Wrench Tool for Body (optional) NO. REQ'D. 1 1 1 1 2 1 1 1 1 1 2 2 --- NOTE; ANSI/NSPI-4 Article V, standard for above-ground and on-ground pools, advises that components such as the filtration system, pumps and heater be positioned so as to prevent their being used as a means of access to the pool by young children.
-
 1
1 -
 2
2 -
 3
3 -
 4
4
 |
 |
