Hayward Perflex Perflex EC40 - Page 3
Proceed as in STARTING THE FILTER
 |
View all Hayward Perflex manuals
Add to My Manuals
Save this manual to your list of manuals |
Page 3 highlights
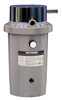
Screw the fitting into the thread hand tight; then, using a wrench, tighten one more full turn. Additional tightening is unnecessary and could result in broken or damaged fittings. 4. Refer to the diagrams for suggested valving. 5. Connect the pool suction plumbing between the skimmer, pool outlet, etc., and the pump. 6. Install the pool return plumbing. 7. A drain plug, with gasket, is furnished with each filter and is all that is needed for complete filter draining. If desired however, drain piping may be extended from the filter by using an appropriate length of 1 1/2" pipe. Piping must slope away from the filter so the tank can drain by gravity. DO NOT use roll-flat type hose for drain piping. BEFORE STARTING THE FILTER 1. Obtain a supply of operating chemicals, D.E., and a pool test kit. Use only the swimming pool grades of D.E., such as: CELATOM Eagle Pitcher Industries, Inc. AQUA-CEL Johns-Manville Products Corporation DICALITE 4200 Grefco, Inc. WITCO Witco Corporation 2. Superchlorinate the pool water by adding unstabilized granular or liquid chlorine. Stabilized forms of chlorine are recommended for normal daily use after the initial clean up of the water. Follow chemical manufacturer's recommendations for superchlorination and daily use. STARTING THE FILTER Close the filter drain and the vent valve. Caution: All suction and discharge valves must be open when starting the pump. Failure to do so could cause severe personal injury and/or property damage. Prime and start the pump following the manufacturer's instructions. Air trapped in the system will automatically vent to the pool. When there is a steady flow of water returning to the pool, the filter is ready for precoating. DO NOT operate the filter for more than one minute without the precoat charge. PRECOATING Scoop 4 lbs. (1.8 kgs.) of diatomite into the system through the skimmer as fast as the plumbing will take it. Note and record the pressure gauge reading after the diatomite has been added. This is the "precoat pressure." FILTERING Filtration starts as soon as the filter has been precoated. As the filter removes dirt from the pool water, the accumulated dirt causes a resistance to flow. As a result, the gauge pressure will rise and flow will decrease. When the pressure rises 7-10 psi (.49-.70 Bar) above the precoat pressure, regenerate the filter. REGENERATION (Extending the Cycle) Stop the pump. Move the bump handle down slowly, then up briskly. Repeat 3 times. Restart the pump and filtration will resume at near the original flow and pressure. After each regeneration, and until the filter is cleaned, there may be a slight increase in the starting pressure. This is the result of dirt accumulating within the filter and is completely normal. CLEANING Cleaning is recommended when the gauge pressure rises more than 10 psi (.70 Bar) in less than a 24 hour period or when cloudy water returns to the pool for more than 30 seconds after regeneration. To clean, first stop the pump, then move the bump handle down slowly, then up briskly. Repeat 8 times. Open the filter drain and open the vent valve (Note: if the filter is installed below the pool water line, close the suction and return valves) and allow water and dirt to empty completely. After the filter has drained, and with the drain still open, run the pump for a few seconds to flush out any dirt remaining in the bottom of the filter. (Note: If the filter is installed below the pool water line, opening the suction valve for a few seconds with the pump off will adequately flush the unit.) Close the filter drain and the vent valve. Open the suction and return valves (when used). Start the pump and let the filter fill with water and repeat the CLEANING procedure. This completes the cleaning phase. The filter is now ready for recharging. Proceed as in STARTING THE FILTER and PRECOATING. VACUUMING Vacuuming can be performed directly into the filter whenever needed. For fastest results, regenerate the filter before and after each vacuuming operation. TO CHANGE BUMP HANDLE POSITION 1. Remove the bump handle grip. Carefully pry the bump cover from the head retaining groove and slide the cover off the handle. 2. Using a drift (or 10 penny nail), tap the pivot pin out of the filter head anchor point, freeing the end of the handle. 3. Rotate the bump handle to the alternate position and align the handle and the head anchor holes. Tap the pivot pin in place. 4. Reinstall the bump cover and grip. PREVENTIVE MAINTENANCE While Perflex filters are basically resistant to the difficulties often encountered as a result of chemical build-up in swimming pools, it is important to keep in mind that the mineral content in a pool increases every day as a result of the chemicals added and the normal water evaporation process. If the concentration of minerals is allowed to get too high, the minerals will form deposits on the Flex-Tubes inside the filter, and will eventually result in shortened filter cycles. To guard against this, a yearly chemical cleaning (soaking) of the Flex-Tube assembly is suggested. Use commercially available 20% muriatic acid added to water in 1 to 1 ratio; or use other commercial filter element cleaner mixed according to the package instructions. Use a plastic container and take extreme caution when handling cleaning agents as they can be harmful to the eyes, skin and clothing. After cleaning, thoroughly flush all affected parts with cold water.
-
 1
1 -
 2
2 -
 3
3 -
 4
4
 |
 |