Hayward S200 Series S200 Sand Filter - Page 3
BACKWASH under Filter Control Valve Functions. - pool filters
 |
View all Hayward S200 Series manuals
Add to My Manuals
Save this manual to your list of manuals |
Page 3 highlights
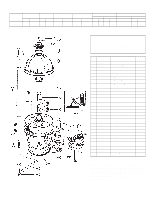
3. Assemble pump and pump mounting base (if supplied) to the filter according to instructions packed with the base. 4. Loading sand media. Filter sand media is loaded through the top opening of the filter. a. Remove the top diffuser from the internal diffuser elbow pipe and place flexible automatic air relief tube to the side, out of the way, inside the tank. b. Cap the internal diffuser elbow pipe with sand shield provided to prevent sand from entering it. c. It is good practice to fill tank approximately 1/2 way with water to provide a cushioning effect when the filter sand is poured in. This helps protect the underdrain laterals from excessive shock. (Be sure the drain cap is securely in place on drain pipe. Apply wrench to flats on pipe when tightening cap.) Note: Check to confirm all laterals are in the down position before loading with sand. (See Figure A on Page 2.) d. Carefully pour in correct amount and grade of filter sand, as specified. Sand surface should be leveled and should come to about the center of the flange of the filter tank. Use no more than the recommended amount of sand. e. Remove sand shield from internal diffuser elbow pipe. f. Replace diffuser on internal diffuser elbow pipe, positioning automatic air relief tube through the hole provided in the diffuser. Align tab on diffuser with slot in pipe and gently press down. g. Carefully clean off top seal O-ring and screw access dome, with manual air relief, securely into the filter head. 5. Connect pump to control valve opening marked PUMP according to instructions. Make return to pool pipe connection to control valve opening marked RETURN and complete other necessary plumbing connections, suction lines to pump, waste, etc. 6. Make electrical connections to pump per pump instructions. 7. To prevent water leakage, be sure drain cap is securely in place and all pipe connections are tight. INITIAL START-UP OF FILTER 1. Be sure correct amount of filter sand media is in tank and that all connections have been made and are secure. 2. Depress Vari-Flo control valve handle and rotate to BACKWASH* position. (To prevent damage to control valve seal, always depress handle before turning.) 3. Prime and start pump according to pump instructions (be sure all suction and return lines are open), allowing the filter tank to fill with water. CAUTION: All suction and discharge valves must be open when starting the system. Failure to do so could cause severe personal injury and/or property damage. Once water flow is steady out the waste line, run the pump for at least 2 minutes. This initial backwashing of the filter is recommended to remove any impurities or fine sand particles in the sand media. 4. Turn pump off and set valve to RINSE position. Start pump and operate until water in sight glass is clear-about 1/2 to 1 minute. Turn pump off, set valve to FILTER position and restart pump. Your filter is now operating in the normal filter mode, filtering particles from the pool water. 5. Adjust pool suction and return valves to achieve desired flow. Check system and filter for water leaks and tighten connections, bolts, nuts, as required. 6. Note the initial pressure gauge reading when the filter is clean. It will vary from pool to pool depending upon the pump and general piping system.) As the filter removes dirt and impurities from the pool water, the accumulation in the filter will cause the pressure to rise and flow to diminish. When the pressure gauge reading is 6-8 PSI (0.41-0.55 BAR) higher than the initial "clean" pressure you noted, it is time to backwash (clean) the filter (see BACKWASH under Filter Control Valve Functions). NOTE: During initial clean-up of the pool water it may be necessary to backwash frequently due to the unusually heavy initial dirt load in the water. IMPORTANT: To prevent unnecessary strain on piping system and valving, always shut off pump before switching Filter Control Valve positions. To prevent damage to the pump and filter and for proper operation of the system, clean pump strainer and skimmer baskets regularly. FILTER CONTROL VALVE FUNCTIONS FILTER-Set valve to FILTER for normal filtering. Also use for regular vacuuming. BACKWASH-For cleaning filter. When filter pressure gauge rises 6-8 PSI (0.41-0.55 BAR) above start-up (clean pressure): Stop the pump, set valve to BACKWASH. Start pump and backwash approximately 2 minutes or less depending on dirt accumulation until water in sight glass is clear. Proceed to RINSE. RINSE-After backwashing, with pump off, set valve to RINSE. Start pump and operate for about 1/2 to 1 minute. This ensures that all dirty water from backwashing is rinsed out of the filter to waste, preventing possible return to the pool. Stop pump, set valve to FILTER, and start pump for normal filtering. WASTE-To bypass filter for draining or lowering water level and for vacuuming heavy debris directly to waste. RECIRCULATE-Water is recirculated through the pool system, bypassing the filter. CLOSED-Shuts off flow from pump to filter. VACUUMING-Vacuuming can be performed directly into the filter. When vacuuming heavy debris loads, set valve to WASTE position to bypass the filter and vacuum directly out to waste. *NOTE: For new concrete or gunite pools, or where there is a large amount of plaster dust or debris-start filter in FILTER position (not BACKWASH) to prevent clogging of underdrain laterals.
-
 1
1 -
 2
2 -
 3
3 -
 4
4
 |
 |