HealthRider C550e Elliptical English Manual - Page 8
Wire Harness 73
 |
View all HealthRider C550e Elliptical manuals
Add to My Manuals
Save this manual to your list of manuals |
Page 8 highlights
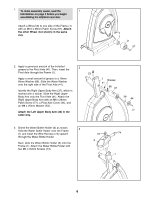
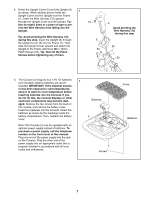
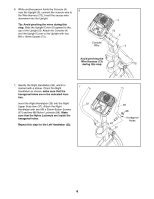
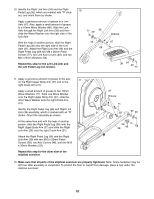
6. While another person holds the Console (4) 6 near the Upright (3), connect the console wire to the Wire Harness (73). Insert the excess wire downward into the Upright. Tip: Avoid pinching the wires during this step. Slide the Upright Cover (5) upward to the top of the Upright (3). Attach the Console (4) and the Upright Cover to the Upright with four M4 x 19mm Screws (75). Console Wire 4 73 3 5 Avoid pinching the Wire Harness (73) during this step 75 7. Identify the Right Handlebar (36), which is marked with a sticker. Orient the Right Handlebar as shown; make sure that the hexagonal holes are in the indicated location. Insert the Right Handlebar (36) into the Right Upper Body Arm (37). Attach the Right Handlebar with two M8 x 35mm Button Screws (67) and two M8 Nylon Locknuts (68). Make sure that the Nylon Locknuts are inside the hexagonal holes. Repeat this step for the Left Handlebar (22). 7 22 67 37 36 68 Hexagonal Holes 8
-
 1
1 -
2
-
 3
3 -
 4
4 -
 5
5 -
 6
6 -
 7
7 -
 8
8 -
 9
9 -
 10
10 -
 11
11 -
 12
12 -
 13
13 -
14
-
15
-
16
-
17
-
18
-
19
-
20
-
21
-
22
-
23
-
24
 |
 |
