HealthRider Health Rider T90 English Manual
HealthRider Health Rider T90 Manual
 |
View all HealthRider Health Rider T90 manuals
Add to My Manuals
Save this manual to your list of manuals |
HealthRider Health Rider T90 manual content summary:
- HealthRider Health Rider T90 | English Manual - Page 1
QUESTIONS? If you have questions, or if there are missing parts, we will guarantee complete satisfaction through direct assistance from our and instructions in this manual before using this equipment. Save this manual for future reference. USER'S MANUAL Visit our website at www.healthrider.com new - HealthRider Health Rider T90 | English Manual - Page 2
9 HOW TO FOLD AND MOVE THE TREADMILL 25 TROUBLE-SHOOTING 26 CONDITIONING GUIDELINES 29 PART LIST 30 ORDERING REPLACEMENT PARTS Back Cover LIMITED WARRANTY Back Cover Note: An EXPLODED DRAWING is attached in the center of this manual. HealthRider is a registered trademark of ICON Health - HealthRider Health Rider T90 | English Manual - Page 3
of this treadmill are adequately informed of all warnings and precautions. 2. Use the treadmill only as described in this manual. 12. Failure see your local HealthRider dealer or call 1-800-8063651 and order part number 146148. 20. Do not attempt to raise, lower, or move the treadmill until it - HealthRider Health Rider T90 | English Manual - Page 4
de- scribed in this manual. Never remove the motor hood unless instructed to do so by an authorized service representative. Servicing other than the procedures in this manual should be performed by an authorized service representative only. 29. This treadmill is intended for in-home - HealthRider Health Rider T90 | English Manual - Page 5
age of 35 or persons with pre-existing health problems. Read all instructions before using. ICON assumes no responsibility for personal THESE INSTRUCTIONS The decal shown at the right has been placed on your treadmill. If the decal is missing or illegible, please call our Customer Service Department - HealthRider Health Rider T90 | English Manual - Page 6
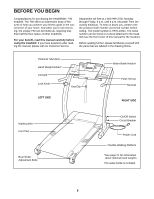
're not exercising, the unique T90 can be folded up, requiring less than half the floor space of other treadmills. For your benefit, read this manual carefully before using the treadmill. If you have questions after reading the manual, please call our Customer Service Department toll-free at 1-800 - HealthRider Health Rider T90 | English Manual - Page 7
shown. 1 Refer to the inset drawing. Insert one of the Extension Legs (88) into the treadmill as shown. Make sure that the Extension Leg is turned so the Thick Base Pad (90) 110 thread in the Bolt. Have another person support the Handrails as you complete the remaining steps. 89 110 111 7 - HealthRider Health Rider T90 | English Manual - Page 8
must be properly inserted, and the VCR must be playing. Refer to your VCR user's manual for operating instructions. 109 75 Ohm Antenna Terminal 8 . Make sure that all parts are tightened before you use the treadmill. Keep the included allen wrench in a secure place. The allen wrench is used to - HealthRider Health Rider T90 | English Manual - Page 9
. To decrease the possibility of 2 your treadmill being damaged, always use a surge suppressor with your treadmill (see drawing 1 at the right). To purchase a surge suppressor, see your local HealthRider dealer or call 1-800-806-3651 and order part number 146148. Grounding Pin Grounded Outlet - HealthRider Health Rider T90 | English Manual - Page 10
in the Time/Pace display. If you have connected a CATV cable to the treadmill, cAbL should be selected. If you have connected an antenna, Air should be area have been set into memory, you can erase unwanted channels or manually add channels. To erase a channel, first press the Channel buttons until - HealthRider Health Rider T90 | English Manual - Page 11
antenna and lead-in wiring before connecting the antenna. Any service center can explain the various outdoor antennas available. Combination VHF/ 300 to 75 ohm adapter or the VHF cable from the antenna terminal on the treadmill. (See assembly drawing 7 on page 8 to find the location of the terminal - HealthRider Health Rider T90 | English Manual - Page 12
measurement, refer to THE INFORMATION MODE/ DEMO MODE on page 21. Note: For simplicity, all instructions in this manual refer to miles. Incline/Distance display-This display shows the incline level of the treadmill and the distance that you have walked or run. The display will change from one number - HealthRider Health Rider T90 | English Manual - Page 13
one of the eight preset programs. When the key is inserted, the manual mode will be selected. To select one of the preset programs, press the example, the upper left profile shows that the speed and incline of the treadmill will gradually increase during the first half of that program, and then - HealthRider Health Rider T90 | English Manual - Page 14
override the setting by pressing the Speed or Incline buttons on the console. Note: If you manually override the speed or incline setting for the current segment, when the segment ends the treadmill will automatically adjust to the speed and incline settings for the next segment. To stop the - HealthRider Health Rider T90 | English Manual - Page 15
2 Select one of the custom programs. When the key is inserted, the manual mode will be selected. To select one of the custom programs, press the to start the program. A moment after the button is pressed, the treadmill will automatically adjust to the first speed and incline settings for the program. - HealthRider Health Rider T90 | English Manual - Page 16
: If your CD player has separate LINE OUT and PHONES jacks, see instruction A below. If your CD player has only one jack, see instruction B. A. Plug one end of the audio cable into the jack on the front of the treadmill near the power cord. Plug the other end of the cable into the - HealthRider Health Rider T90 | English Manual - Page 17
CONNECT YOUR COMPUTER Note: If your computer has a 3.5mm LINE OUT jack, see instruction A. If your computer has only a PHONES jack, see instruction B. A. Plug one end of the audio cable into the jack on the front of the treadmill near the power cord. Plug the other end of the cable into the LINE - HealthRider Health Rider T90 | English Manual - Page 18
iFIT.com mode. When the key is inserted, the manual mode will be selected. To use an iFIT.com CD guiding you through your workout. Simply follow your personal trainer's instructions. Note: If the Time/Pace display is flashing, press the Start button or the Speed v button on the console. The treadmill - HealthRider Health Rider T90 | English Manual - Page 19
or incline settings are too high or too low, you can manually override the settings at any time with the Speed or Incline buttons the key and go to step 1 on page 18. Note: If the speed or incline of the treadmill does not change when a "chirp" is heard: • Make sure that the iFIT.com indicator is - HealthRider Health Rider T90 | English Manual - Page 20
an internet connection and an internet service provider. A list of specific system When the key is inserted, the manual mode will be selected. To use on-line instructions for using a program. 6 Follow the on-line instructions to start and/or the incline of the treadmill is about to change. CAUTION: - HealthRider Health Rider T90 | English Manual - Page 21
MODE/DEMO MODE THE OPTIONAL CHEST PULSE SENSOR The console features an information mode that keeps track of the total number of hours that the treadmill has been operated and the total number of miles that the walking belt has moved. The information mode also allows you to switch the console - HealthRider Health Rider T90 | English Manual - Page 22
indicators on the console will light. To use the manual mode of the console, follow the steps beginning 20. To operate the personal television, follow the instructions beginning on page 22. IMPORTANT: For the to the 75 ohm antenna terminal on the treadmill. If you are using an antenna, it - HealthRider Health Rider T90 | English Manual - Page 23
most from your exercise. When the console is in the manual mode, the speed and incline of the treadmill can be changed with a touch of a button. As programs automatically control the speed and incline of the treadmill as a personal trainer guides you through every step of your workout. High-energy - HealthRider Health Rider T90 | English Manual - Page 24
output jack on your VCR. 2. Plug in the power cord of your VCR. See your VCR user's manual for proper grounding instructions. 3. Connect the CATV cable to the 75 ohm antenna terminal on the treadmill. (See assembly drawing 7 on page 8 to find the location of the terminal. To operate the television - HealthRider Health Rider T90 | English Manual - Page 25
unplug the power cord. CAUTION: You must be able to safely lift 45 pounds (20 kg) in order to raise, lower, or move the treadmill. 1. Hold the treadmill with your hands in the locations shown at the right. CAUTION: To decrease the possibility of injury, bend your legs and keep your back - HealthRider Health Rider T90 | English Manual - Page 26
TROUBLE-SHOOTING Most treadmill problems can be solved by following the instructions below. If further assistance is needed, please call our Customer Service Department toll-free at 1-800-999-3756, Monday through Friday, 6 a.m. until 6 p.m. Mountain Time (excluding holidays). PROBLEM: The power - HealthRider Health Rider T90 | English Manual - Page 27
cord, insert the key and run the treadmill for a few minutes. Repeat until the walking belt is properly tightened. b 3"-4" Rear Roller Adjustment Bolts c. If the walking belt still slows when walked on, please call our Customer Service Department, tollfree. PROBLEM: The walking belt is off-center - HealthRider Health Rider T90 | English Manual - Page 28
CONNECTIONS on page 22.) b. Check for the problems listed below and follow the applicable instructions. • Ignition (black spots or horizontal streaks that appliances. Try changing the position of the treadmill or other electric appliances to correct the problem. • Ghosts-Ghosts are caused by the - HealthRider Health Rider T90 | English Manual - Page 29
using your heart rate as a guide. The chart below shows recommended heart should include the following three parts: A Warm-up-Start each and will help prevent post-exercise problems. To measure your heart rate adjust the speed and incline of the treadmill. Fat Burning EXERCISE FREQUENCY To maintain - HealthRider Health Rider T90 | English Manual - Page 30
No. HRTL13911 R0102A To locate the parts listed below, refer to the EXPLODED DRAWING attached in the center of this manual. Key No. Qty. 11 22 31 42 52 62 78 Guide Foot Grip (Left) Walking Belt Walking Deck Foot Grip (Right) Power Board Front Endcap (Right) Support Bracket Screw Support Bracket - HealthRider Health Rider T90 | English Manual - Page 31
#1 #1 #1 #1 #1 Description Rear Roller Adj. Spring 12" Green Wire, 2 Ring 12" Green Wire, F/Ring 8" Green Wire, M/Ring 14" Blue Wire, 2F 4" Black Wire, 2F User's Manual * Includes all parts shown in box **For information about the optional chest pulse sensor and hand weights, see page 21 # These - HealthRider Health Rider T90 | English Manual - Page 32
60 49 66 69 68 70 67 63 64 65 12 66 8 24 20 66 72 53 26 72 55 66 72 To identify the parts shown on this exploded drawing, refer to the PART LIST on pages 30 and 31 of the USER'S MANUAL. R0102A EXPLODED DRAWING-Model No. HRTL13911 - HealthRider Health Rider T90 | English Manual - Page 33
73** 74** 76 113 116 118 106 69 105 108 111 102** 107 79 78 77 114 109 86 108 111 104 105 79 83 82 80 81 82 31 80 81 89 79 31 82 82 31 82 31 82 112 110 79 108 111 97 114 96 98 7 88 84* 85 90 86 75 86 90 86 104 101 100 7 98 88 84* 85 90 86 86 75 97 90 86 96 95 - HealthRider Health Rider T90 | English Manual - Page 34
(HealthRider® T90 treadmill) • The SERIAL NUMBER of the product (see the front cover of this manual) • The KEY NUMBER and DESCRIPTION of the part(s) (see the PART , at ICON's option, the product through one of its authorized service centers. All repairs for which warranty claims are made must be
-
 1
1 -
 2
2 -
 3
3 -
 4
4 -
 5
5 -
 6
6 -
 7
7 -
8
-
9
-
10
-
11
-
12
-
13
-
14
-
15
-
16
-
17
-
18
-
19
-
20
-
21
-
22
-
23
-
24
-
25
-
26
-
27
-
28
-
29
-
30
-
31
-
32
-
33
-
34
 |
 |

CAUTION
Read all precautions and instruc-
tions in this manual before using
this equipment. Save this manual
for future reference.
Serial Number Decal
Model No. HRTL13911
Serial No.
Find the serial number in the location
shown below. Write the serial number
in the space above for reference.
Visit our website at
www.healthrider.com
new products, prizes,
fitness tips, and much more!
QUESTIONS?
If you have questions, or if there
are missing parts, we will guar-
antee complete satisfaction
through direct assistance from
our factory.
TO AVOID UNNECESSARY
DELAYS, PLEASE CALL DIRECT
TO OUR TOLL-FREE CUSTOMER
HOT LINE. The trained techni-
cians on our customer hot line
will provide immediate assis-
tance, free of charge.
CUSTOMER HOT LINE:
1-800-999-3756
Mon.–Fri., 6 a.m.– 6 p.m. MST
Patent Pending
USER'S MANUAL