HealthRider R850x Bike English Manual - Page 7
and two M8 Nylon Jamnuts 82. Note: The Button
 |
View all HealthRider R850x Bike manuals
Add to My Manuals
Save this manual to your list of manuals |
Page 7 highlights
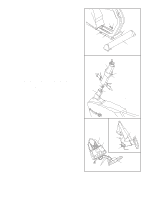
5. The Console (4) requires four "D" batteries (not includ- 5 ed); alkaline batteries are recommended. Refer to the inset drawing. Press the tab on the battery cover, and lift off the battery cover. Insert four batteries into the battery compartment. Make sure that the batteries are oriented as shown by the diagram inside the battery compartment. Reattach the battery cover. While another person holds the Console (4), connect the wire harness on the Console to the Upper Wire Harness (39). Insert the wire harnesses down into the Upright (2). Attach the Console to the Upright with three M10 x 27mm Patch Screws (51). Be careful to avoid pinching the wire harnesses. Slide the Console Collar (6) to the top of the Upright (2). Attach the Console Collar with two M5 x 16mm Screws (62). 6 6. Attach the front of the Seat Frame (13) to the Seat Carriage (12) with two M8 x 40mm Carriage Bolts (57) and two M8 Nylon Jamnuts (82). Do not tighten the Nylon Jamnuts yet. Attach the back of the Seat Frame (13) to the Seat Carriage (12) with two M8 x 36mm Button Bolts (81) and two M8 Nylon Jamnuts (82). Note: The Button Bolts must be inserted from below to provide maximum clearance around the Seat Knob (34). Tighten all four M8 Nylon Jamnuts (82). 4 Tab Battery Cover Batteries Wire Harness 39 51 4 62 51 2 6 57 82 82 13 12 34 7. Attach the Seat (14) to the Seat Frame (13) with four 1/4" x 19mm Screws (59) and four M6 Washers (56). 7 14 82 81 13 56 59 7
-
 1
1 -
 2
2 -
 3
3 -
 4
4 -
 5
5 -
 6
6 -
 7
7 -
 8
8 -
 9
9 -
 10
10 -
 11
11 -
 12
12 -
13
-
14
-
15
-
16
-
17
-
18
-
19
-
20
-
21
-
22
-
23
-
24
 |
 |
