HealthRider Softstrider 225p Treadmill Uk Manual - Page 7
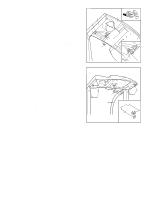
two turns, Be careful not to overtighten the, Long Screws., Bottom View
 |
View all HealthRider Softstrider 225p Treadmill manuals
Add to My Manuals
Save this manual to your list of manuals |
Page 7 highlights
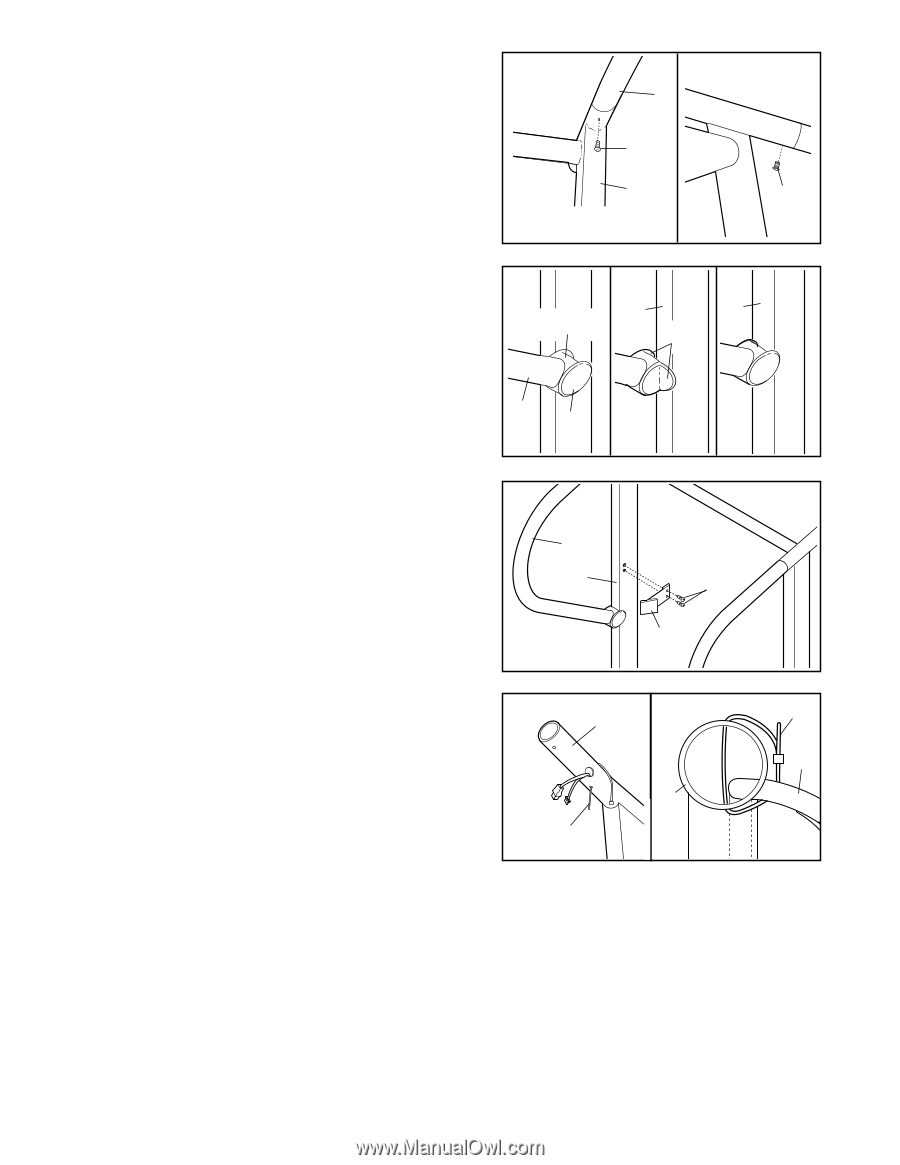
3. Align the hole in the Handrail (1) with the indicated hole 3a in the right Upright (11). Thread a Handrail Screw (53) two turns into the Upright and the Handrail at the angle shown in drawing 3b. It may be helpful to lift up and push down on the Handrail as you thread the Handrail Screw. 3b 1 53 11 53 Bottom View 4. Refer to drawing 4a. Slide a Handrail Endcap (41) onto the end of the Handrail (1). The Handrail Endcap should fit on the Handrail as shown, with the narrow part of the Handrail Endcap on top. Pivot the lower end of the Handrail to the side as shown. Refer to drawing 4b. Fold the flap on the Handrail Endcap to one side or the other as you position the Handrail Endcap on the Upright (11) as shown in drawing 4c. 4a 4b 4c 11 11 Narrow Part Flap 1 41 5. Refer to step 3. Tighten the Handrail Screw (53). Attach the other Handrail (1) to the left Upright (11) as described in steps 2 to 4. 5 1 Attach the Storage Latch (14) to the left Upright (11) with 11 two Long Screws (3). Be careful not to overtighten the Long Screws. 3 14 6. Refer to drawing 6a. Insert the included plastic tie (A) 6a 6b through the indicated hole in the right Upright (11). 11 A Refer to drawing 6b. Look into the right Upright (11) and make sure the Wires (21) have been secured to the side shown. Tighten the plastic tie (A). 21 11 A
-
 1
1 -
 2
2 -
 3
3 -
 4
4 -
 5
5 -
 6
6 -
 7
7 -
 8
8 -
 9
9 -
 10
10 -
 11
11 -
 12
12 -
13
-
14
-
15
-
16
-
17
-
18
-
19
-
20
-
21
-
22
-
23
 |
 |