HP 10622 Best practices for HP 10000 Series and HP 10000 G2 Series Racks - Page 17
Rack-mountable products
 |
View all HP 10622 manuals
Add to My Manuals
Save this manual to your list of manuals |
Page 17 highlights
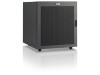
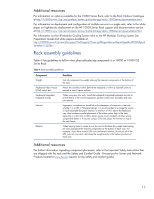
Rack-mountable products Because computer components are stacked vertically in a rack, adhere to the following precautions to ensure rack stability: • Use the configuration you prepared with the HP eCo-Enterprise Configurator as a guideline for installing the components. • Load heavier components first and load the rack from the bottom up. • When coupling or baying racks, be sure to balance the weight load between or among the racks, placing the heaviest components at the bottom. For example, if you have several UPS units and several servers, do not put all of the UPS units into one rack-distribute them evenly in the bottom positions among the racks. • Allow a minimum clearance of 30 in. (762 mm) at the back of the rack. • Allow a minimum of 48 in. (1219.2 mm) clearance beyond the front of the rack to permit server installation and removal. This applies to both individual rack installations as well as when aligning rack rows so that the front doors are facing each other. See Figure 3. • Use caution when pressing the component rail release latches and sliding a component into the rack. The slide rails can pinch your fingers and cables. • Components must be qualified prior to consideration for shipment within racks; this means the unit has been successfully tested under common carrier simulations. HP recommends the use of padded van carriers to avoid potential damaging handling scenarios. The qualification process is an ongoing effort to evaluate models as they are introduced. Prior to a successful qualification, a component should be shipped in its individual shipping container; shipment of an unqualified system in a rack, or any system without the proper shock pallet, will void the warranty. The listing of qualified components is maintained on an internal HP database. If the reader is external to HP, please contact your HP representative to arrange a review of the components intended for use. Figure 3. Rack clearance (Minimum recommended front rack space) 15
-
 1
1 -
2
-
3
-
4
-
5
-
6
-
7
-
8
-
9
-
10
-
11
-
 12
12 -
 13
13 -
 14
14 -
 15
15 -
 16
16 -
 17
17 -
 18
18 -
 19
19 -
 20
20 -
 21
21 -
 22
22 -
23
-
24
-
25
-
26
-
27
-
28
-
29
-
30
-
31
-
32
-
33
-
34
-
35
-
36
-
37
-
38
-
39
-
40
-
41
-
42
-
43
-
44
-
45
-
46
-
47
-
48
 |
 |
