HP 1240 HP Fax 1240 - (English/French) Setup Poster - Page 1
HP 1240 - Fax Color Inkjet Manual
 |
UPC - 829160181998
View all HP 1240 manuals
Add to My Manuals
Save this manual to your list of manuals |
Page 1 highlights
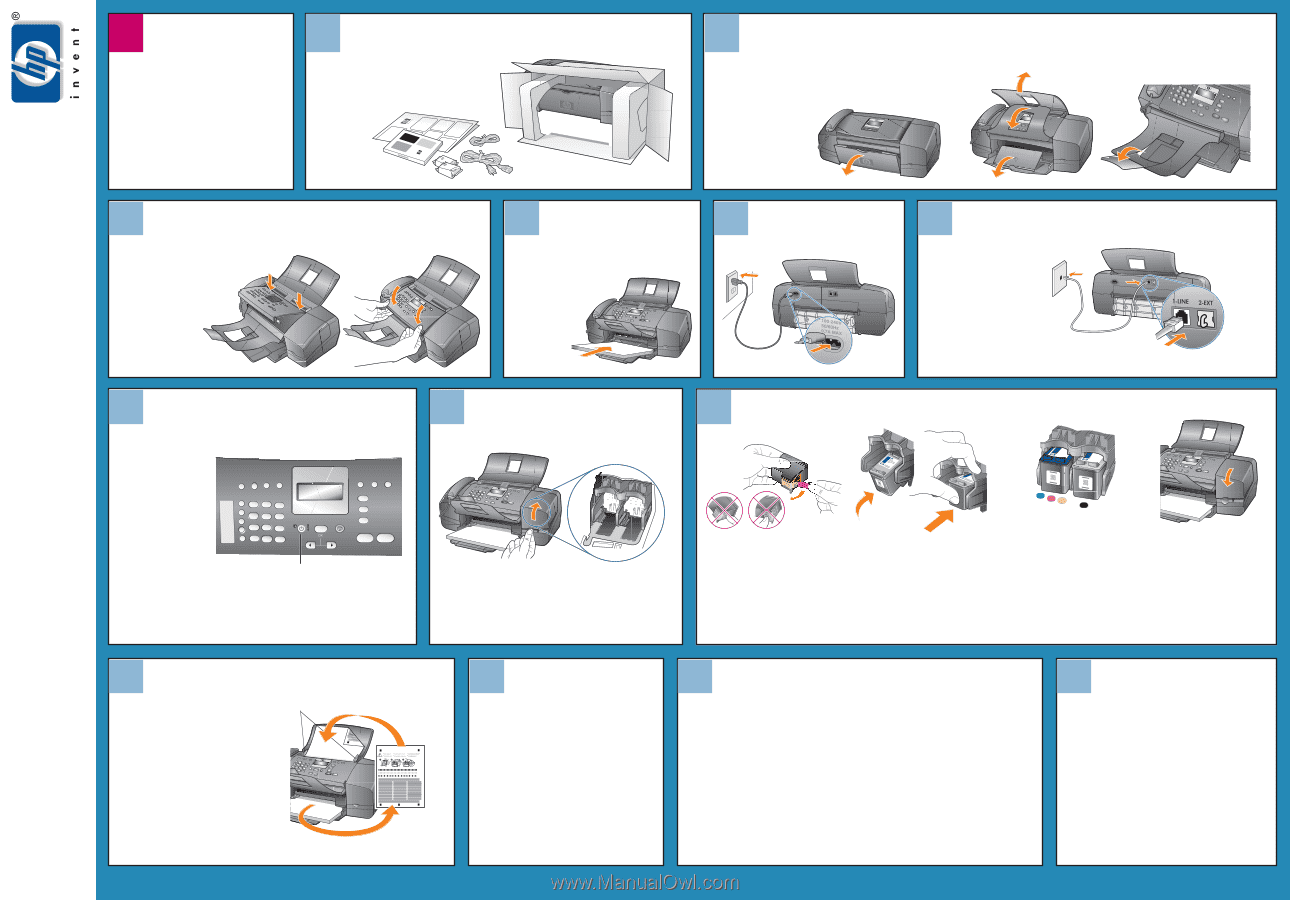
1 START HERE Follow the steps on this poster in order. See the box for exact contents and system requirements. 2 Unpack the device Remove tape and the cardboard packaging from inside the device. 3 Unfold the paper trays Unfold all three paper trays. Pull out the cardboard packaging from inside the device. *Q5621-90101* *Q5621-90101* Q5621-90101 4 Attach the front panel overlay Insert the front panel overlay tabs into the slots on top of the device. Press the overlay down firmly on both front corners until the overlay snaps securely in place. Make sure it is aligned evenly with the device. 8 Set the language and country/region Press the On button to turn on the device. When prompted, press 11 for English or 12 for French, then press 1 to accept. Press 11 for USA or 12 for Canada, then press 1 to accept. On button 11 Align the print cartridges When prompted, press OK to print an alignment page. Remove the alignment page and load the top of the page face down in the document feeder tray between the paper width guides, and press OK. When "Alignment Complete" appears on the front panel display, the alignment is complete. Paper width guides 5 Load plain white paper Adjust paper guides so they are close to the paper without bending the paper. Note: Forcing paper too far into the paper tray might cause a paper jam. 6 Connect the power cord 9 Open the print-carriage access door 10 Insert the print cartridges a b 7 Connect the supplied phone cord Connect one end of the supplied phone cord to the 1-LINE jack on the device and the other end to a wall jack. c d Remove the bright pink tape from both print cartridges. Do not touch the ink nozzles or the gold-colored contacts, and do not re-tape the cartridges. Note: Make sure the power is on and you have removed the cardboard from inside the device. Hold the black print cartridge with the large HP label on top. Slide the print cartridge at a slight upward angle into the right side of the print carriage. Press firmly until the cartridge snaps up into place. Tri-color Black Repeat step b to install the tri-color print cartridge on the left side of the print carriage. Make sure both cartridges are secure. Close the print-carriage access door. Note: You must install both cartridges in order for your HP Fax to work. 12 Set the date and time Press the Setup button, press 3, and then press 1. Enter date: appears on the LCD screen. Enter the date in mm-dd-yy format using the numeric keypad, and then press the OK button. Enter time: appears on the LCD screen. Enter the time in the hh:mm format using the numeric keypad. When prompted, press 1 for AM or 2 for PM. 13 Set the fax header Note: Setting the fax header is required by law in many countries. Press the Setup button, press 3 and then press 2. Enter your name: appears on the LCD screen. Using the numeric keypad, enter your name using the numeric keys that correspond to the letters in your name. For example, to enter the letter R, press the 7 key three times until the letter R appears on the LCD screen. Continue in this manner until your entire name is entered. To enter a symbol, press the * key repeatedly until the required symbol appears on the LCD screen. To enter a space, press the # key. When you are finished entering your name, press the OK button. Your fax number: appears on the LCD screen. Enter your fax number using the numeric keypad, and then press the OK button. 14 Need more help? For more information about setting up your fax with other equipment or services, see the Fax Setup chapter of the HP Fax 1240 Series User Guide. Still need help? ? www.hp.com/support © 2003 Copyright Hewlett-Packard Development Company, LP. Printed in U.S.A. hp fax 1240 setup poster
-
 1
1 -
 2
2
 |
 |