HP 2000sa HP StorageWorks 2312sa and 2324sa Modular Smart Array user guide (48 - Page 21
Installing the enclosures, Installation checklist
 |
View all HP 2000sa manuals
Add to My Manuals
Save this manual to your list of manuals |
Page 21 highlights
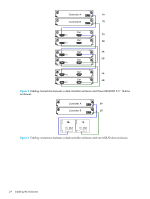
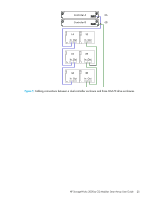
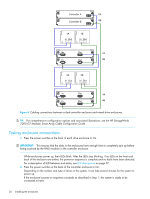
3 Installing the enclosures Installation checklist The following table outlines the steps required to install the enclosures and initially configure the system. To ensure a successful installation, perform the tasks in the order they are presented. Table 2 Installation checklist Step Task Where to find procedure 1. Install the controller enclosure and optional See the racking instructions drive enclosures in the rack, and attach ear poster. caps. 2. Connect controller enclosure and LFF/SFF See Connecting controller and drive enclosures. drive enclosures on page 22. 3. Connect power cords. See the installation poster. 4. Test enclosure connections. See Testing enclosure connections on page 26. 5. Obtain IP values and set management See Obtaining IP values on port IP properties on the controller page 27. enclosure. 6. Install required host software. See Host system requirements on page 31. 7. Connect data hosts. See Connecting the enclosure to data hosts on page 31. 8. Connect remote management hosts. See Connecting remote management hosts on page 34. 9. Perform initial configuration tasks: • Verify that controllers and enclosures See Updating firmware on have the latest firmware. page 35. • Set the date and time on the controller See Changing the system date enclosure. and time on page 46. • Initially configure and provision the system. • Test the configuration. See Using the Configuration Wizard on page 48 and Using the Provisioning Wizard on page 49. See Testing the configuration on page 49. NOTE: For help with installing your MSA2000 G2 product, see the HP StorageWorks 2000 Modular Smart Array Software Support/Documentation CD shipped with your product. NOTE: For information on NEBS Level-3 compliant carrier-grade enclosures, see http://www.hp.com/products1/servers/carrier_grade/products/cgblades/enclosure. HP StorageWorks 2000sa G2 Modular Smart Array User Guide 21
-
 1
1 -
2
-
3
-
4
-
5
-
6
-
7
-
8
-
9
-
10
-
11
-
12
-
13
-
14
-
15
-
 16
16 -
 17
17 -
 18
18 -
 19
19 -
 20
20 -
 21
21 -
 22
22 -
 23
23 -
 24
24 -
 25
25 -
 26
26 -
27
-
28
-
29
-
30
-
31
-
32
-
33
-
34
-
35
-
36
-
37
-
38
-
39
-
40
-
41
-
42
-
43
-
44
-
45
-
46
-
47
-
48
-
49
-
50
-
51
-
52
-
53
-
54
-
55
-
56
-
57
-
58
-
59
-
60
-
61
-
62
-
63
-
64
-
65
-
66
-
67
-
68
-
69
-
70
-
71
-
72
-
73
-
74
-
75
-
76
 |
 |
