HP 2009m 1859m,2009m,2009v, 2009f, 2159m,2159v,2309m,2309v, 2509m, 2709m LCD M - Page 27
Selecting Video Input Connectors, Identifying Monitor Conditions, Switch Video, Input - hdmi
 |
UPC - 884420327684
View all HP 2009m manuals
Add to My Manuals
Save this manual to your list of manuals |
Page 27 highlights
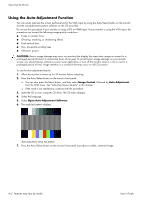
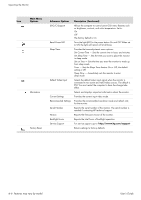
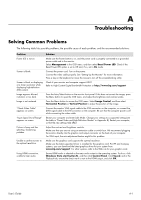
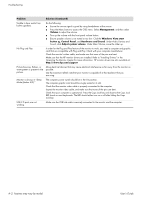
Operating the Monitor Selecting Video Input Connectors The input connectors are: ■ VGA connector (analog) ■ DVI-D connector (digital) ■ HDMI connector The monitor automatically determines which inputs have valid video signals, and displays the image. You can connect the VGA cable, the DVI-D cable, or both. If both cables are installed, the default input selection is DVI. The HDMI cable is in place of the DVI-D cable. The source of input can be switched using the Switch Video Input option in the OSD menu. Switching from a VGA to an HDMI input source may take several seconds. Identifying Monitor Conditions Special messages appear on the monitor screen for the following monitor conditions: ■ Input Signal Out of Range - Indicates the monitor does not support the video card's input signal because its resolution or refresh rate are set higher than the monitor supports. Change your video card settings to a lower resolution or refresh rate. Restart your computer for the new settings to take effect. ■ Monitor Going to Sleep - Indicates the screen display is entering a sleep mode. The speakers are turned off in sleep mode. ■ Check Video Cable - Indicates a video input cable is not properly connected to the computer or monitor. ■ OSD Lock-out - The OSD can be enabled or disabled by pressing and holding the Menu button on the front panel for 10 seconds. If the OSD is locked, the warning message OSD Lock-out appears for 10 seconds. If the OSD is locked, press and hold the Menu button for 10 seconds to unlock the OSD. If the OSD is unlocked, press and hold the Menu button for 10 seconds to lock the OSD. ■ No Input Signal - Indicates the monitor is not receiving a video signal from the computer on the monitor video input connector(s). Check to see if the computer or input signal source is off or in the power-saver mode. ■ Auto Adjustment in Progress - Indicates the auto-adjustment function is active. See "Adjusting Screen Quality" in this chapter. User's Guide 4-7
-
 1
1 -
2
-
3
-
4
-
5
-
6
-
7
-
8
-
9
-
10
-
11
-
12
-
13
-
14
-
15
-
16
-
17
-
18
-
19
-
20
-
21
-
 22
22 -
 23
23 -
 24
24 -
 25
25 -
 26
26 -
 27
27 -
 28
28 -
 29
29 -
 30
30 -
 31
31 -
 32
32 -
33
-
34
-
35
-
36
-
37
-
38
-
39
-
40
-
41
-
42
-
43
-
44
-
45
-
46
-
47
-
48
 |
 |