HP 220mx 16/24-Slot Jukebox Troubleshooting - Page 1
HP 220mx Manual
 |
View all HP 220mx manuals
Add to My Manuals
Save this manual to your list of manuals |
Page 1 highlights
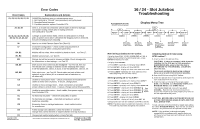
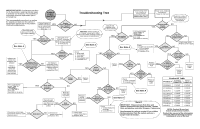
Error Codes Error Codes 01, 03, 04, 05, 06, 07, 09 37, 38, 39 40, 41, 42, 44, 45, 46, 48, 49, 54, 55, 4A, 4C, 4D 56 57 B0, B2 B1, B4 B3 B8, B9 BC, BD C9 CA CB CC CD CE D0 D1 Copyright ©1999 Hewlett-Packard Co. Explanations and Actions RAM/ROM checksum error or microprocessor error. 1. Set Config 16 to "CLEAR"(see procedure) and cycle power. 2. Download latest firmware. 3. If problem persists, replace Controller PCA. Drive 1, 2 or both not connected. Check cables to drive for damage and proper seating. Check pins in mating connector. Set Config 16 to "CLEAR". Carriage or picker motion failed. Check for obstructions in vertical path, on picker and in drive. Check that the shipping screw is removed. Ensure everything moves smoothly. Need to run Initial Element Status Test (Test 10). Invalid test configuration - check number and placement of cartridges (occurs when running front panel test). Mailslot will not rotate. Move mailslot by hand to check - run Test 17. Mailslot sensors bad - run Test 43. Storage slot will not accept or release cartridge. Check storage slots for obstructions or bent springs - run Test 15. Drive access error. Drive may be misaligned - run Test 16, then run Test 65 with one cartridge in mailslot and the following slots empty: In 16-slot jukeboxes, slots 2, 6,10,14; in 24-slot jukeboxes, slots 12, 20. Drive eject error - run Test 16. Check cables on back of drive and switches on top of drive (#1 on rearmost bank of switches on, all others off). Unable to move picker motor - check connections of encoder/power cables to motor (rear of picker). If secure, change picker. Unable to move carriage motor - check connections of encoder/ power cables to vertical motor. If secure, change vertical drive assembly. Unable to move either motor - check cables, then power supply, then Controller PCA. No hard stop on picker - check belt and pulley on picker. No hard stop on carriage - check belt and pulley on vertical leadscrew assembly. Excessive force on carriage leadscrew - check vertical motion for smoothness. Failed storage slot calibration. Check for broken or unseated storage slots. Check for bent or warped chassis near top of product. Unexpected mailslot empty (when running Test 65). SCSI Toolbox is a trademark of Peripheral Test Instruments, Inc. Printed in U.S.A. 9/99 Part No. C1115-90006 16 / 24 - Slot Jukebox Troubleshooting * If Configuration 15 is ON, SECURE will be displayed * NEXT READY LOAD * ENTER Display Menu Tree EJECT * ENTER NEXT PREV TEST * CONF * ENTER ENTER INFO * ENTER SCSI ID * ENTER Move media from mailslot to drive or slot Move media from drive or slot to mailslot Running diagnostic tests Setting Configurations Setting Config 16 to "CLEAR" (shown below) Retrieving Jukebox Error Codes (see below) Setting and Viewing SCSI IDs Retrieving Jukebox Error Codes: If display shows FAIL 1, FAIL 0, MISLOAD or FAIL # (where # is the number of a control panel test) - press ENTER to display error code. If display shows READY: 1. Press NEXT repeatedly until display shows INFO*. 2. Press ENTER - display will show INFO 0. 3. Press ENTER - display will show most recent error code. 4. Pressing NEXT repeatedly will show additional error codes (beginning with the most recent). Setting Config 16 to "CLEAR": 1. Press NEXT repeatedly until display shows CONF*. 2. Press ENTER - display will show CONF 0. 3. Press NEXT repeatedly until display shows CONF 16. 4. Press ENTER - display will show CODE1 0. 5. Press ENTER - display will show CODE2 0. 6. Press ENTER - display will show CODE3 0. See Note below 7. Press ENTER - display will show SAVE. 8. Press NEXT - display will show CLEAR. 9. Press ENTER - display will briefly show SET 16. Configurations are now set to default and RAM is cleared. NOTE: The default security code from the factory is 0, 0, 0. This code may have been changed by the customer. Checking Optical Drives Using SCSI toolbox™ : 1. Insert a disk in the optical drive. CAUTION: If using a customer's disk from the Jukebox for the first part of this procedure (RANDOM READ), ensure that the disk is RETURNED TO ITS ORIGINAL LOCATION after the test. To prevent accidently destroying customer data, use a scratch disk whenever possible. 2. Scan the SCSI bus using SCSI Toolbox. 3. Select the optical drive in question by clicking on the icon associated with that drive. 4. From the menu at the top of the screen, select DISK, then TESTS, then RANDOM TESTS, then RANDOM READ, then START TEST. The Random Read test runs until you select CANCEL. Run the test for several minutes to ensure that the drive can read properly. Any failures will be reported as they occur. CAUTION: NEVERUSEACUSTOMER'S DISK OR A DISK CONTAINING USABLE DATA FOR THE FOLLOWING TEST. To test a drive's write functionality, repeat steps above, but select RANDOM WRITE. Run the test for several minutes. Any failures will be reported as they occur. NOTE: If the problem involves drive/media compatibility or problems with specific disks, you will have to run these tests with different disks for comparisons.
-
 1
1 -
 2
2
 |
 |