HP 24-e000 Optical Drive Replacement Instructions 4
HP 24-e000 Manual
 |
View all HP 24-e000 manuals
Add to My Manuals
Save this manual to your list of manuals |
HP 24-e000 manual content summary:
- HP 24-e000 | Optical Drive Replacement Instructions 4 - Page 1
Optical Drive Replacement Instructions 852271-121 Before you begin Observe the following requirements before removing and replacing the optical drive. WARNING: Never open the cover while the power cord - HP 24-e000 | Optical Drive Replacement Instructions 4 - Page 2
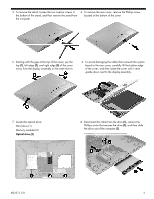
3. To remove the stand, loosen the two captive screws in the bottom of the stand, and then remove the stand from the computer. 4. To remove the rear cover, remove the Phillips screw located at the bottom of the cover. 5. Starting with the gap at the top of the cover, pry the top (1), left edge - HP 24-e000 | Optical Drive Replacement Instructions 4 - Page 3
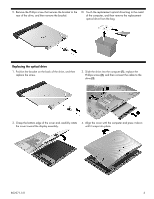
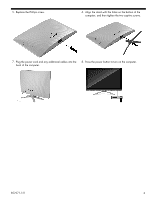
9. Remove the Phillips screw that secures the bracket to the rear of the drive, and then remove the bracket. 10. Touch the replacement optical drive bag to the metal of the computer, and then remove the replacement optical drive from the bag. Replacing the optical drive 1. Position the bracket on - HP 24-e000 | Optical Drive Replacement Instructions 4 - Page 4
5. Replace the Phillips screw. 6. Align the stand with the holes on the bottom of the computer, and then tighten the two captive screws. 7. Plug the power cord and any additional cables into the back of the computer. 8. Press the power button to turn on the computer. 852271-121 4 - HP 24-e000 | Optical Drive Replacement Instructions 4 - Page 5
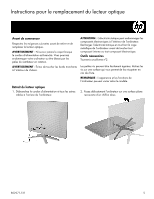
Instructions pour le remplacement du lecteur optique Avant de commencer Respectez les exigences suivantes avant de retirer et de remplacer le lecteur optique. AVERTISSEMENT : N'ouvrez jamais - HP 24-e000 | Optical Drive Replacement Instructions 4 - Page 6
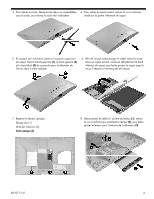
3. Pour retirer le socle, desserrez les deux vis imperdables 4. Pour retirer le capot arrière, retirez la vis cruciforme sous le socle, puis retirez le socle de l'ordinateur. située sur la partie inférieure du capot. 5. En partant de l'ouverture située sur la partie supérieure du capot, tirez le - HP 24-e000 | Optical Drive Replacement Instructions 4 - Page 7
avec la partie métallique de l'ordinateur, puis retirez-en le lecteur optique de remplacement. Réinstallation du lecteur optique 1. Placez le support à l'arrière du lecteur, puis remettez la vis. 2. Faites glisser le lecteur dans l'ordinateur (1), remettez la vis cruciforme (2), puis branchez - HP 24-e000 | Optical Drive Replacement Instructions 4 - Page 8
to change without notice. The only warranties for HP products and services are set forth in the express warranty statements accompanying such products and services. Nothing herein should be construed as constituting an additional warranty. HP shall not be liable for technical or editorial errors
-
 1
1 -
 2
2 -
 3
3 -
 4
4 -
 5
5 -
 6
6 -
 7
7 -
8
 |
 |

852271-121
1
Optical Drive Replacement
Instructions
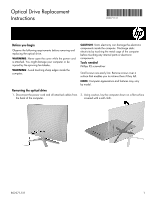
Before you begin
Observe the following requirements before removing and
replacing the optical drive.
WARNING
: Never open the cover while the power cord
is attached. You might damage your computer or be
injured by the spinning fan blades.
WARNING
: Avoid touching sharp edges inside the
computer.
CAUTION
: Static electricity can damage the electronic
components inside the computer. Discharge static
electricity by touching the metal cage of the computer
before touching any internal parts or electronic
components.
Tools needed
Phillips #2 screwdriver
Small screws are easily lost. Remove screws over a
surface that enables you to retrieve them if they fall.
NOTE
: Computer appearance and features may vary
by model.
Removing the optical drive
1.
Disconnect the power cord and all attached cables from
the back of the computer.
2.
Using caution, lay the computer down on a flat surface
covered with a soft cloth.
852271-121