HP 2820 HP Color LaserJet 2820/2830/2840 All-In-One - Software Technical Refer - Page 170
Choose Rendering Intent button, Halftoning, Special, Scaling, Restore Defaults button - want black ink only
 |
UPC - 829160742304
View all HP 2820 manuals
Add to My Manuals
Save this manual to your list of manuals |
Page 170 highlights
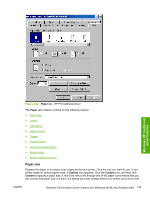
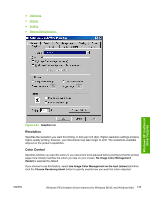
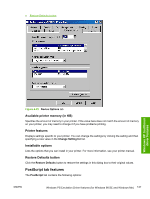
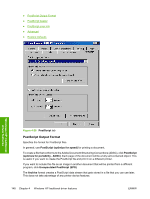
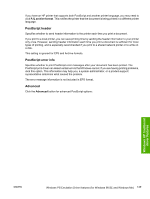
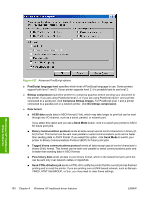
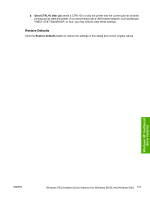
Choose Rendering Intent button Click the Choose Rendering Intent button to specify how you want your color images created to produce the best-looking image on the printed page. If you are printing a chart or using fully saturated, bright colors, it's best to click Saturation. For photographs or pictures where the colors blend together, click Contrast. If your document has a color for which you need an exact match, and you are sending the document to a printer that has that specific color of ink, click Colormetric. Windows HP traditional driver features Figure 4-24 Image Color Management dialog Halftoning Specifies values for the number of lines per inch (frequency) and angle of the pattern that you want to use for halftone screens. If you are getting a moiré pattern when you print graphics such as photographs or detailed images, you may want to adjust these settings. However, the default printer settings should work in most cases. Do not change these settings unless you have experience using halftones. To return to the default settings after you have made changes, click Use printer's settings. Special ■ Print as a negative image: Prints a negative of the image by complementing the RGB values or reversing the black and white values. Click this option to see an example. ■ Print as a mirror image: Prints a mirror image of your document by reversing the horizontal coordinates. Click this option to see an example. Scaling Specifies the size of the image to print. You can specify from 25 to 400, or 25% to 400% of normal size. Print jobs at 400% produce an image four times larger than the original. Restore Defaults button Click the Restore Defaults button to restore the settings in this dialog box to their original values. Device Options tab features The Device Options tab contains the following options: ● Available printer memory (in KB) ● Printer features ● Installable options 146 Chapter 4 Windows HP traditional driver features ENWW
-
 1
1 -
2
-
3
-
4
-
5
-
6
-
7
-
8
-
9
-
10
-
11
-
12
-
13
-
14
-
15
-
16
-
17
-
18
-
19
-
20
-
21
-
22
-
23
-
24
-
25
-
26
-
27
-
28
-
29
-
30
-
31
-
32
-
33
-
34
-
35
-
36
-
37
-
38
-
39
-
40
-
41
-
42
-
43
-
44
-
45
-
46
-
47
-
48
-
49
-
50
-
51
-
52
-
53
-
54
-
55
-
56
-
57
-
58
-
59
-
60
-
61
-
62
-
63
-
64
-
65
-
66
-
67
-
68
-
69
-
70
-
71
-
72
-
73
-
74
-
75
-
76
-
77
-
78
-
79
-
80
-
81
-
82
-
83
-
84
-
85
-
86
-
87
-
88
-
89
-
90
-
91
-
92
-
93
-
94
-
95
-
96
-
97
-
98
-
99
-
100
-
101
-
102
-
103
-
104
-
105
-
106
-
107
-
108
-
109
-
110
-
111
-
112
-
113
-
114
-
115
-
116
-
117
-
118
-
119
-
120
-
121
-
122
-
123
-
124
-
125
-
126
-
127
-
128
-
129
-
130
-
131
-
132
-
133
-
134
-
135
-
136
-
137
-
138
-
139
-
140
-
141
-
142
-
143
-
144
-
145
-
146
-
147
-
148
-
149
-
150
-
151
-
152
-
153
-
154
-
155
-
156
-
157
-
158
-
159
-
160
-
161
-
162
-
163
-
164
-
 165
165 -
 166
166 -
 167
167 -
 168
168 -
 169
169 -
 170
170 -
 171
171 -
 172
172 -
 173
173 -
 174
174 -
 175
175 -
176
-
177
-
178
-
179
-
180
-
181
-
182
-
183
-
184
-
185
-
186
-
187
-
188
-
189
-
190
-
191
-
192
-
193
-
194
-
195
-
196
-
197
-
198
-
199
-
200
-
201
-
202
-
203
-
204
-
205
-
206
-
207
-
208
-
209
-
210
-
211
-
212
-
213
-
214
-
215
-
216
-
217
-
218
-
219
-
220
-
221
-
222
-
223
-
224
-
225
-
226
-
227
-
228
-
229
-
230
-
231
-
232
-
233
-
234
-
235
-
236
-
237
-
238
-
239
-
240
-
241
-
242
-
243
-
244
-
245
-
246
-
247
-
248
-
249
-
250
-
251
-
252
-
253
-
254
-
255
-
256
-
257
-
258
-
259
-
260
-
261
-
262
-
263
-
264
-
265
-
266
-
267
-
268
-
269
-
270
-
271
-
272
-
273
-
274
-
275
-
276
-
277
-
278
-
279
-
280
-
281
-
282
-
283
-
284
-
285
-
286
-
287
-
288
-
289
-
290
-
291
-
292
-
293
-
294
-
295
-
296
-
297
-
298
-
299
-
300
-
301
-
302
-
303
-
304
-
305
-
306
-
307
-
308
-
309
-
310
-
311
-
312
-
313
-
314
-
315
-
316
-
317
-
318
-
319
-
320
-
321
-
322
-
323
-
324
-
325
-
326
-
327
-
328
-
329
-
330
-
331
-
332
-
333
-
334
-
335
-
336
-
337
-
338
-
339
-
340
-
341
-
342
-
343
-
344
-
345
-
346
-
347
-
348
-
349
-
350
-
351
-
352
-
353
-
354
-
355
-
356
-
357
-
358
-
359
-
360
-
361
-
362
-
363
-
364
-
365
-
366
-
367
-
368
-
369
-
370
-
371
-
372
-
373
-
374
-
375
-
376
-
377
-
378
-
379
-
380
-
381
-
382
-
383
-
384
-
385
-
386
-
387
-
388
-
389
-
390
-
391
-
392
-
393
-
394
-
395
-
396
-
397
-
398
-
399
-
400
-
401
-
402
-
403
-
404
-
405
-
406
 |
 |
