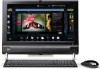
HP 300-1020 Limited Warranty and Support Guide - Refurbished - Page 16
System recovery at system, startup, Starting system recovery from, recovery discs, Windows Vista - desktop
 |
UPC - 884962290293
View all HP 300-1020 manuals
Add to My Manuals
Save this manual to your list of manuals |
Page 16 highlights
8 Your computer restarts. NOTE: If your system does not detect a recovery partition, it will prompt you to insert a recovery disc. Insert the disc and proceed to Step 7 in "Starting system recovery from recovery discs" on page 16. 9 When prompted to perform a system recovery, click Yes, and then click Next. 10 If you are prompted to back up your files, and you have not done so, click the Back up your files first button. Otherwise, click the Recover without backing up your files button, and then click Next. 11 System recovery begins. After system recovery is complete, click Finish to restart the computer. 12 Complete the registration process, and wait until you see the desktop. 13 Turn off the computer, reconnect all peripheral devices, and turn the computer back on. 14 Perform the procedure "Performing the post-recovery procedure" on page 17. System recovery at system startup If Windows Vista is not responding, but the computer is working, use these steps to perform a system recovery: NOTE: System Recovery deletes any data or programs that you created or installed after purchase. Therefore, ensure you have backed up to a removable disc any data that you want to keep. 1 Turn off the computer. If necessary, press and hold the On button until the computer turns off. 2 Disconnect all peripheral devices from the computer, except the monitor, keyboard, and mouse. 3 Press the On button to turn on the computer. 4 As soon as you see the initial company logo screen appear, repeatedly press the F11 key on your keyboard until the Recovery Manager window opens. 5 Click Advanced options. 6 Choose the system recovery option that recovers your computer to its original factory condition, and then click Next. 7 If you are prompted to back up your files, and you have not done so, click the Back up your files first button. Otherwise, click the Recover without backing up your files button, and then click Next. 8 System recovery begins. After system recovery is complete, click Finish to restart the computer. 9 Complete the registration process, and wait until you see the desktop. 10 Turn off the computer, reconnect all peripheral devices, and turn the computer back on. 11 Perform the procedure "Performing the post-recovery procedure" on page 17. 16 Starting system recovery from recovery discs This section contains the procedure for performing a system recovery from the recovery discs you created as described in "Creating Recovery Discs" on page 15. NOTE: System Recovery deletes any data or programs that you created or installed after purchase. Therefore, ensure you have backed up to a removable disc any data that you want to keep. To perform a system recovery program using recovery discs: 1 If the computer is working, create a backup CD or DVD containing all the data files you want to save. When you are done, remove the backup disc from the disc slot. CAUTION: All data on the hard disk drive will be deleted. You will lose data if it is not backed up. 2 Insert recovery disc #1 into the disc slot. 3 If the computer works, click the Windows Vista start button, click the Arrow button next to the Lock button, and then click Shut Down. Or If the computer is not responding, press and hold the On button for approximately 5 seconds, or until the computer turns off. 4 Disconnect all peripheral devices from the computer, except the monitor, keyboard, and mouse. 5 Press the On button to turn on the computer. 6 A window may open, prompting you to choose between running system recovery from the discs or from your hard drive. 7 Choose to run from the recovery discs, and then click Next. 8 In the Welcome to the Recovery Manager window, click the Advanced Options button. 9 Choose Recover your computer to its original factory condition, and then click Next. 10 If you are prompted to back up your files, and you have not done so, click the Back up your files first button. Otherwise, click the Recover without backing up your files button, and then click Next. 11 If you are prompted to insert the next recovery disc, do so. 12 When the Recovery Manager is finished, remove all recovery discs from the system. 13 Click Finish to restart the computer.
-
 1
1 -
2
-
3
-
4
-
5
-
6
-
7
-
8
-
9
-
10
-
 11
11 -
 12
12 -
 13
13 -
 14
14 -
 15
15 -
 16
16 -
 17
17 -
 18
18 -
 19
19 -
 20
20 -
 21
21 -
22
-
23
-
24
 |
 |