HP 311-1025NR Mini User Guide - Windows 7 - Page 50
Connecting optional external drives, Sharing optical drives
 |
UPC - 884962639306
View all HP 311-1025NR manuals
Add to My Manuals
Save this manual to your list of manuals |
Page 50 highlights
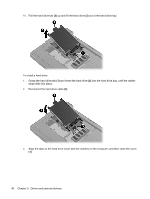
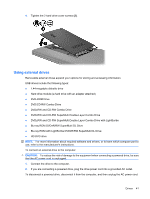
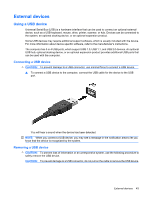
Connecting optional external drives NOTE: For more information about required software and drivers, or to learn which computer port to use, refer to the manufacturer's instructions. To connect an external drive to the computer: CAUTION: To reduce the risk of damage to the equipment when connecting a powered drive, be sure that the drive is turned off and the AC power cord is unplugged. NOTE: An external optical drive must be connected to the USB port on the computer, not to a USB port on another external device, such as a hub or docking station. 1. Connect the drive to the computer. 2. If you are connecting a powered drive, plug the drive power cord into a grounded AC outlet. 3. Turn on the drive. To disconnect an unpowered external drive, turn off the drive, and then disconnect it from the computer. To disconnect a powered external drive, turn off the drive, disconnect it from the computer, and then unplug the AC power cord. Sharing optical drives Although your computer does not have an installed optical drive, you can easily access software, as well as install programs and access data, by sharing an optical drive from another computer that has an optical drive and is on the same wired or wireless network. Sharing drives is a feature of the Windows operating system that allows a drive on another computer to be made available for other people to use on a network. NOTE: For information on setting up a home network and sharing a drive, refer to Help and Support. NOTE: Some discs, such as DVD movies and game discs, may be copy-protected and therefore unusable through DVD or CD sharing. 42 Chapter 5 Drives and external devices
-
 1
1 -
2
-
3
-
4
-
5
-
6
-
7
-
8
-
9
-
10
-
11
-
12
-
13
-
14
-
15
-
16
-
17
-
18
-
19
-
20
-
21
-
22
-
23
-
24
-
25
-
26
-
27
-
28
-
29
-
30
-
31
-
32
-
33
-
34
-
35
-
36
-
37
-
38
-
39
-
40
-
41
-
42
-
43
-
44
-
 45
45 -
 46
46 -
 47
47 -
 48
48 -
 49
49 -
 50
50 -
 51
51 -
 52
52 -
 53
53 -
 54
54 -
 55
55 -
56
-
57
-
58
-
59
-
60
-
61
-
62
-
63
-
64
-
65
-
66
-
67
-
68
-
69
-
70
-
71
-
72
-
73
-
74
-
75
-
76
-
77
-
78
-
79
-
80
-
81
-
82
-
83
-
84
-
85
-
86
-
87
-
88
-
89
-
90
-
91
-
92
-
93
-
94
-
95
 |
 |