HP 347786-B21 Eight-Port SAS/SATA RAID Host Bus Adapter Installation Guide - Page 5
Installation procedure, Preparing the server, Installing the adapter hardware - driver
 |
UPC - 829160928067
View all HP 347786-B21 manuals
Add to My Manuals
Save this manual to your list of manuals |
Page 5 highlights
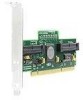
2 Installation procedure WARNING! To reduce the risk of personal injury or damage to the equipment, consult the safety information and user documentation provided with the server before attempting the installation. Many servers are capable of producing energy levels that are considered hazardous and are intended to be serviced only by qualified personnel who have been trained to deal with these hazards. Do not remove enclosures or attempt to bypass any interlocks that may be provided for the purpose of removing these hazardous conditions. WARNING! When working with equipment installed in a rack, be sure that the equipment and rack are stable before beginning the installation procedure. The installation procedure involves the following steps: • Preparing the server • Installing the adapter hardware • Connecting the adapter to other devices • Completing the adapter installation procedure, including updating the firmware and installing drivers These steps are described in more detail in the following sections. Preparing the server 1. Perform a normal system shutdown. 2. Power down the server. 3. Power down all peripheral devices attached to the server. 4. Unplug the AC power cord from the outlet, and then unplug it from the server. 5. Disconnect all peripheral devices attached to the server. Installing the adapter hardware CAUTION: Electrostatic discharge (ESD) can damage electronic components. Be sure that you are properly grounded before beginning this procedure. For more information, see the "Electrostatic Discharge" section of this guide. 1. Remove or open the server access panel and locate the PCI/PCI-X bus expansion slots. (For detailed instructions, see the documentation that was provided with the server.) WARNING! To reduce the risk of personal injury from hot surfaces, allow the internal system components to cool before touching them. 2. Remove or open the server access panel and locate the PCI/PCI-X bus expansion slots. (For detailed instructions, see the documentation that was provided with the server.) 3. Select the expansion slot that you want to use. 4. Depending on the server model, remove the retaining screw or open the expansion slot latch that secures the PCI/PCI-X slot. 5. Remove the slot cover. Save it to use for if you later decide to remove the adapter and leave the slot empty. 6. Insert the adapter into the slot, and press it firmly into place. The contacts on the adapter edge should be fully seated in the system board connector. 7. Depending on the server model, secure the adapter by replacing the retaining screw or by closing the slot latch. Installation procedure 5
-
 1
1 -
 2
2 -
 3
3 -
 4
4 -
 5
5 -
 6
6 -
 7
7 -
 8
8 -
 9
9 -
 10
10 -
 11
11 -
12
-
13
-
14
-
15
-
16
-
17
-
18
-
19
-
20
 |
 |
