HP 3500 HP LaserJet Printer - Network Installation Guide - Page 4
Networked and shared printer install guide for Windows OSs, Possible network configurations
 |
View all HP 3500 manuals
Add to My Manuals
Save this manual to your list of manuals |
Page 4 highlights
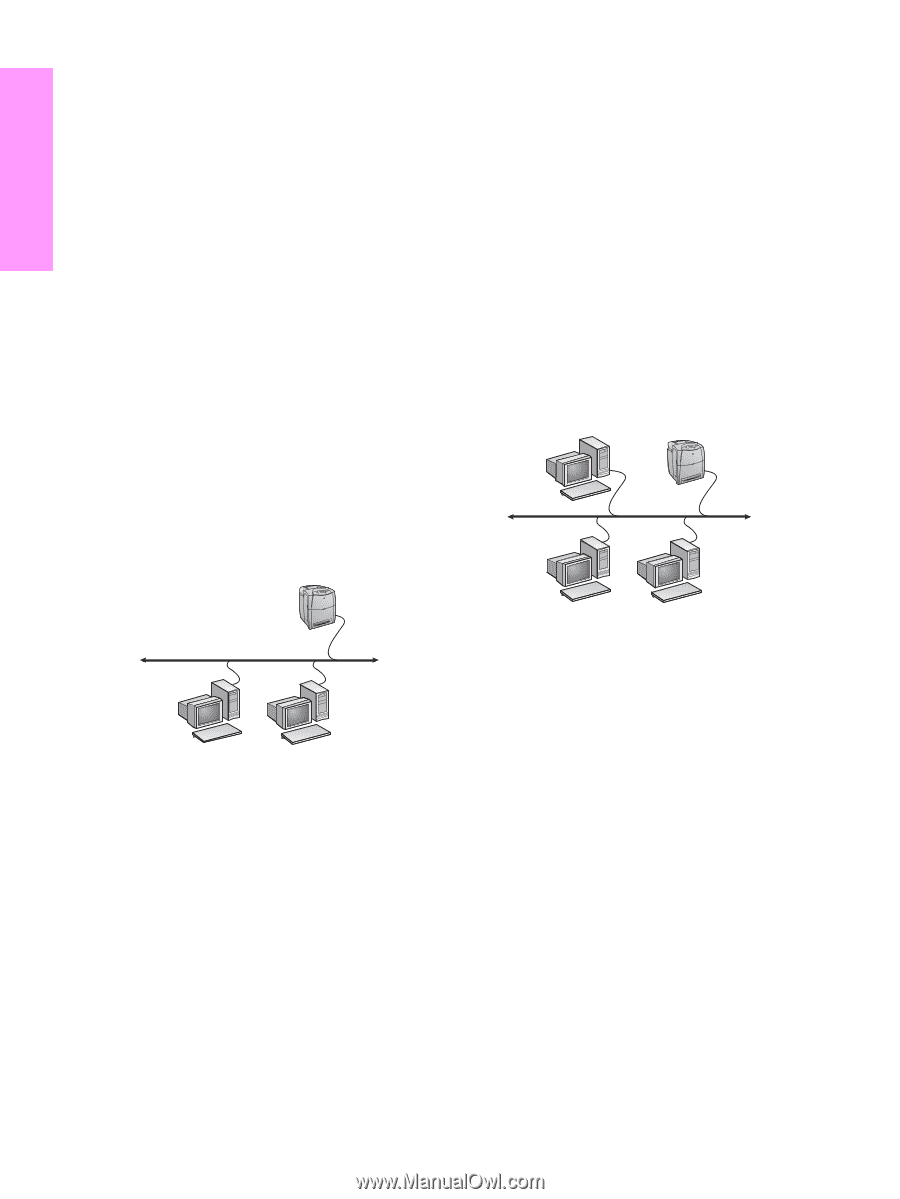
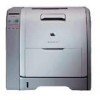
English Networked and shared printer install guide for Windows OSs HP recommends that you use the HP software installer on the CD to set up printer drivers for the network configurations described here. The installer utility is available on the CD that comes with the printer. You are not required to install additional printer software using this installer. You can also set up these configurations using the Add Printer Wizard, but instructions on how to do this are not included here. See the User Guide, located on the CD that shipped with the printer, for these instructions and for more detailed instructions on using the installer. Instructions for other operating systems can also be found there. The HP JetDirect Administrator Guide and the Installation Notes, also located on the CD, have additional instructions. Possible network configurations Four possible network printer configurations include: 1. The printer is connected directly to the network. 2. The printer is connected directly to the network and has a print server. 3. The printer is connected directly to a PC that acts as a print server and allows the printer to be shared on the network. 4. PC clients connect to a printer that has already been set up on the network or connect to a printer through a PC that has a printer connected it. The following sections provide information about each network configuration and provide basic installation information. 4. On the Network Setup screen, select Basic network setup for a PC or server. 5. On the Identify Printer screen, identify the printer either by searching or by specifying a hardware or IP address. In most cases an IP address is assigned but you can change it if you want by selecting Change Settings. Note: Change Settings is the name of a button on that dialog screen. See the online Help provided with the installer for information about the IP address. 6. Select the model of the printer. 7. If you want the typical software installed, select Typical Installation; or, if you want to select the software to be installed, select Custom Installation. 8. Give the printer a name to be used in the Printers folder. 9. On the Printer Sharing screen, select Not Shared. 10. Provide a location and descriptive information if you want. 11. Allow the installation to complete. 2 - Network port-connected and shared printer (client-server printing) The printer is connected to the network and installed on a network server. The server then manages the printing. Print Server Printer 1 - Network port-connected printer configuration (direct mode or peer-to-peer printing) The printer is connected directly to the network and all PCs or clients print directly to the printer. Clients Printer Clients ● Recommended for groups of 10 to 20 users or small offices. ● Requires a network connection on the printer or an internal or external print server. If the printer does not have one, use configuration #3 below. ● Installation overview: • Hardware setup - plug the printer directly into the network using a network cable. • Run the CD that came with the printer and follow the steps below for each PC to enable printing. • Information required during software setup - printer hardware or IP address obtained from page 2 of the printer configuration page. For instructions on how to print the configuration page, see the printer's User Guide on the CD. Installation steps: 1. Insert the CD that came with the printer. The software installer should start without assistance. Click on Install Printer. If the software installer does not start, browse to setup.exe in the root directory of the CD and double-click on it; then click on Install Printer. 2. Select the language you would like the installer to display and accept the License Agreement. 3. On the Printer Connection screen, select Connected via the network. ● Recommended for larger workgroups, more than 30 users. Allows administrator control of client printer driver settings. ● Requires a network connection on the printer or an internal or external print server. If the printer does not have a network connection, use configuration #3 below. ● Installation overview: • Hardware setup - plug the printer directly into the network using a network cable. • Run the CD that came with the printer on the server PC to enable printing. ● Information required during software setup: • Determine the printer's hardware or IP address, obtained from page 2 of the printer configuration page. For instructions on how to print the configuration page see the printer's User Guide on the CD. • Decide on a printer share name. Installation steps: 1. Insert the CD that came with the printer. The software installer should start without assistance. Click on Install Printer. If the software installer does not start, browse to setup.exe in the root directory of the CD and double-click on it; then click on Install Printer. 2. Select the language you would like the installer to display and accept the License Agreement. 3. On the Printer Connection screen, select Connected via the network. 4. On the Network Setup screen, select Basic network setup for a PC or server. 5. On the Identify Printer screen, identify the printer either by searching or by specifying a hardware or IP address. In most cases an IP address is assigned but you can change it if you want by selecting Change Settings. Note: Change Settings is the name of a button on that dialog screen. 1 ENWW
-
 1
1 -
 2
2 -
 3
3 -
 4
4 -
 5
5 -
 6
6 -
 7
7 -
 8
8 -
 9
9 -
 10
10 -
11
-
12
-
13
-
14
-
15
-
16
-
17
-
18
-
19
-
20
 |
 |