HP 353803-B22 HP StorageWorks 8Gb Simple SAN Connection Kit quick start instru - Page 3
Software installation instructions
 |
UPC - 808736781619
View all HP 353803-B22 manuals
Add to My Manuals
Save this manual to your list of manuals |
Page 3 highlights
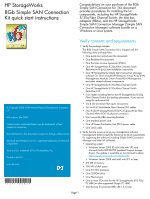
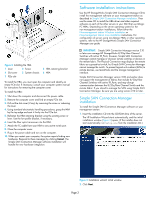
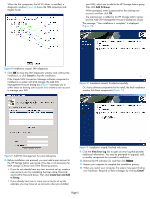
6 1 2 3 4 7 5 Figure 2 Installing the HBA 1 Lever 2 Screw 4 Slot cover 5 System chassis 7 PCIe slot 3 HBA retaining bracket 6 HBA To install the HBA, you must open the computer and identify an empty PCIe slot. If necessary, consult your computer system manual for instructions for removing the computer cover. To install the HBA: 1. Shut down the computer and disconnect the power cable. 2. Remove the computer cover and find an empty PCIe slot. 3. Pull out the slot cover (if any) by removing the screw or releasing the lever. 4. Using standard electrostatic handling procedures, grasp the HBA by the top edge and seat it firmly into the PCIe slot. 5. Re-fasten the HBA retaining bracket using the existing screw or lever. Use the low-profile bracket, if necessary. 6. Insert the fiber optic transceiver into the HBA. 7. Attach the FC cable from your HBA to any active switch port. 8. Close the computer cover. 9. Plug in the power cable and turn on the computer. 10. When you restart your computer, the system reports finding new hardware. Respond to these messages by clicking Cancel. The Simple SAN Connection Manager software installation will handle the new hardware integration. Software installation instructions Use the HP StorageWorks Simple SAN Connection Manager CD to install the management software on your management station as described in Simple SAN Connection Manager installation. Then use the same CD to install the HBA driver and other required software on each of the other servers in your SAN that use QLogic FC HBAs. Depending on the server operating system for the non-management station installations, follow either the Non-management station Windows installation or Non-management station Linux installation instructions. For configuration of servers using non-QLogic HBAs or other operating systems, refer to the HP StorageWorks Simple SAN Connection Manager user guide. IMPORTANT: Simple SAN Connection Manager version 2.10 or later can manage HP StorageWorks 8/20q Fibre Channel Switches with active TR_Ports; however, Simple SAN Connection Manager cannot manage or discover remote switches or devices in the remote fabric. The Physical Connection map displays the remote fabric as a grayed-out switch, but Simple SAN Connection Manager cannot manage the switch. To present logical unit numbers (LUNs) to remote devices, use QuickTools and the storage management interface. Simple SAN Connection Manager version 2.00 and earlier does not support the management of fabrics that include 8/20q Fibre Channel Switches with active TR_Ports, and may disrupt communication between the 8/20q Fibre Channel Switch and the remote fabric. If you intend to manage the SAN using Simple SAN Connection Manager, be sure you are using version 2.10 or later. Simple SAN Connection Manager installation To install the Simple SAN Connection Manager software on your management station: 1. Insert the installation CD into the CD-ROM drive of the server. The HP Installation Wizard starts automatically, and the initial installation window (Figure 3) opens. (If the installer does not start automatically, run Setup.exe from the installation CD.) Figure 3 Installation wizard: initial window 2. Click Next. Page 3
-
 1
1 -
 2
2 -
 3
3 -
 4
4 -
 5
5 -
 6
6 -
 7
7 -
 8
8
 |
 |
