HP 4400 HP Disk Drive Replacement Instructions (652989-001, June 2011) - Page 2
Types of disk failures, Checking system redundancy, Verifying component failure - not working
 |
View all HP 4400 manuals
Add to My Manuals
Save this manual to your list of manuals |
Page 2 highlights
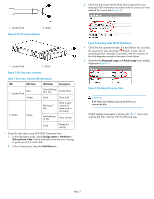
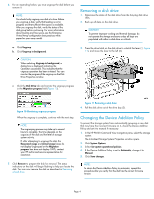
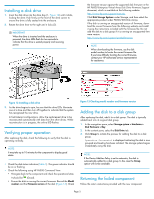
Figure 3 SAS LFF disk drive numbering . Types of disk failures There are two types of disk failures: • Hard failure: The disk is no longer functioning properly and has been assigned a failed status. This type of failure is indicated by an operational state of (Failed) in HP P6000 Command View. The amber fault status indicator on the disk is typically on. • Impending failure: Although the disk is still functioning, errors have been detected that indicate an impending failure. This type of failure is not accompanied by a failed status. 3. If the system is redundant, continue with Verifying component failure. If the system is not redundant, information is displayed indicating the cause of the lack of redundancy. See the HP P6000 Command View online help to interpret the information that is displayed. In this situation, work with your HP call center agent to determine how to proceed. CAUTION: Do not proceed with the disk replacement until you are certain the storage system is redundant. Verifying component failure Before replacing a disk, use the following methods to verify component failure: CAUTION: A disk with an impending failure will appear to be operating normally in HP P6000 Command View, and the fault light on the disk will not be on. Therefore, it is important that you positively identify the disk before performing the replacement. Work with the HP Solution Center to ensure you identify the correct disk for replacement. Checking system redundancy Before replacing a disk, check the redundancy status of the entire storage system to ensure a disk can be removed without impacting data availability. 1. Open HP P6000 Command View and click the icon of the storage system you want to check (Figure 4). CAUTION: If HP P6000 Command View does not present a status consistent with the disk status indicators, or if HP P6000 Command View or your system monitoring tool indicates multiple hardware failures, contact HP support for assistance (http://www.hp.com/ support). • Analyze any failure messages received. Error messages identify each disk by its rack, enclosure, bay, and UUID (World Wide Name). Record this information to assist you in identifying the correct disk before replacing it. The following is a sample of the disk identification information: FRU List: Storage System Name: EVA_1 Storage System World Wide ID: 5000-1FE1-0015-42A0 Disk Drive UUID: 2000-0000-871D-FE60 Drive Location --- Enclosure ID: 8 Bay ID: 1 Rack Number: 0 Figure 4 Selecting a storage system . 2. On the Initialized Storage System Properties window, click Check Redundancy (Figure 5). NOTE: The Disk Drive UUID corresponds to the disk Node World Wide Name displayed in HP P6000 Command View. • Check the disk status indicators (Figure 6 for Fibre Channel disks and Figure 7 for SAS disks; Table 1 describes the LEDs). If a hard failure has occurred, the amber indicator should be on solid. Figure 5 Checking redundancy . Page 2
-
 1
1 -
 2
2 -
 3
3 -
 4
4 -
 5
5
 |
 |
